Racks and Roadcases Defined
When Should I use a Roadcase?
- Use a road case when you have a barcoded container that items can be scanned and placed into, prior to the road case being scanned and loaded onto the truck for shipping; items can easily be removed from the road case to be rented as single items if need be.
When Should I use a Rack?
- Use a rack when you have individually barcoded items that will be bolted or physically attached together on a permanent/semi-permanent basis; these items cannot easily be detached and rented separately.
How are Racks different from Roadcases?
- The main difference between the functionality of a road case and a rack within RentalPoint is that items packed into a rack are removed from stock temporarily, and no availability tracking is done on these items.
Setting up a Rack
 Before setting up your first rack, please ensure Operational Parameter 102

and Operational Parameter 103 are correctly set for how your company uses racks.

1. Create a Rack Product
The first step in setting up a rack is to create a product and set the Shipping configuration to ‘Is a Rack’. The option to Track Asset Movements must also be enabled as racks are uniquely barcoded items.
2. Create the Rack Asset
Each rack is tracked using a unique barcode. You’ll need to create an asset for the newly created rack product. To do this, expand the rack product in the tree, right click on the Assets folder and click New.

Complete asset information and save.
3. Determine the products Included in the Rack
This will depend on your chosen setting for Operational parameter 102 explained in Rack Parameters & Settings above.
- If Operational #102 is set to 'Racks have components NO', then you're finished setting up your rack!
- Rack Components
- If Operational #102 is set to 'Racks have components YES', then you'll need to add your rack components in Inventory Setup so that you can pack only those items when packing the rack.
- If Operational #102 is set to 'Racks have components UNPACKED components and accessories', then you'll need to add only the components that are NOT packed into the rack, but should be included in the rental as individual items.
- Your rack is now ready to be packed!

Packing a Rack
See illustrations in Fig 1.1 below:
- From the
 Menu
Menu - Select the
 Tab at the bottom of the screen
 - Click the
 icon
icon - Choose the
 option
 - Then hit

 Menu
Menu Tab at the bottom of the screen
 icon
icon  option
Fig 1.1

See Fig 1.2 below:
- Enter/scan the rack barcode (the rack MUST exist in inventory)
- Check/uncheck your rack preferences so that they are applied when packing the rack (see rack parameters and preferences for more information on these options)
- Scan the items to be packed into the rack
- Errors & warnings displayed

Packing a Rack with predefined Components
- When your rack is set to have components via Operational Parameter #102, the components and accessories display in the Pack a Rack window. This allows the user to see the entire list of items that go with the rack; both the items attached to it and the loose items sent along with it.
- When your rack is set to have UNPACKED components and accessories via Operational Parameter #102;, if users who have access rights to edit components and accessories, users are also able to add/edit/delete the components and accessories in this window.

Packing a Rack into a Road Case
With Operational Parameter #207 ‘Allow nested road cases’ enabled, road cases and racks can be packed into other road cases.
The steps for setup and packing include:
1. Create Road case product and road case asset. (similar to setting up a rack above)
2. Create Rack product and rack asset (see setting up a rack above)
3. Pack the Rack (See packing a rack above)
4. When Packing your RoadCase, scan the RACK barcode to pack the rack into the roadcase
In the example below, a road case RR3 is packed into the road case SMR3, this in turn is packed into SMR2 and that into SMR1.

In checkout or return, when the SMR1 barcode is scanned, any fixed items from SMR1, SMR2, SMR3 and RR3 will be loaded.
 While a rack may be packed into a road case, a rack cannot be directly packed into another rack.
Packing Racks with Multi-location Inventory
Relevant only to users with a multi-location RentalPoint license.
Asset Warehouse Location: The last warehouse location the asset was checking in/out from
Asset Home Location: Where the asset generally resides (asset ownership)

Rack Warehouse Location
When packing a rack, where the rack warehouse location differs from the users current location, the user will be provided an option to:
- Stop packing (so they can manually rectify the issue)
- Pack anyway
- Move the rack asset to the current location (i.e. change the rack warehouse location to the users current location)

Should the user choose to 'pack anyway', then the Rack Warehouse Location is used as the correct location for all assets to be packed into the rack. Any assets with a different warehouse location will be flagged in error.

Asset/Barcode Tracked Items with a different warehouse location to the rack
While packing a rack, if scanned assets have a different warehouse location to the rack asset, the user will be given an option to fix the error on save.

Where the user chooses to 'do nothing', the asset will NOT be packed into the rack when the user hits OK
 User needs 'ability to override discrepancies when packing a rack' operator privilege
Non Barcode Tracked Items
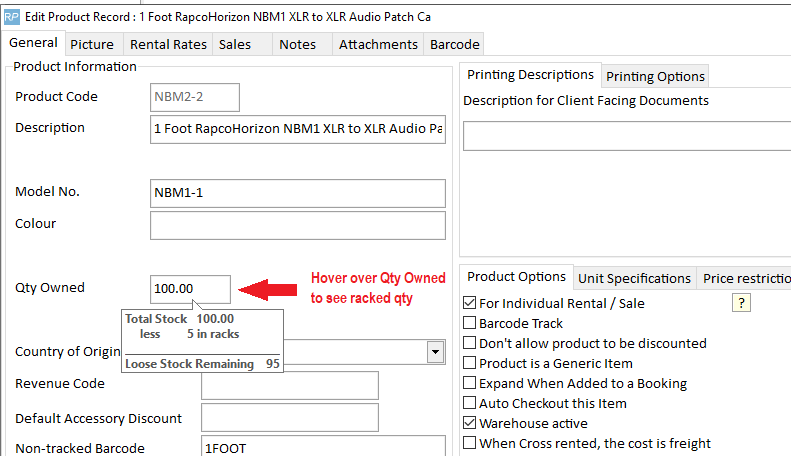
When a non barcode tracked item is scanned, the item count is deducted from the stock of the 'rack assets' warehouse location. So even if you have a different location scope selected, the items will assume the SAME warehouse location as the rack. The non-tracked product below has a total count of 5 items, 4 are packed in racks, leaving 1 item for individual rental.
Fig 1.3

Fig 1.4
Addressing Packing Errors
Some assets may have errors or warnings that should be resolved before packing can be completed. Enabling the ‘Ability to override discrepancies when packing a rack’ operator privilege, will allow the user an option to resolve discrepancies during the packing process. Any errors or warnings that can be resolved will be listed once the user attempts to save the packed rack.
Availability & Inventory Packed in Racks
 When packed into the rack, the item is removed from general stock and is not available to be rented separately, even when sitting in the warehouse.
See information on Barcode #43 in Parameters section for Availability for Packed/UnPacked racks
Non Barcode Tracked Inventory
is identified as packed in racks in Inventory Setup (highlight the product and hit F10)
OR from the Product menu using the  option

Single Location

Or click Location tab on Multi-Location system

Assets/Barcode Tracked Inventory
When a product is barcode tracked, the  button will display in the Availability Calendar Window.
While the availability calendar shows the availability count only for items NOT packed in racks, clicking  will show the breakdown of assets under the product including those packed in racks.
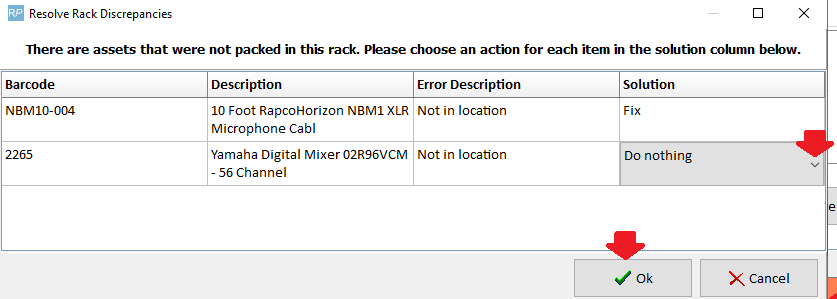
Asset Status
Asset Status is accessible From Product Menu Availability Calendar.

 Asset Status also available via right click Product Menu
and from the Equipment Grid of the booking via  button

and from the checkout window  button
The RoadCase View option will further separate Loose Stock from gear packed in Racks or Road Cases for easier identification

Show Parent Product option
Use Show Parent Product to identify racks your product is packed into
Accessible from Products Menu
And/or Inventory Setup Menu

Show Parent Product can also be used to identify which racks the product is packed into
Non Barcode Tracked Product

Barcode Tracked Product

Inventory Setup and Items Packed in Racks
Single Location Product Record
Multi-Location Product record

Barcode Tracked 'Assets' are further identified as follows
Edit asset record, identifies the asset as packed into a rack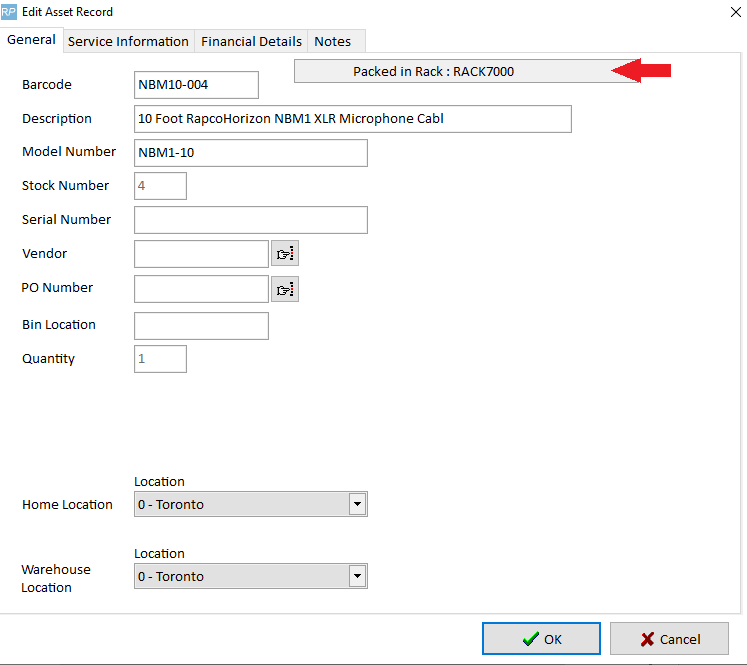

Swap out Damaged Rack Items
If an item in a rack or road case needs to be swapped with another due to fault or damage, use the swap option on the Roadcases and Racks tab. This option can be used even if the rack is checked out to a booking
See illustrations in Fig 1.1 below:
- From
 Menu, Roadcases and Racks tab
 - Click
 (or find the asset in the tree and then click the swap button)
 - The first prompt will ask for the item to be unpacked and replaced. If you’ve selected an asset in the tree the barcode will be filled in for you.
 Menu, Roadcases and Racks tab
  (or find the asset in the tree and then click the swap button)
 Fig 1.1

The second prompt will ask for the replacement barcode of the asset to be added to the rack.


 Barcoding parameter #42 ‘Return assets before entering into maintenance’
- TRUE - the asset will be returned before it is unpacked
- FALSE - the asset will not be returned, instead it will be flagged for automatic entry to maintenance when the asset is scanned in the return window
Enter a maintenance record for the faulty asset when prompted

Note the asset swapped out in the packed rack

Exceptions:
- If the original asset has a sold/disposed status it will be unpacked but not returned.
- If the new asset is sold/disposed the swap will not be allowed
- If both the original and new asset are out on the same booking the old asset will be returned (as needed) but the new asset will remain on the booking so it can be scanned in when the road case/rack is returned.
- If the asset needs to be returned before it can be unpacked (see barcoding #42) then the operator must have rights to return a booking in order to use the swap when the asset is currently out.
Rack items in Maintenance
Entering maintenance for an item within a rack won't affect the items availability. Unpack the item from the rack if you want to send it out for maintenance, or schedule maintenance on the rack item to indicate that the entire rack will be out of service for the time period.
Racks on Custom Templates
When printing custom templates, you can use the &EXRACKIC& insert field to stop racked items from printing.
Things to keep in mind:
- If you are already excluding parts on your template this field may not be necessary.
- Racked items will continue to print if the racked item is an accessory and the accessory has a price. This ensures that all values included in the total amounts are displayed.
- The consolidated booking hardcopy report does not include racked items to ensure that items that are already packed in a rack are not picked from loose stock.
- Operational #60, #61, #62 and #63 also determine if racked items display on printouts. These global overrides will override the product properties and any special insert fields.
Print Rack Picklist
A pick list for a road case or rack, lists the items that were previously packed into it. The pick list is the last complete pack list.
To print the pick list for a road case or rack, use one of the options below:
- Highlight the rack in the Roadcases and Racks tree, then click the
 button
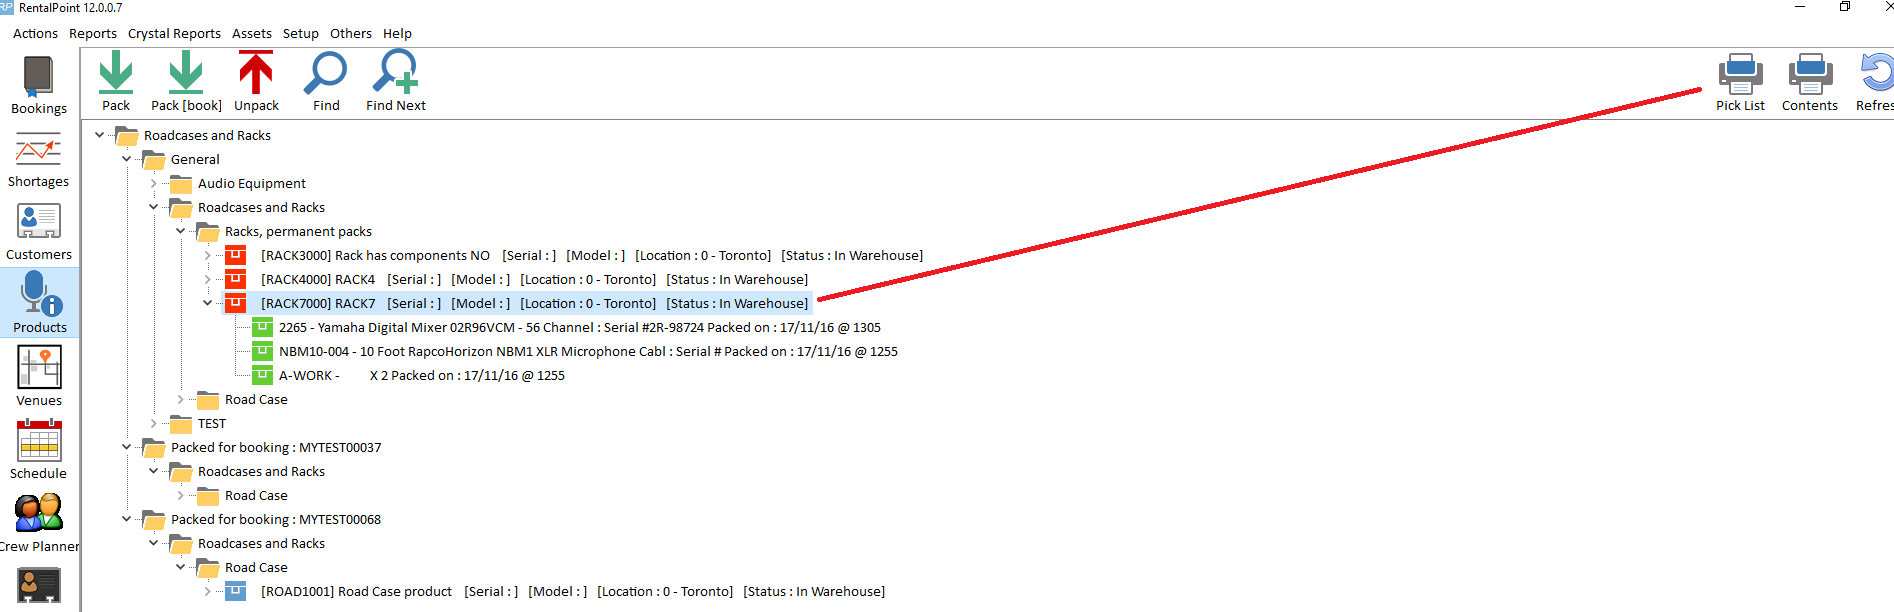
 button
- Highlight the rack in the Roadcases and Racks tree, then right click to find the
 option
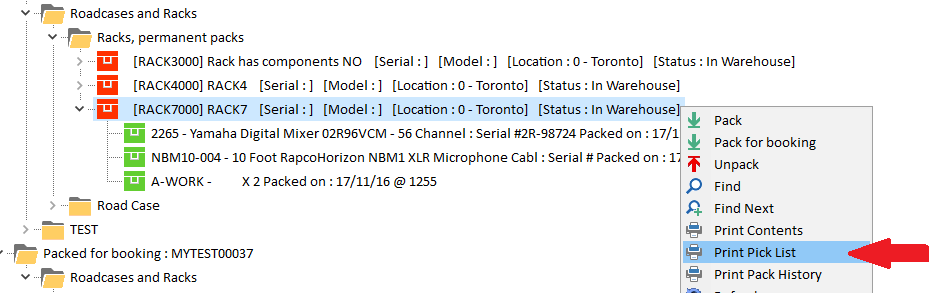
 option
Choose your output option


Print Rack Contents
Contents should be what's packed currently, to print the contents of a road case or rack, use one of the options below:
- Highlight the rack in the Roadcases and Racks tree, then click the
 button
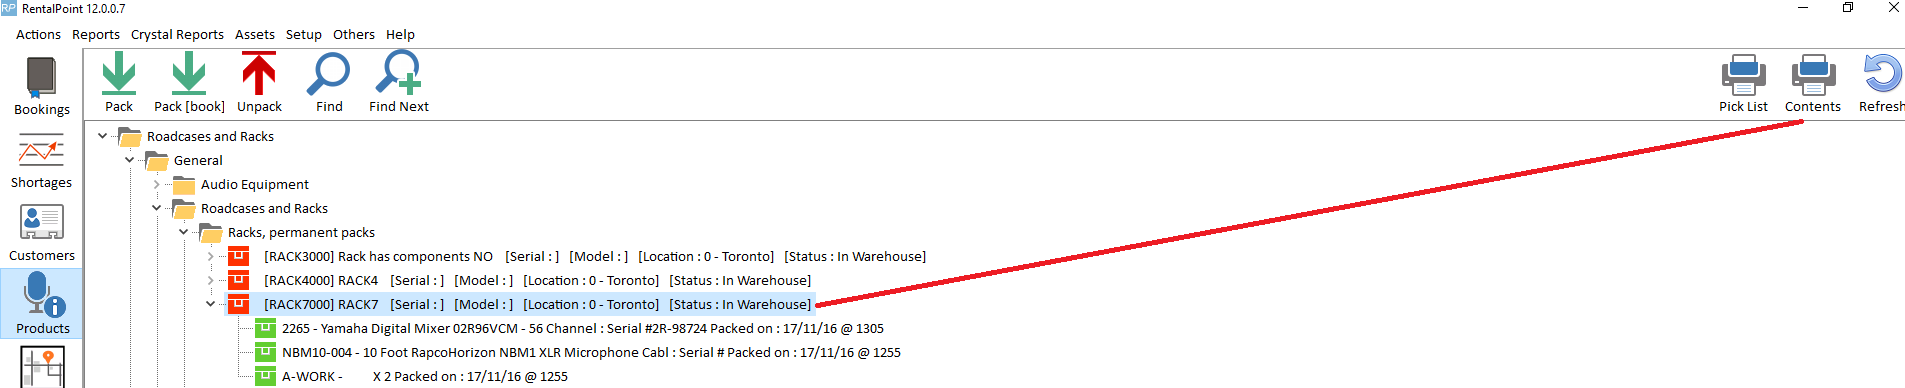
 button
- Highlight the rack in the Roadcases and Racks tree, then right click to find the option
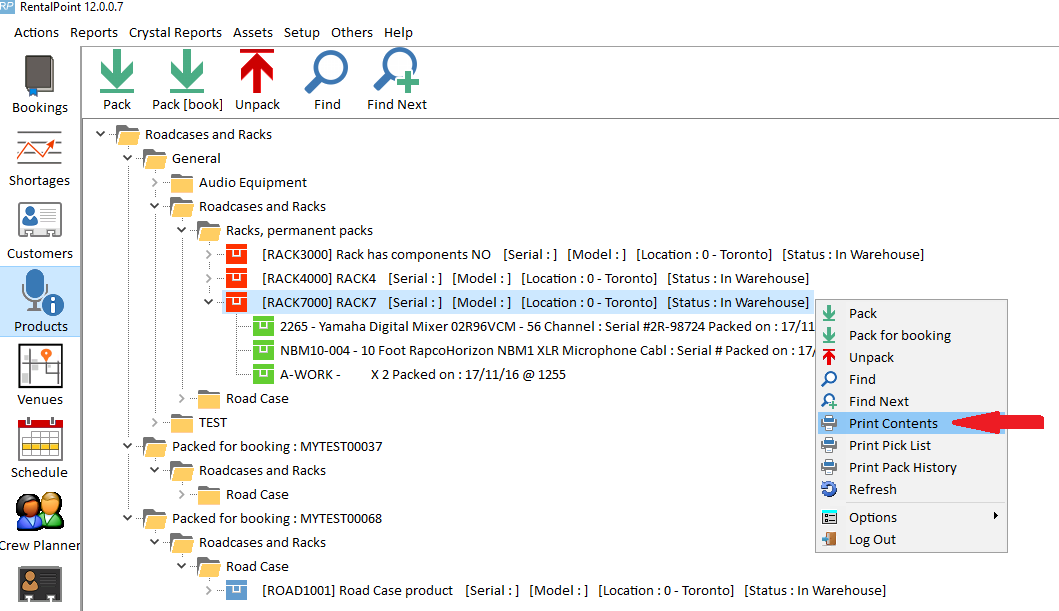

Choose your output option

Print Pack History
The pack list gets reset after you completely unpack the roadcase/rack and then repack. The first time the new pack list is entered the old one gets moved to history.
In the right-click menu, there’s an option to print the pack history, which will list all the items that had previously been packed as well as the pack date and the operator.
Rack Parameters & Settings
Racks have components Yes/No (Operational Parameter #102)
There are three options for determining how racks use components. Choose the option that best suits your rack use, then go to setup-->parameters-->operational-->102 to set your option:
 Option 3 is provided as a legacy to those companies that have racks already set up in this manner, and wish to continue. Option 1 is recommended for new users.

Option 1: Racks have components: NO **Recommended **
In this scenario, component and accessory folders within a rack product are hidden in the Inventory Setup Product Tree (F10). The rack parts are simply defined by what is packed into the rack.
This option functions as follows:
- The component and accessory folders are hidden from the product tree.
- Only items packed in the rack are loaded into the booking equipment list.
- All items packed into the rack are listed on a booking as 'In Rack'.
- Items packed into the rack are removed from loose stock.
Initial Setup
- All items that are part of the rack need to be created separately in F10.
- Use the Pack a Rack window to scan the components into the rack. Packing an item in a rack removes the item from loose stock.
- A rack must be packed before it’s added to a booking.
Option 2: Racks have components: UNPACKED components and accessories
Option 2 allows components or accessories to be defined, that are NOT part of the PACKED rack but may be shipped with it.
This option functions as follows:
- The component and accessory folders are visible in the Inventory Setup Product Tree (F10). Components and accessories should be added ONLY if they are NOT getting packed into the rack
- Items packed into the rack are removed from loose stock. The rack should be packed before adding it to a booking.
- When the rack is added to a booking & subsequently checked out:
- Components and Accessories are loaded on the booking with normal availability (not 'In Rack') following the packed items and are not removed from loose stock. These items must be scanned at checkout like any other non-rack item.
- All items packed into the rack are listed on a booking as 'In Rack'. Simply scan the rack barcode out at checkout.
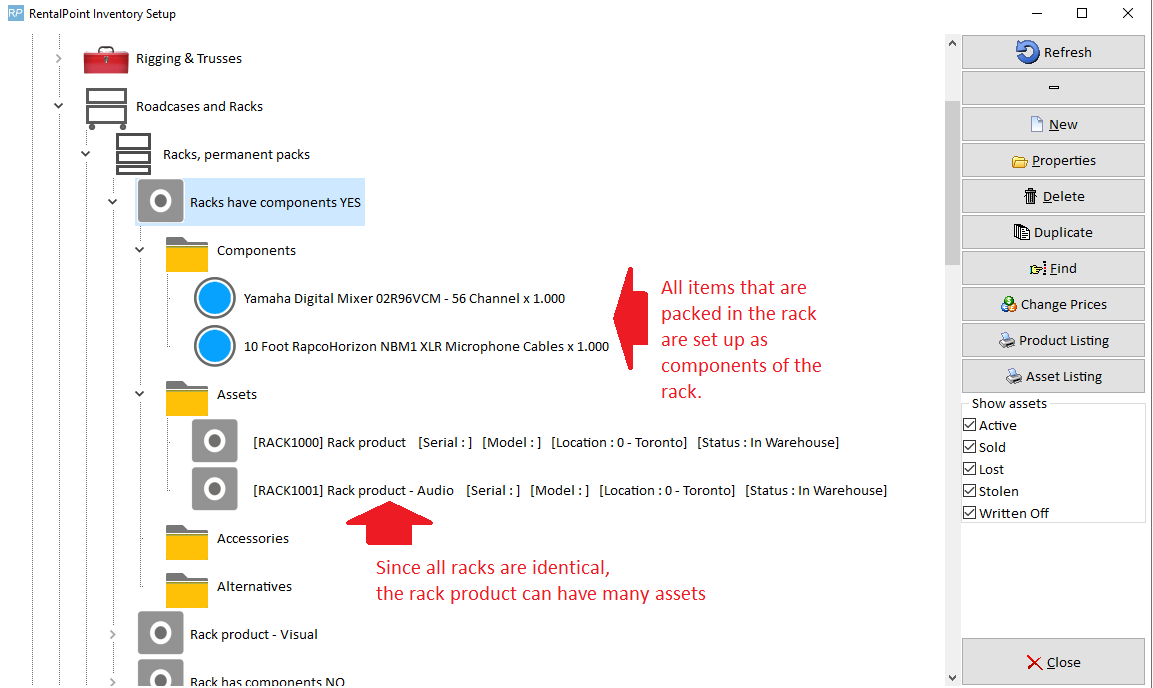
Option 3: Racks have components: YES
In this scenario, all items that are part of a rack are first defined as components in the Inventory Setup Product Tree (F10). After the items are configured as components of the rack, the items need to be scanned into the rack with the Pack a Rack utility.
This option functions as follows:
- Components of racks are listed on a booking as 'In Rack'.
- Items packed into the rack are removed from loose stock.
- Items packed into the rack should match the component list in Inventory Setup (F10).
Initial Setup
- All items that are part of the rack need to be created separately in Inventory Setup (F10).
- Using drag & drop, add the items to the components folder of the rack.
- Use the Pack a Rack window to scan the components into the rack. Packing an item in a rack removes the item from loose stock.
- The list of components must match the list of assets packed into the rack, if there are more components than items packed in the rack then the line item will show a shortage in the equipment grid of the booking.
Mobile Storerooms (Operational Parameter #103)
Usually a rack is a box or unit with items bolted/attached to it. This is the recommended setting. 
However, when Operational Parameter #103 is set to ‘Mobile storerooms or Van’, availability can be tracked for the items inside the rack separate from the rack asset itself. All items that are part of a rack display as short (in red) if the rack product is short.
In Fig 1.1 below, the rack is not short, only the cable product displays in red because it hasn't been fully packed.
Fig 1.1

In Fig 1.2 below, the Rack is short, therefore all items in the rack display in red, to indicate that they are all short.
Fig 1.2

Allow Nested Road Cases (ability to pack a rack into a road case)
With Operational Parameter #207 ‘Allow nested road cases’ enabled, road cases and racks can be packed into other road cases.

The steps for setup and packing include:
1. Create Road case product and road case asset. (similar to setting up a rack above)
2. Create Rack product and rack asset (see setting up a rack above)
3. Pack the Rack (See packing a rack above)
4. When Packing your RoadCase, scan the RACK barcode to pack the rack into the roadcase
In the example below, a road case RR3 is packed into the road case SMR3, this in turn is packed into SMR2 and that into SMR1.
In checkout or return, when the SMR1 barcode is scanned, any fixed items from SMR1, SMR2, SMR3 and RR3 will be loaded.
While a rack may be packed into a road case, a rack cannot be packed directly into another rack.
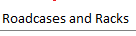
Override discrepancies when packing a Rack
When packing road cases or racks, some assets may have errors or warnings that should be resolved before being packed. Enabling the ‘Ability to override discrepancies when packing a rack’ operator privilege, will allow the user an option to resolve discrepancies during the packing process. Access the operator privilege on the Products and PO’s tab of the Operator Group (per screenshot below) or contact your system administrator for access.

Once set, errors and warnings that show up during the packing process will offer an option to resolve on SAVE.

Any errors or warnings that can be resolved will be listed. Select the action to take in the ‘Solution’ column. When ‘Fix’ is selected the error will be resolved (for instance an asset in maintenance will be returned to service, or an asset listed as being at a different warehouse will be moved to the same warehouse as the rack/road case).

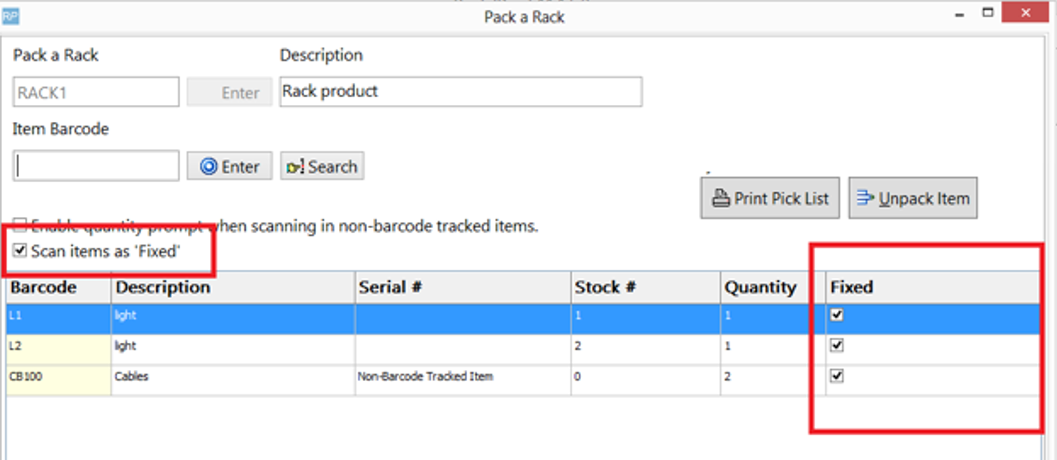
Floating v Fixed Rack Items
Rack items can now either be physically bolted to the rack 'Fixed' or sent along with the rack 'Floating'.
- Fixed items are automatically scanned in the checkout window and return window when the rack barcode is scanned, while floating items must be scanned individually.
- Floating items are still part of the rack, they are removed from loose stock and display as 'In Rack' in the booking.
- Barcode Parameter #41 ‘Scan floating rack items on return only’
- When set to NO, floating items must be individually scanned both in the checkout and return window
- When set to YES, floating items are automatically scanned out when the rack is scanned out, however all floating items must be individually scanned on return
In Fig 1.1 below:
- Items are defined as floating in the pack window by unchecking the Fixed column.
- The 'Scan items as 'Fixed'' checkbox option, allows any new items scanned to default to either 'fixed' or 'floating'

An important note on use of Rack quantities
One Product and Asset Combination Per Unique Rack
- Since all racks can be packed differently, each unique Rack Product MUST have ONE asset only in inventory setup. Each UNIQUE Rack Product would then be packed uniquely and used individually on the equipment grid of the booking.
One Product with multiple assets used only for IDENTICALLY packed racks
- If there is a need for a Rack Quantity of greater than one (eg. 2 or more of the identical items are booked on a job where both are individually packed racks); Then all Racks packed for that product should be identical in content.
 Rack products with multiple assets can be located using the Fix Invalid Racks utility in Inventory Setup Utilities

Availability for Empty/UnPacked Racks
Enable barcode parameter #43 so that empty (i.e. unpacked) racks will not show as available for rental.

Here a new rack has been added, but is not yet packed.

 Qty Owned in Inventory Setup will reflect the qty of packed racks
In the running balance, the initial stock shows as 0 with the total not packed displayed in red.
After packing some items into the rack the running balance now displays the rack as being in stock and available for rentals
 The rack will again be removed from available stock when it is unpacked.