Once the installation is complete you'll want to prepare the software for first use by entering the initial data you require, such as operators, tax authorities, freight option etc...
Below are the items that you'll need to set up before you start entering orders, click on the links to view detailed instruction for each item.
Operator & Operator Groups
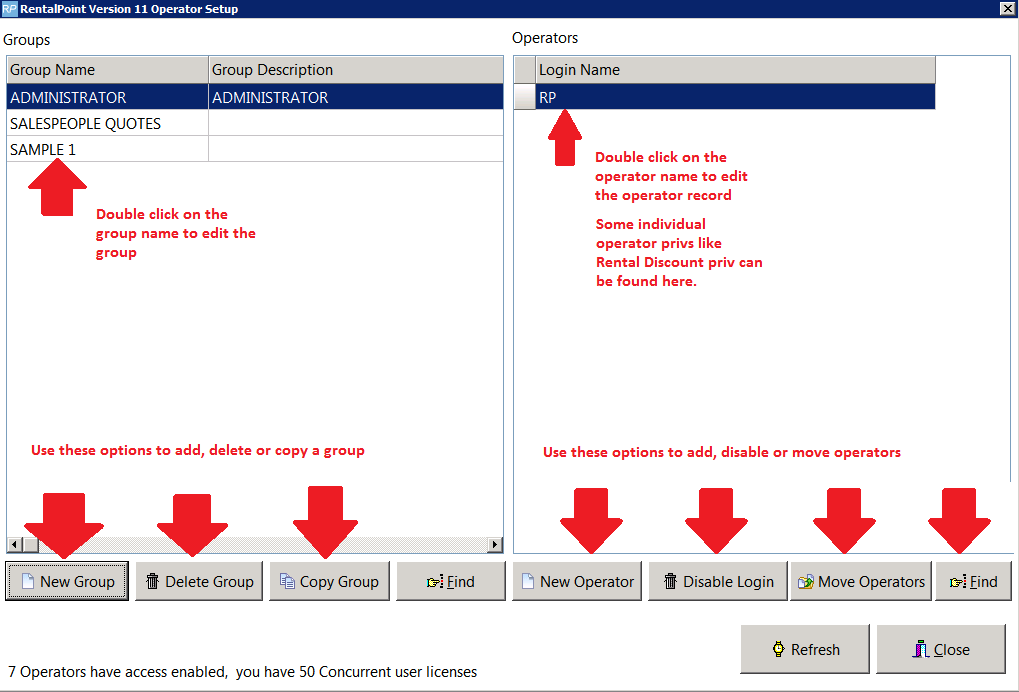
Operator or user permissions within RentalPoint are managed via “Operator Groups”. Simply create a group, grant access permissions for use of different RentalPoint features to the group, and add operators to the group. Group permissions apply to all operators within the group. You'll need to enter an operator for each person you want to track in the system (though you may want a general log-in for a shop computer for instance that will be used by several people).
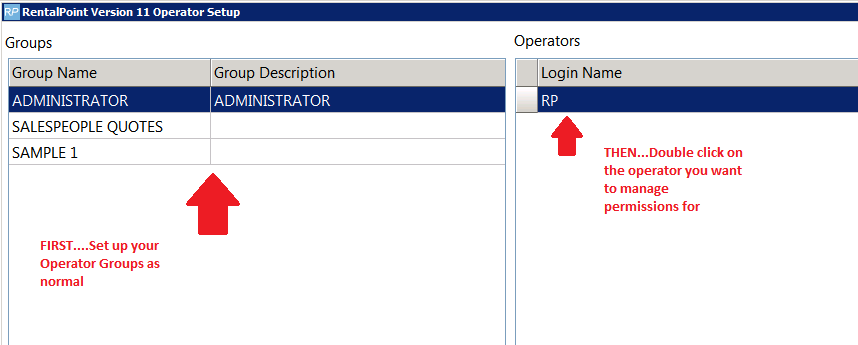
Managing Operator Groups
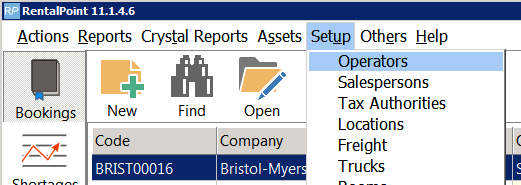
- To access operator setup go to Setup and click Operators.
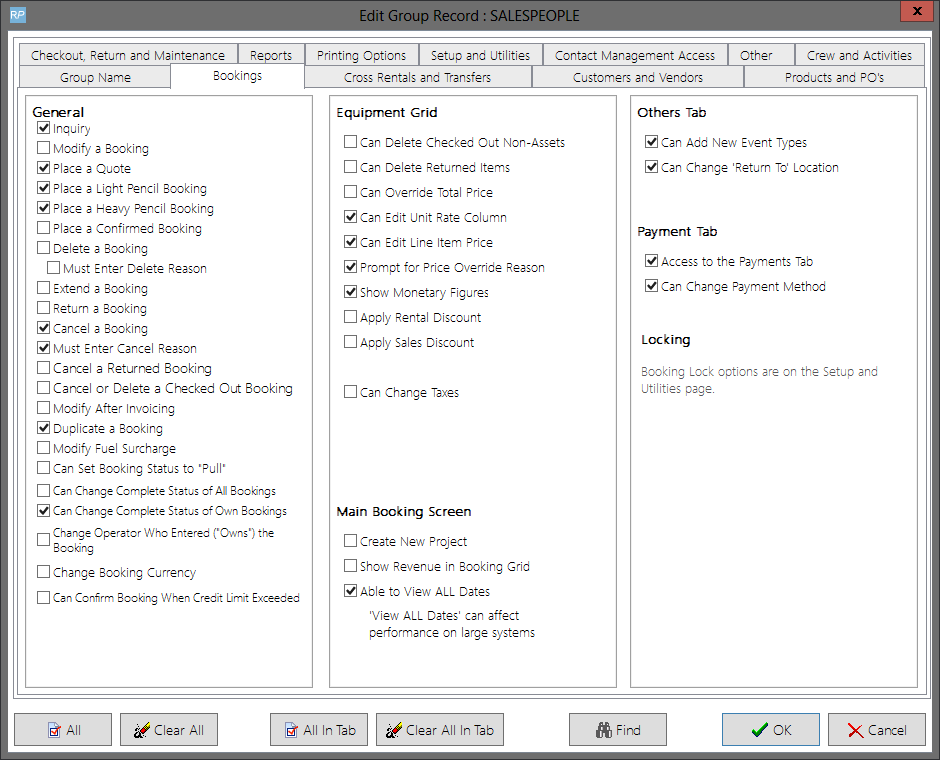
- Grant rights to the group by ticking the boxes in the appropriate tabs. Click OK to save your changes.
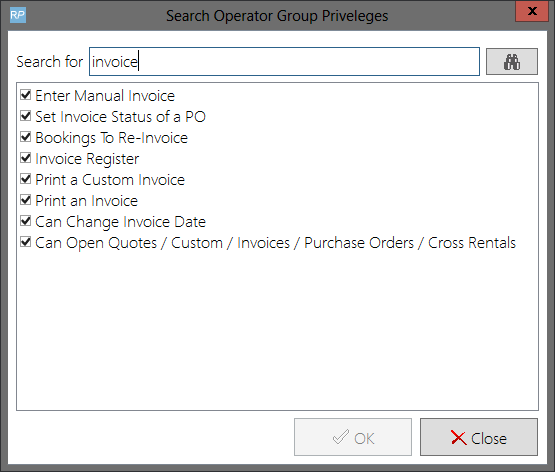
- If you can't find the privilege you're looking for, try the Find option. Type the privilege that you're looking for and hit enter. A list of related operator privileges displays. Tick the box beside the privilege you need and click OK.
Create/Edit Operators
Now that you have created operator groups you can add operators to the groups. Click 'New Operator'
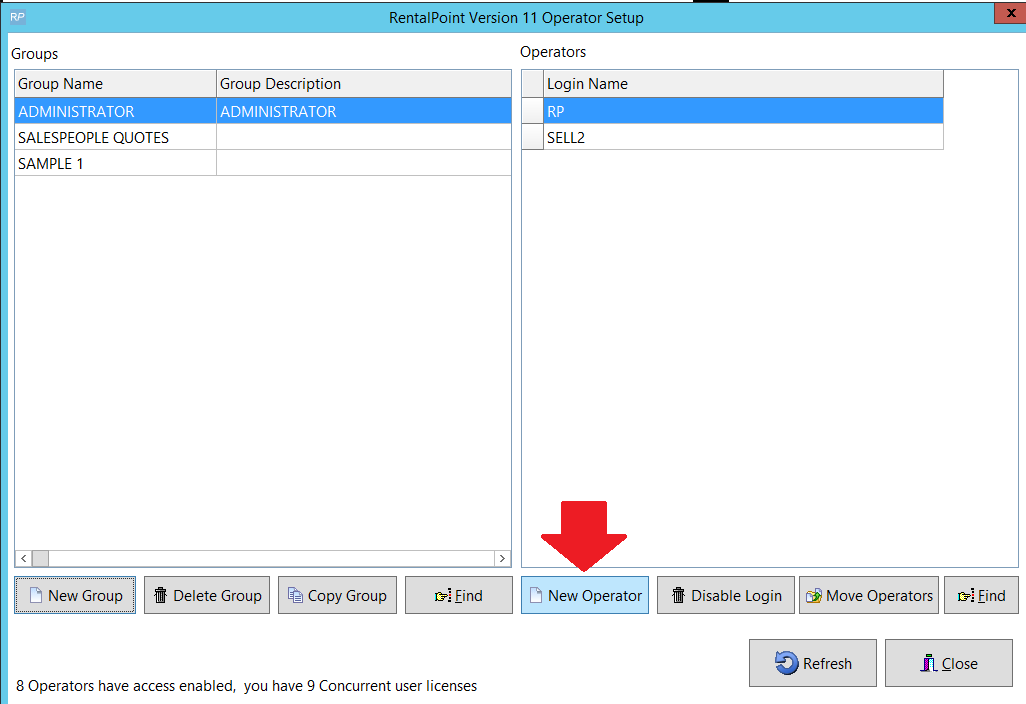
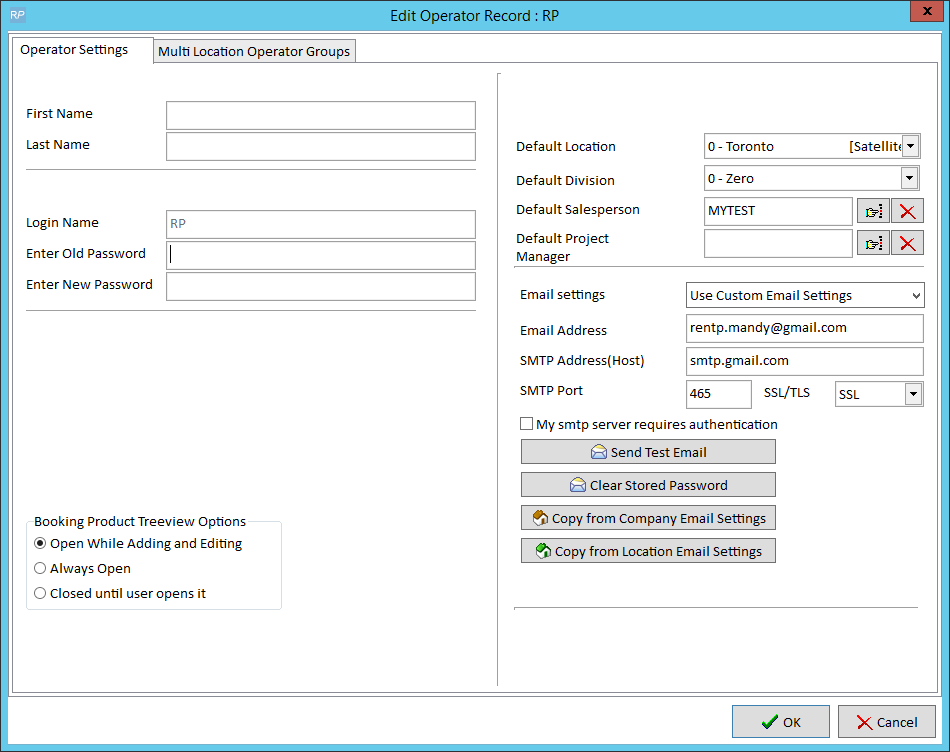
For each operator, you must specify a first and last name as well as user name and password so he or she may log into RentalPoint. You also must add the user to a group so he or she can have rights inherent to that group, throughout the system. As a default, the operator does not have access to anything.
Operator setup allows you to give an operator a default region and location. When he or she logs in, the main scope of RentalPoint is set to his or her default scope. Whether the operator is creating a booking or PO, viewing the schedule, or browsing the product tree, his or her scope is set to the default defined in the operator properties.
You may edit these details later by highlighting the operator and clicking Properties.
Use Disable Login to deny login rights to RentalPoint. Please note, once you have created an operator you cannot delete it, only disable it. This is for tracking purposes since a specific operator is linked to a booking.

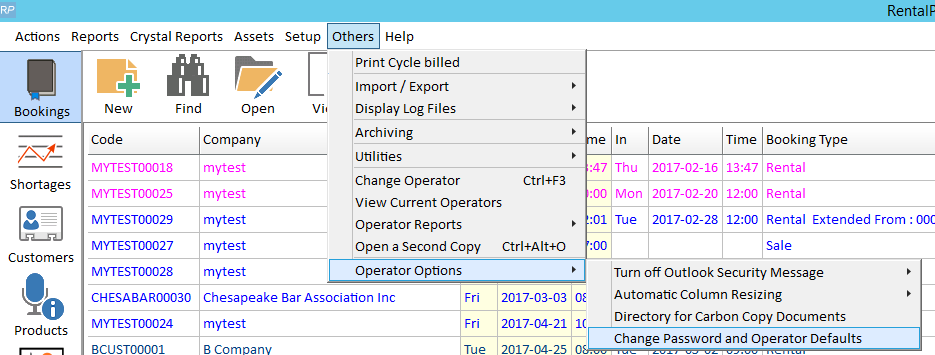
Change Operator Password and defaults
Operators can change their password by using the utility in the Others main menu. Select Others, then Operator Options, then Change Password and Operator Defaults. Enter your old password, then enter the new password and save. You must restart RentalPoint for the password and setting changes to take effect
Administrators can control this utility by setting access rights in the Setup and Utilities tab of the operator privileges.
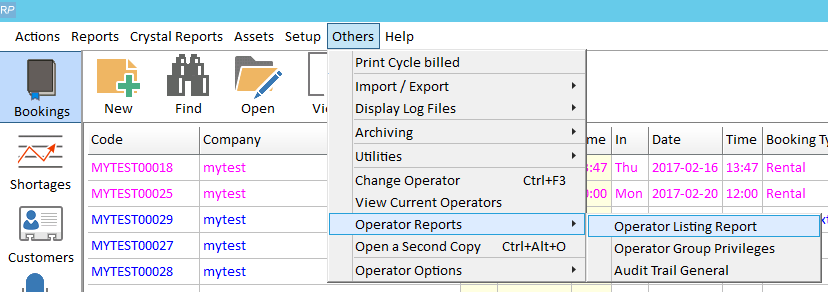
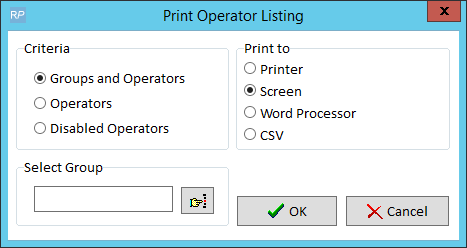
Operator Listing and Other Reports
This is a simple report that prints an alphabetical listing of operators and the group that they are assigned to.
To run this report select the Operator Listing Report from the others main menu.
Once selected, specify scopes and click OK.
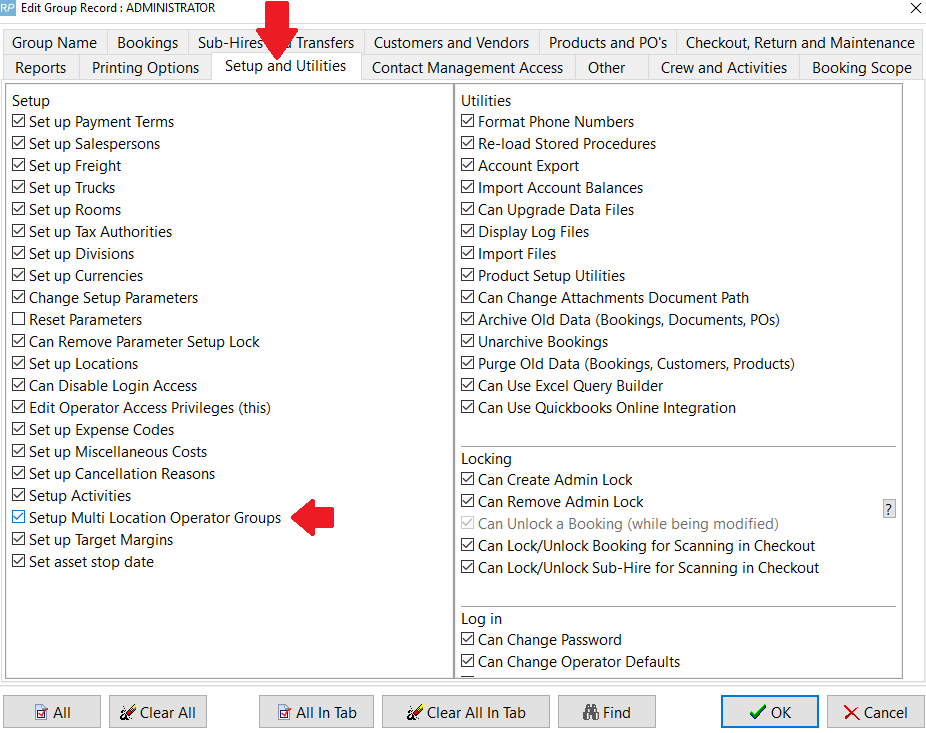
Multi-Location Security
When using the multi-location module, RentalPoint offers the ability to assign different access rights for the SAME operator at each location.
You'll need 'Setup Multi Location Operator Groups' privilege to use this functionality.
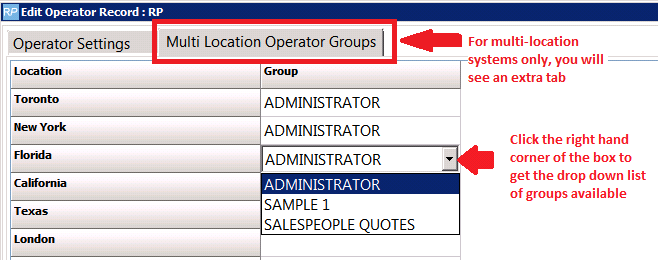
When using RentalPoint, Operator privileges will be applied on a location basis entirely dependent upon the location the user has selected.
Freight Overview
Freight can be recorded against a booking either...
- Manually on the booking equipment tab and/or
- Using predefined freight on the booking freight tab. Using this option freight is set up outside the booking (usually during initial data setup) and selected on the freight tab during booking entry.
Pricing Parameter #24 defines how freight is entered on the booking
- Single Freight Charge

- Delivery, Collection, Fuel Surcharge (fuel surcharge is across all bookings and is entered when setting the parameter)

- Fuel Surcharge and 'Allow Manual Entry of Freight' preferences are set in the same parameter. Freight can also be locked, left unlocked or only locked when a booking is confirmed via Pricing Parameter #25


Manual Freight Entry
When activated, users can choose to manually enter freight on the Equipment Tab of a booking (per screenshot below). It's important to note that the freight tab is still available and any freight entered under the freight tab of the booking will supersede manual freight entry. This freight cost makes up part of the booking total price.
To activate this option set 'Allow Manual Entry of Freight = YES' in Pricing Parameter #24

Predefined Freight - The Display Window

The freight setup window displays differently based on parameter settings.
- When Pricing Parameter #24 is set to 'Allow Manual Entry of Freight'
- One charge for freight will be entered on the booking
- The freight window displays as below
- Region and Location fields display for multi-location systems only.


- When Pricing Parameter #24 is set to 'Allow Manual Entry of Freight' = NO
- The freight window displays as below.
- The parameter also sets either
- Single Freight Charge
- A combined charge is stored for delivery and collection
- OR 'Delivery, Collection and Fuel Surcharge'
- Separate delivery and collection charges are stored against the booking along with a fuel surcharge
- Single Freight Charge
- With no manual entry permitted, shipping costs can be calculated using the base rate up to a specified weight, however for freight greater than the defined weight a higher charge can be applied using the Rate per unit entered against each weight threshold.
- Region and Location fields display for multi-location systems only.

Predefined Freight- Service, Our Truck, Zones
The Freight Setup window allows for configuration of multiple freight options for pickups and deliveries.
Referencing the screenshot below:
- Service is used to describe the type of service offered by the Freight description
- Our Truck is used to identify deliveries and returns that need to be tracked by the software in the Delivery & Return window
- Zones are used to denote distance to travel, so that the same service can be used to charge different rates for differing distances.
Below both a 'Regular' and an 'Express' service are set up for freight description UPS.
Each service covers two zones charged at different Base Rates and escalating rates per unit
Since 'Our Truck' is set to 'No', bookings using this freight option will not display in the Delivery and Return window as we don't need to track this freight in-house.

Predefined Freight - Rate Calculations
Base Rate
Used to calculate the freight charge up to the maximum weight entered.Example:
A Base Rate of 7.5 with a Maximum Weight of 10Kg results in a freight charge of $75
Rate Per Unit (RPU)
Applies an additional charge for each unit above the maximum weight threshold, up to the next configured weight range. From the setup shown in line 1 above:- Base Rate =
1.5 - Weight breaks:
- 5 lb → rate
2 - 10 lb → rate
2.5 - 15 lb → rate
3 - 20 lb → rate
3.5 - 25 lb → rate
4
- 5 lb → rate
The software analyzes as follows:
- Starts with the BaseRate
- Finds the highest matching weight break ≤ booking weight (Use the highest weight tier that does not exceed the booking weight)
- Adds:
For a booking weight of 20 lb:
- First break weight =
5 - Matching bracket =
20with rate3.5
So:
Then add the base rate:
- Base Rate =
Fuel surcharge is applied to collection.
Example assuming:
- Collection =
54 - Fuel surcharge rate =
10%
- Collection =
Then:
Total:
Using weight thresholds together with multiple freight services provides considerable flexibility when calculating freight charges.
Using weight thresholds together with multiple freight services provides considerable flexibility when calculating freight charges.
Predefined Freight - Default Built in Methods
Default freight settings can also be configured. These defaults are automatically applied whenever a new booking is created.


Predefined Freight on the Booking
Now that freight has been set up it can be used in bookings. If you haven't done so already, log out and back in again to see the latest freight setup.
When freight is selected on a booking, the software intelligently groups the related options together offering one freight option for matching descriptions with differing service and zone options for that description. This setup provides flexibility for operators to manage different freight scenarios, including:
Charging based on varying travel distances
Applying preferred freight rates for selected customers
Offering different shipping priorities and service levels
For our example, UPS will appear once in the list with options under 'Service' for Regular and Express and options under 'Zone' for 0 and 1
Our number/Their number is simply a toggle showing who is paying for freight.
- Our number: the freight charge is added to the booking
- Their number: the freight charge is noted on the booking but NOT added to the final quote since it will be paid by the client

When freight is entered or modified click 'Apply to booking' so that the latest freight is visible on the Equipment tab.
From the Equipment tab you can also click the blue refresh arrow to reload freight from the freight tab

Multi Location Freight
When using the multi-location module, an additional Location column will appear in the Freight Setup window allowing the freight option to be assigned either to all locations or to a specific location.
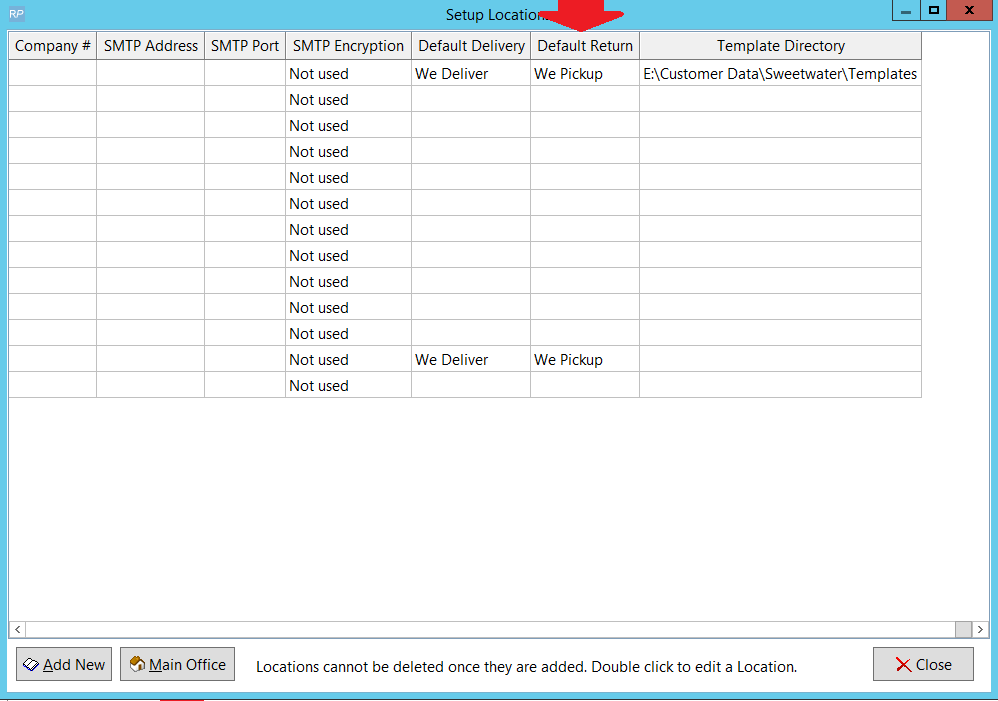
To configure Freight defaults for each location, navigate to Setup → Locations. On the far-right side of the Locations grid, you’ll find the default settings for both Delivery and Return Freight options.
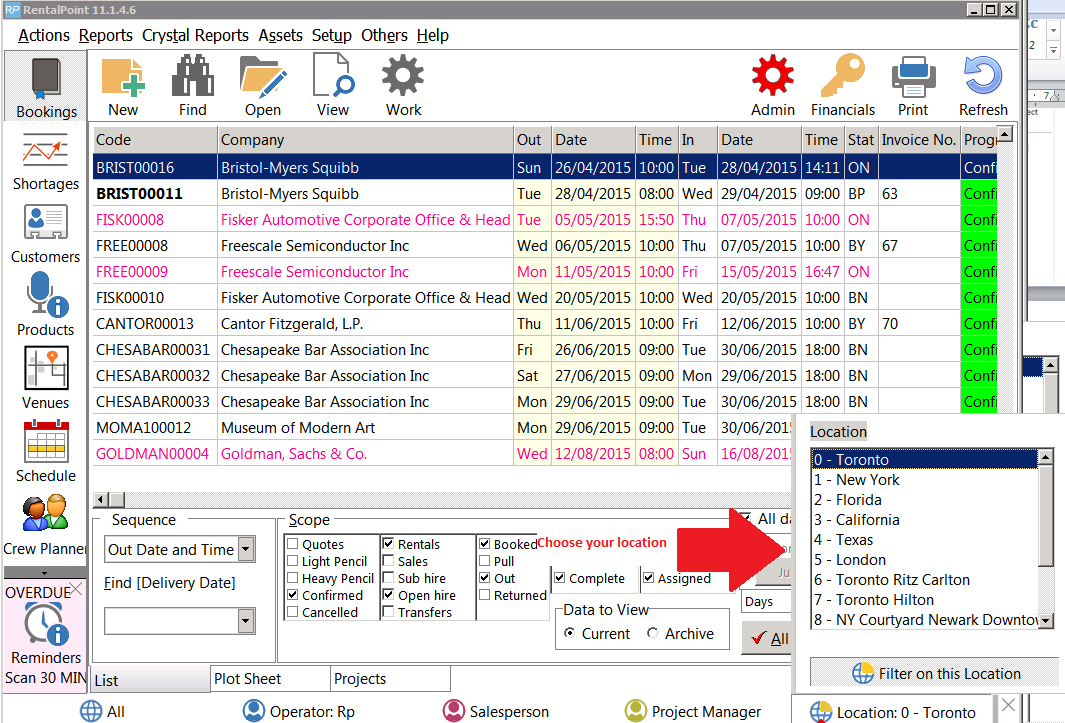
Note: When creating a booking, PO, cross rental or transfer, the freight options will display based on the location selected.
Tax Authorities
The Tax Authorities section of RentalPoint helps you maintain all the taxes used throughout the system. Please do not change the values of tax Exempt. If a customer is not charged tax, this is the only tax authority you can use.

Divisions
Divisions are useful to distribute and track revenue in different departments. For instance if you have a sound department and a lighting department specifying a division on bookings will allows reporting on a specific department.
Revenue Separation
Divisions are used to separate income from bookings into a specified division or department of a company. A division is selected at the booking level. When a booking is invoiced, the invoice uses the division from the booking. When the invoice is paid, the payment uses the division from the invoice that it is applied to. Using divisions does not affect the booking in any way, it only affects reports and accounting activities after the booking is invoiced. Reports in RentalPoint, such as statements and account receivables, sort revenue by division. Divisions are not mandatory and are only something to be considered if you require more organized income separation.
To create divisions click the Division option within the setup menu. Once a division is saved in the system it can be edited but not removed.
A setup window displays with a blank list. To add more divisions click Add New. Once the desired divisions are added, they will be displayed. RentalPoint will need to be restarted for the settings to take effect. The divisions will be available in bookings under the Other Details tab.

To use divisions you'll need to enable accounts parameter #24.
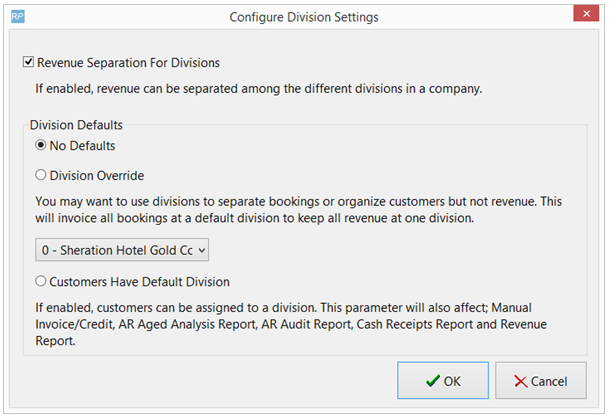
Customers have default division
If you want certain customers to have a default division so that any bookings for that customer will automatically have the correct division selected you can enable accounts parameter #30. Additionally any pre-payments entered for the customer will be allocated to the customer's division before being assigned to a specific invoice when the payment will be applied to the division the invoice was generated for.
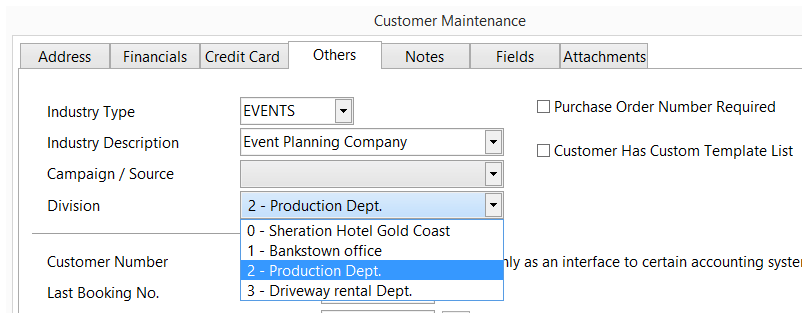
You can then select a division for each customer on the Others tab of customer properties. This division will then be filled in for any new booking entered for the customer.
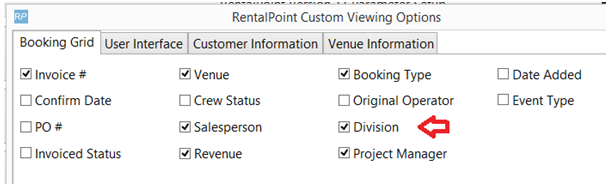
To add a "Division" filter to the main booking window
In the main setup window, click on "Custom viewing", then check "Division" as below -
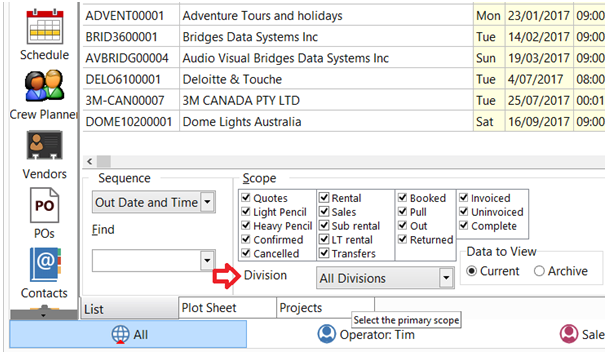
This will then add a filter to the main booking window so you can filter on division, as below -
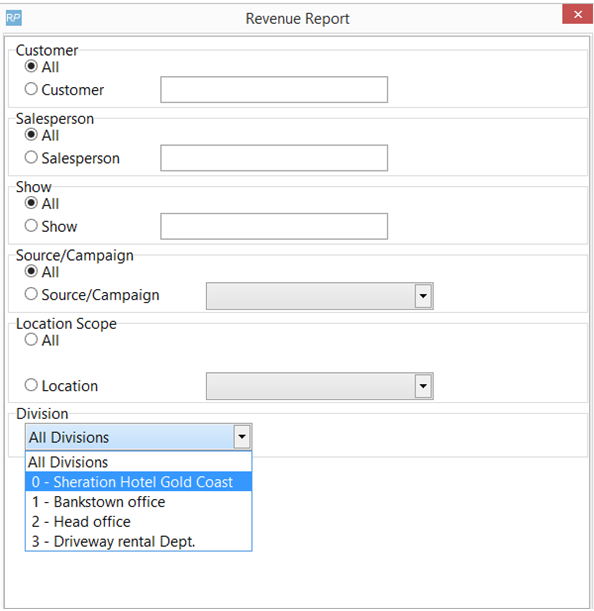
Revenue Report By Division
Profit Analysis Report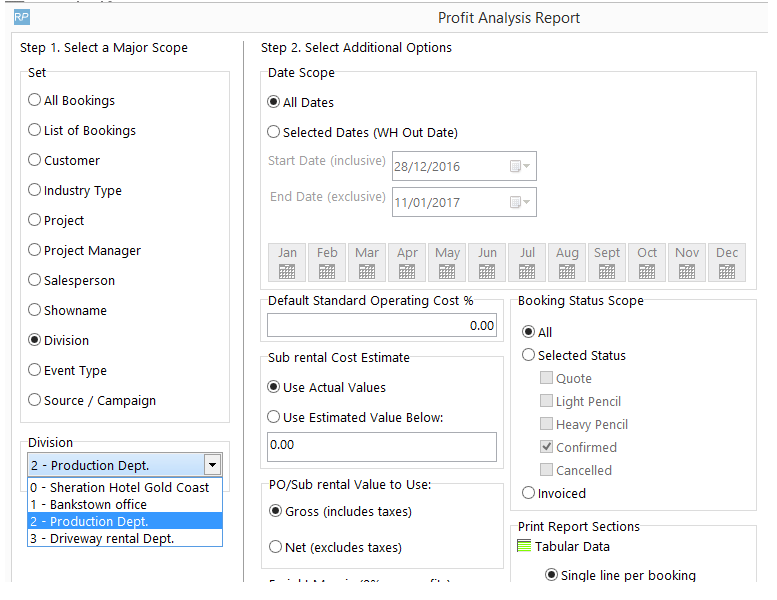

Trucks
In this area you can set up your company trucks as well as their weight and size capacities. RentalPoint uses the trucks you set up when scheduling a delivery or pickup. When scheduling bookings on a truck, the associated license plate and expiry date displays on screen. The system notifies users if a plate is expired at time of scheduling.
Please note, once you have created a Truck you can rename it but not delete it.

Public Holidays
The system warns an operator if a booking is scheduled for delivery or return on any of the Public Holidays setup in the system. Bookings may still be processed but the system only issues a warning. Operational Parameter #42 must be enabled.
Public Holidays can be customized based on your requirements. These holidays may affect bookings, labour, equipment delivery and equipment pickup. The system will not prevent you from performing your normal actions. However, if Operational Parameter #42 is enabled (Warn if Public Holiday on Delivery), then the system will warn the operator that they are scheduling a booking that overlaps a holiday. The system will also display holidays in green in the plot sheet.
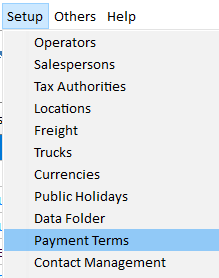
To configure public holidays in RentalPoint click the Public Holidays option in the setup menu. Once selected, you will be prompted with a window in which you can enter any day as a holiday. Since holidays can fall on different days from year to year the system requires that you enter an exact date the holiday falls on year by year.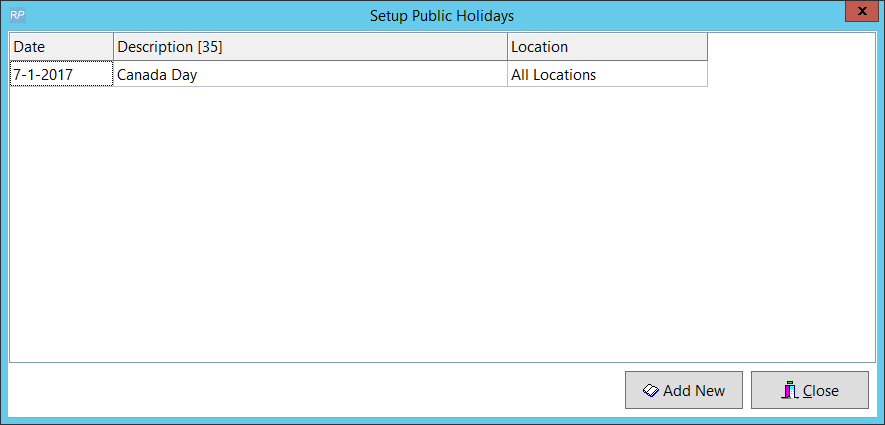
Please note, once you have created a holiday you can rename it and change the details but you may not delete it.
Pricing
Parameters

Price Factor Tables and Price Sets

Multi Rate

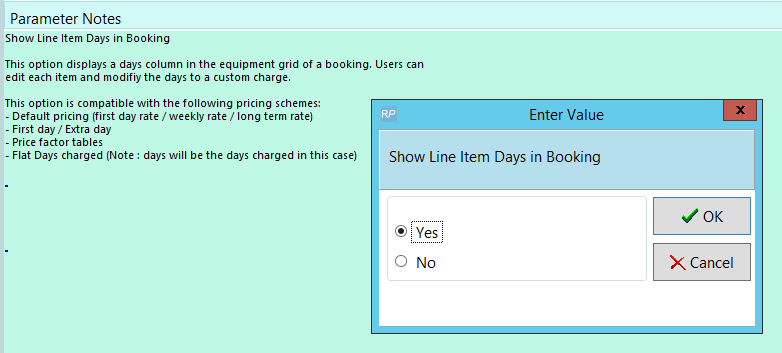
Show Line Item Days in Booking
Enabling this option will allow the number of days to be modified for each line as needed.
The days entered will either be the “days using” or the “days charged” depending on the pricing scheme you are using. Days using will only permit the entry of full days while days charged will allow fractions of a day. The following pricing schemes are compatible with the line item days option. Default pricing (First day rate / weekly rate / long term rate) First day / extra day Price factor tables Flat days charged Can be enabled from the price factor table area or pricing parameter #33.

Effective in v11.1.8 and higher
- Pricing #3 Charge For Sundays. If Price Factor Tables are enabled, then the user can decide if they want the first Sunday free or all Sundays free.
- Pricing #3 will now apply to Pricing #55 Multi Rate Pricing Scheme.
Payment Terms/Customer Account Type
Payment Terms configure the payment intervals for customer accounts. Once created, payment terms can be used for any customer or booking. RentalPoint offers a default setup of 4 account types:
- Cash on delivery
- Cash on return
- 7/14 day account
- 30 day account
If these terms are not to your requirements, click the Payment Terms option in the setup menu to add your own custom terms.
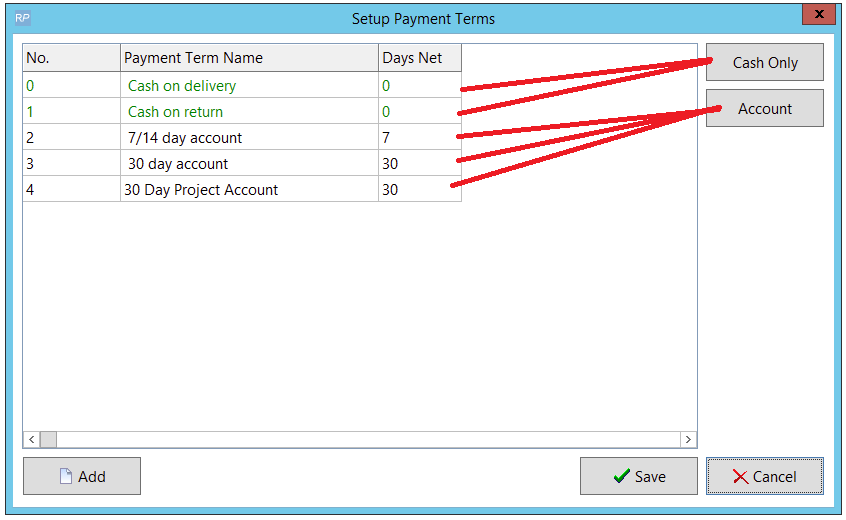
Once the Term and the Days Net have been added, click either OR
OR  , then click Save.
You'll need to log out of RentalPoint and back in again before seeing the new payment terms in the Financials tab of a customer record.
Once you've created a Payment Term you can rename it and change the details (i.e. days Net or Cash Only/Account) but you cannot delete it.
The payment term is used against the customer account type when setting up customer details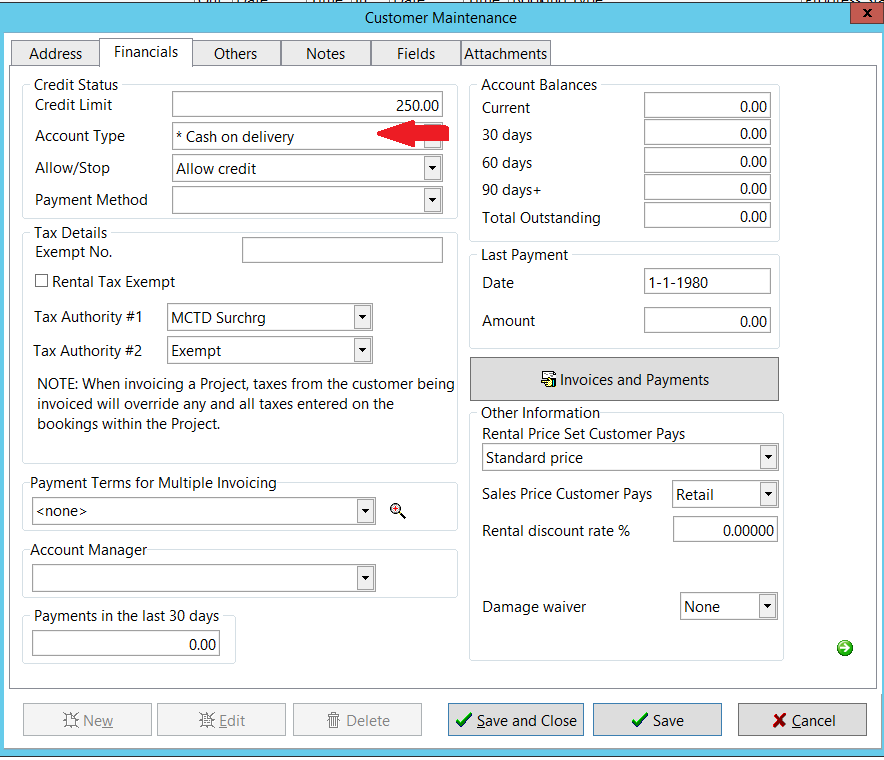
Payment Terms can also be set on a per booking basis if required.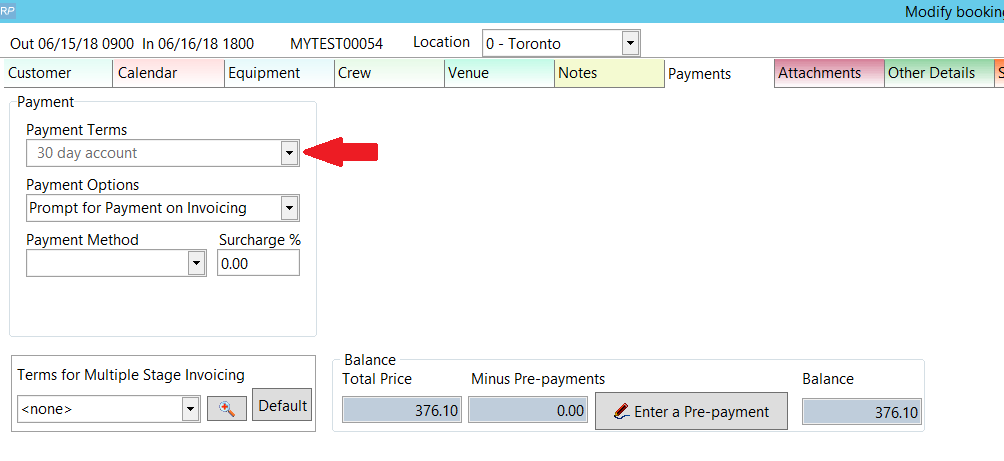
Miscellaneous Costs

The options below only apply to systems with the Multi-location module
Locations
This area allows you to set up different locations for your company. Locations are useful to track inventory, revenue and bookings. Click Add New to add a new location to your company. To set up a main office for your company highlight the location that you would like to use and click Main Office.

Regions Setup
Used in conjunction with Locations, regions are used to group specific locations together. A company with 4 locations, 2 in Eastern Timezone and 2 Pacific Timezone, might create an Eastern and Pacific region, then slot the relevant locations under each region.
To use the regions functionality it must first be enabled. Go to the Parameters option of the setup menu. Open Operational #174 - Enable Region Support. Set this to Yes and restart RentalPoint.
Once you have restarted RentalPoint, the option for adding regions will be enabled. When RentalPoint is run again you will notice a region scope option at the bottom as well as a new option under the setup menu that allows you to configure regions.
To configure the regions, select the Regions option from the setup menu. By default the system will create a region for you, you can change the name to make it more descriptive. Once a Region has been added to the system it can be renamed but not deleted.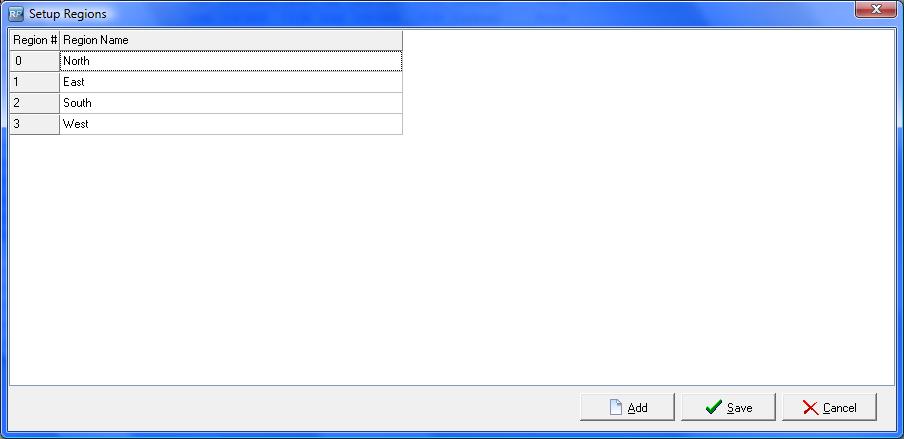
After entering Regions, go into Setup Locations and assign each of your locations to a Region.
Please note, once a Region has been created, you can rename it but not delete it. Bookings and other information in the system will still be linked to the region for reporting information.
Scope and Searching
The secondary scope in RentalPoint can also be sorted by regions. If you select a region from the secondary scope, any bookings that are assigned to that region, or to the locations in that region, are displayed. The secondary scope applies to other areas of RentalPoint, including the Shortages List, Products, and Purchase Orders.
When creating a booking, you can select a region from the list. Only the locations associated with that region display in the location drop down list.
Equipment Availability
Searching for equipment based on a region is quick and easy. Enabling Operational Parameter #127 – Equipment Search Location Sensitive displays an extra search tab in the equipment grid of the booking. Select the region, then continue entering your equipment as normal. Availability is based on location but the tree view and the search are based on the quantities in the region.
Technicians
When entering a technician, the region in which they work can be specified. Then when a booking is created only those technicians that work in the region specified in the booking can be selected.
Custom Printing
When printing custom templates throughout the system, you can specify region specific templates. For example, your Eastern region may have different printouts then your Western region. Using the custom printing option, you can easily organize your templates, so the Eastern region does not accidentally use a Western region template.
Reports
Several reports in the system, such as the Booking Cross Section, Invoice Register and Revenue Report can be sorted by regions, making accounting duties much more simplified.