Accessing Email Configuration
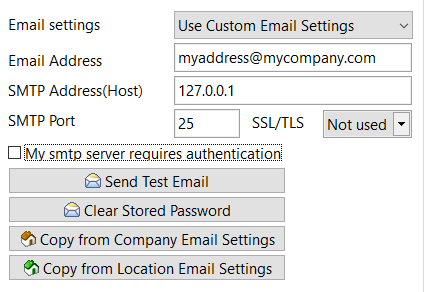
 Email Settings available (i.e. 'Company', 'Custom' and 'Location')
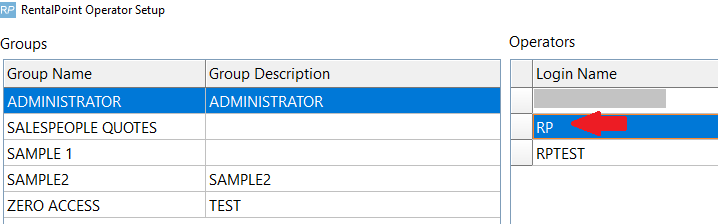
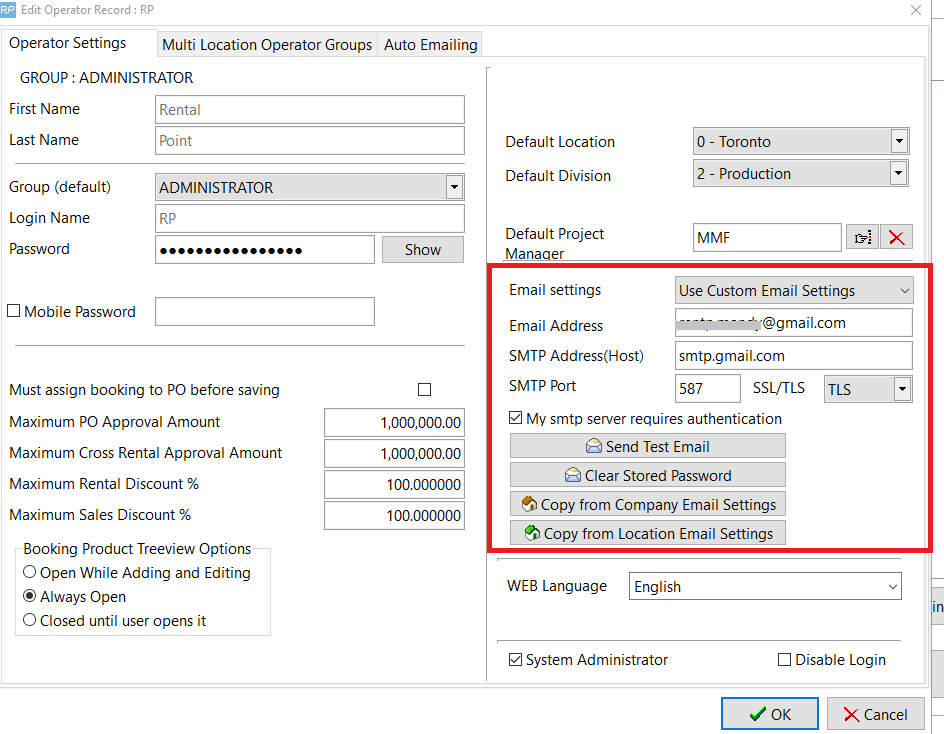
Email configuration can be found in each operator record per screenshots below.
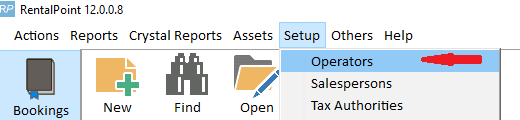
Double Click the operator Login Name to edit the record
Discontinued configuration on RentalPoint Cloud Servers
Per our recent email to affected users; on the 8th December 2020, the third party service used in the configuration below will be closed down in its current format, and should therefore be removed from any operator records that currently use it.
If you are using the settings below in your RentalPoint email configuration, please take a moment to review the other configurations outlined, then contact support@rentp.com with the necessary information (i.e. which email system you are using, and if you have 2FA turned on), should you need further assistance.
OR
Outlook
- If you have Outlook configured on your workstation/server account, then you can leave email configuration in RentalPoint blank in order to avail of your Outlook settings.
- When you leave your email settings in RentalPoint blank, RentalPoint will look to the outlook settings on your workstation and use those

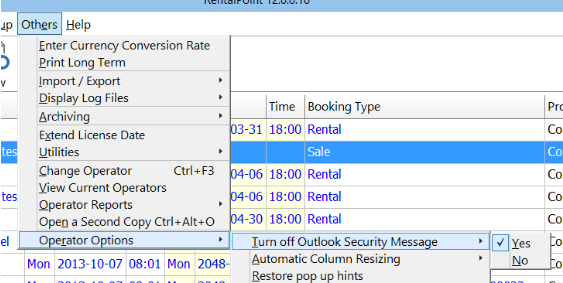
Each operator has an option to turn off the Outlook Security Message pop-up that appears before each email sent...
Office365
 Your company setting in Office 365 email accounts for Multi-Factor Authentication (MFA), also known as Two Factor Authentication (2FA) , will affect your email configuration in RentalPoint. If in doubt about your setting, please check with your IT Company / person. Alternatively, try the configuration settings below 'without MFA' and consult your IT person if they do not work for you.
Without Multi-Factor Authentication (MFA)
Option 1:
- If you have Outlook configured on your workstation to use Office 365, then no setup is needed. RentalPoint will use your Outlook settings

Option 2:
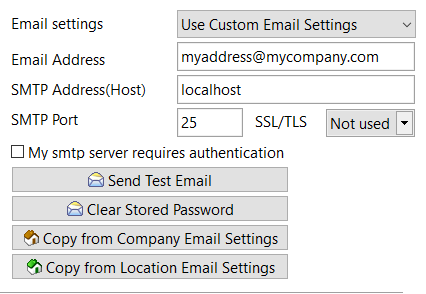
- Email Address: myaddress@mycompany.com {i.e. Full email address of the user}
- SMTP Server: smtp.office365.com
- SMTP Port: 587 TLS
- Tick the box for 'My SMTP Server requires authentication'
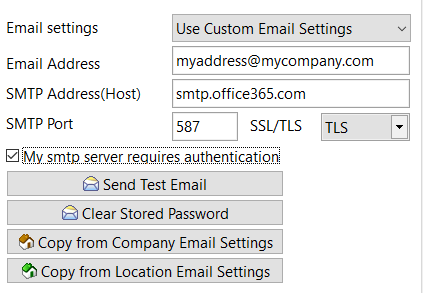

See password verification for next steps.
With Multi-Factor Authentication (MFA)
If you have MFA / 2FA turned on for your email then the above options will not work. Instead you'll need to use
"Option 3: Configure a connector to send mail using Microsoft 365 or Office 365 SMTP relay" outlined in the Microsoft document at this link: https://docs.microsoft.com/en-us/exchange/mail-flow-best-practices/how-to-set-up-a-multifunction-device-or-application-to-send-email-using-microsoft-365-or-office-365
This will take your IT Company / person some time to set up. RentalPoint support cannot perform this task for you. Once completed, your IT person can change the details in your RentalPoint Operator record to use your newly configured settings.
Google Workspace (G Suite)
 Your company setting for 2-Step Verification/Two Factor Authentication (2FA) will affect your email configuration in RentalPoint. Options 1 and 2 below require 'Allow less secure apps: ON' in your Google Account via myaccount.google.com/lesssecureapps
- If you are using 2-Step Verification/Two Factor Authentication (2FA), you will not be permitted to turn on less secure apps and will need to follow Option 3 below
- When Google discontinue the option to turn on less secure apps (target date March 2021), you will need to follow option 3 below
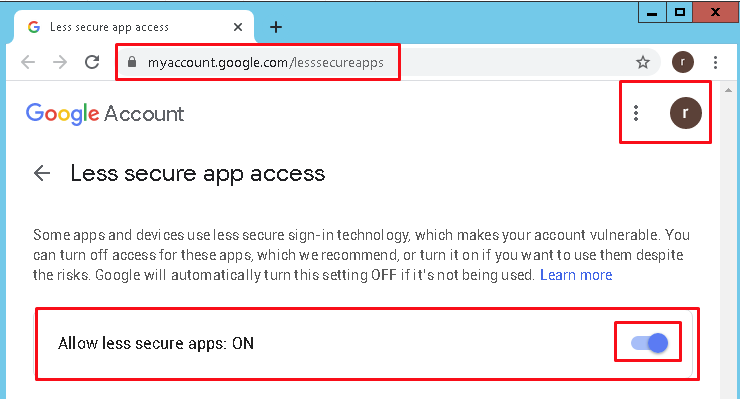
With 'Allow less secure apps: ON' in your Google Account
Option 1:
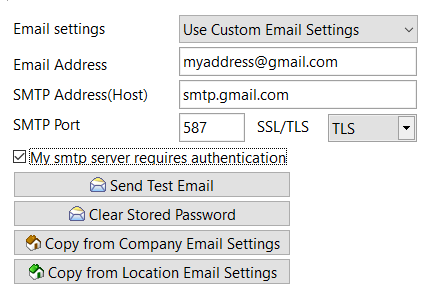
- Email Address: myaddress@gmail.com {i.e. Full email address of the user}
- SMTP Server: smtp.gmail.com
- SMTP Port: 587 TLS
- Tick the box for 'My SMTP Server requires authentication'

Option 2:
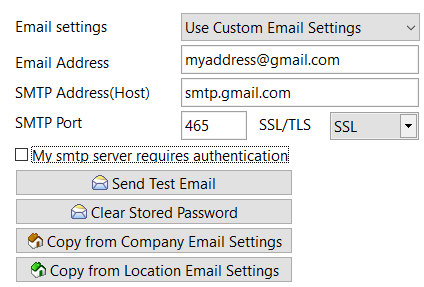
- Email Address: myaddress@gmail.com {i.e. Full email address of the user}
- SMTP Server: smtp.gmail.com
- SMTP Port: 465 SSL
- DO NOT Tick the box for 'My SMTP Server requires authentication'

When using 2-Step Verification/Two Factor Authentication (2FA)
Option 3:
How to confirm 2-Step Verification is already turned on:
1. Configure your operator record for Gmail using a valid gmail address and the following settings (see email configuration above for complete steps to access this record)
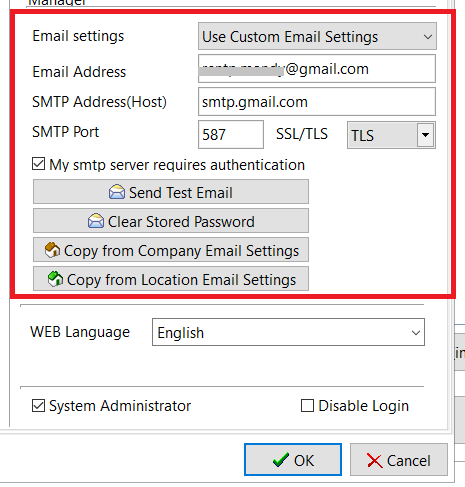
2. Click  to save the details
3. Then edit/open the operator record again and click 
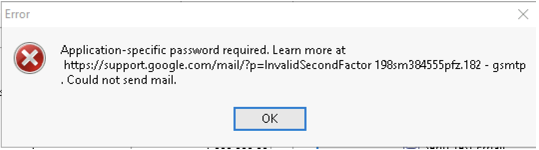
Either you will receive a test email from RentalPoint in your inbox confirming that your configuration is complete and working successfully, OR ....
You will get an error something like the screenshot below. If you get this error message, then you know that your account has 2-Step Verification turned ON (effectively 2FA by another name).
How to set up 2-Step Verification/Two Factor Authentication (2FA) on Google Suite
 If you don't have an option in your Gmail settings to turn on 2FA, your administrator will need to provide this option from your company's GSuite Admin account for the domain you are using < Google info on how to turn on 2FA for your domain account >
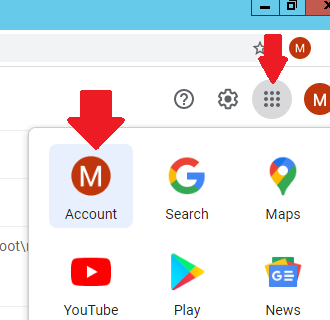
From your Gmail account...
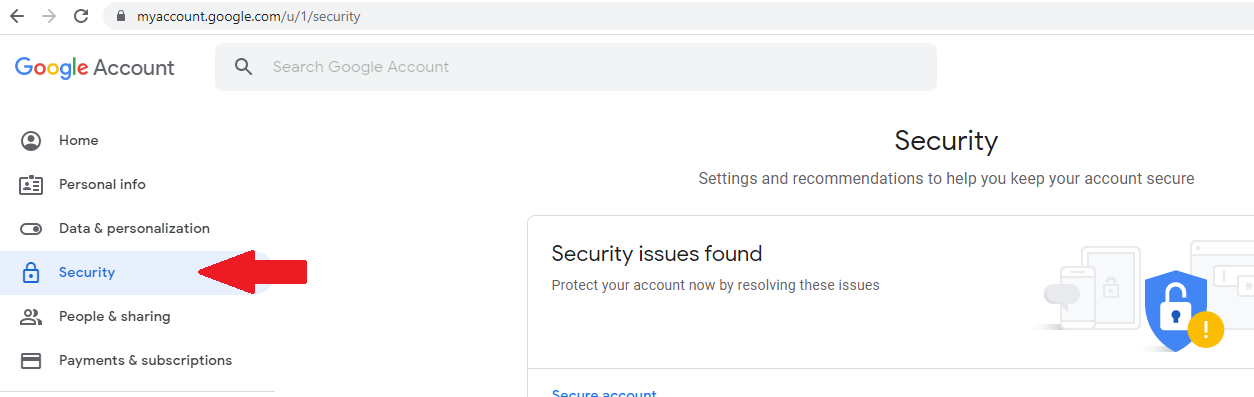
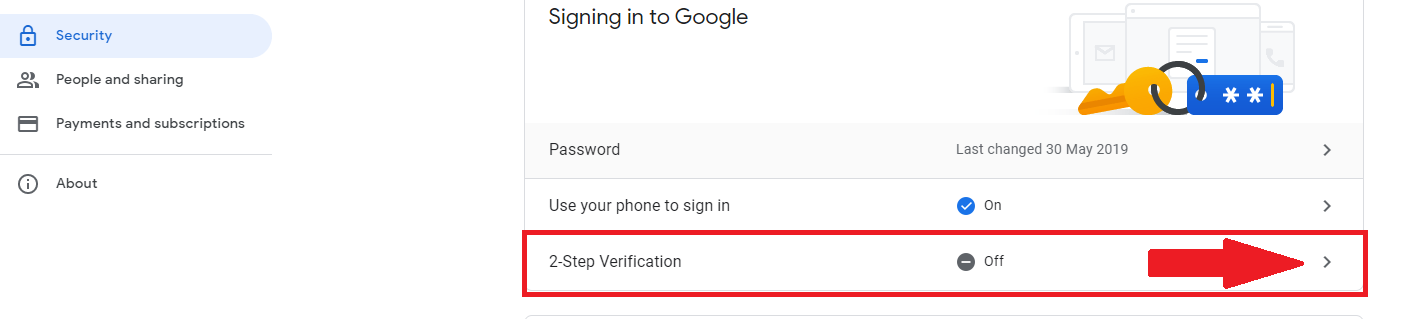
Under the security tab, scroll down to find the 2 Step Verification option
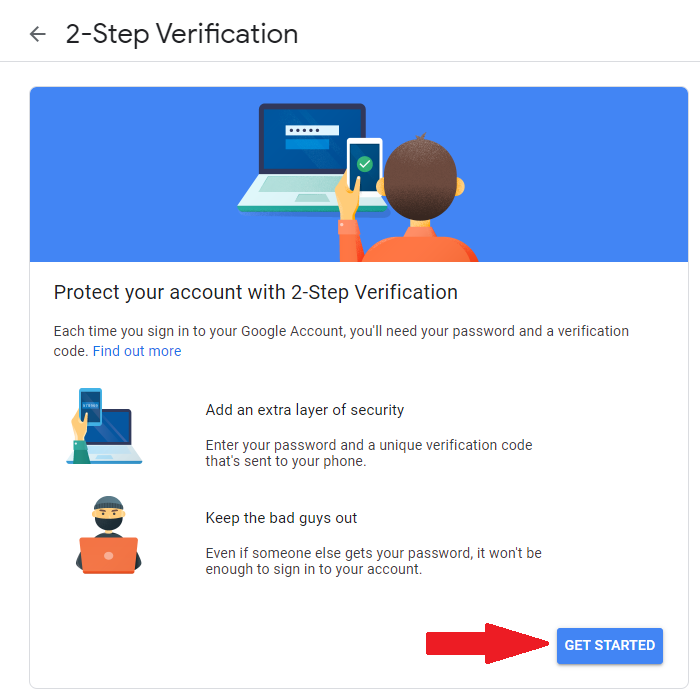
Follow the prompts to set up 2 Step Verification
Once set up is complete, move on to setting up an App password.
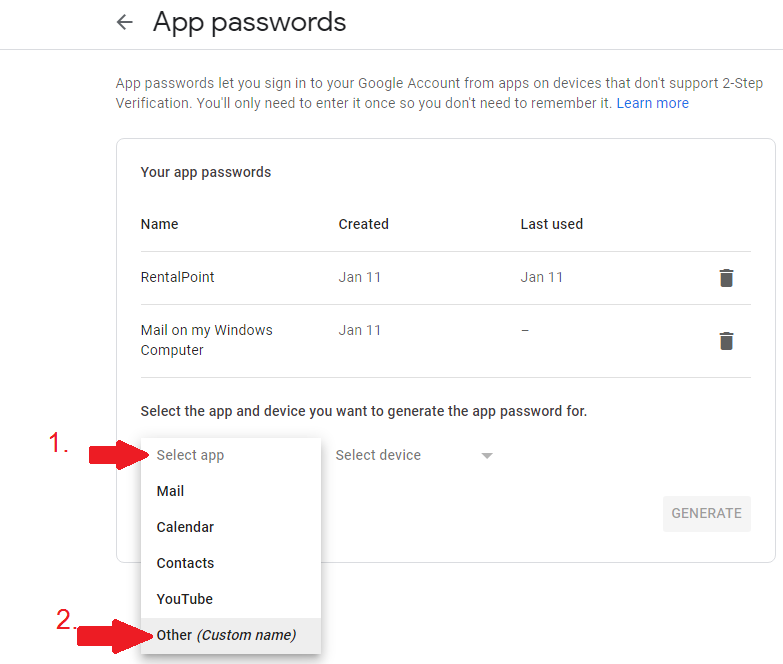
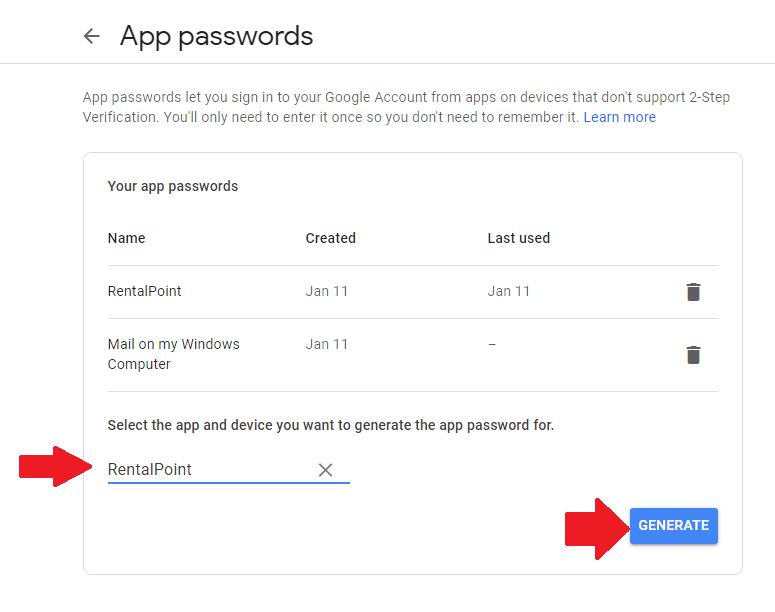
Setting up an App Password
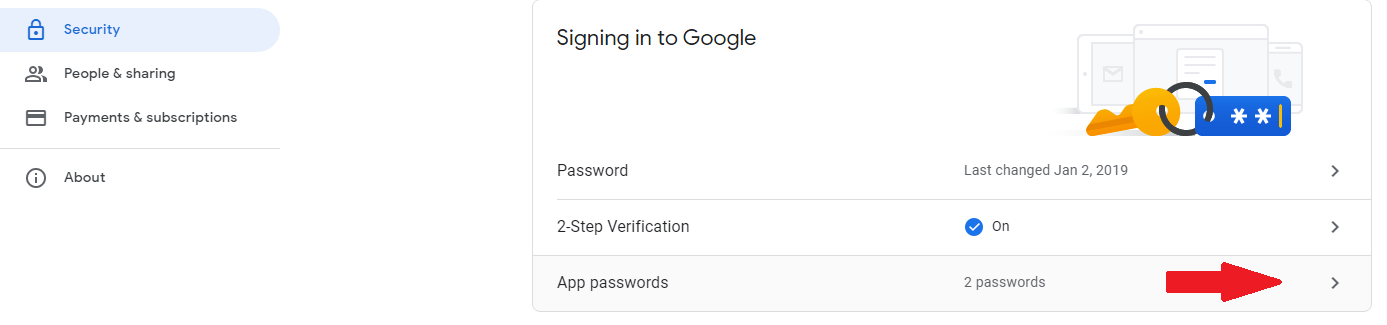
Under the security tab, scroll down to find App passwords and follow the prompts (if you have trouble finding this section, see instructions under setting up 2FA above)
In RentalPoint, Go to Setup-->Operators and edit the operator record
- Email Address: Full email address of the user
- SMTP Server: smtp.gmail.com
- SMTP Port: 587 TLS
- Tick the box for 'My SMTP Server requires authentication'
- Clear the stored password
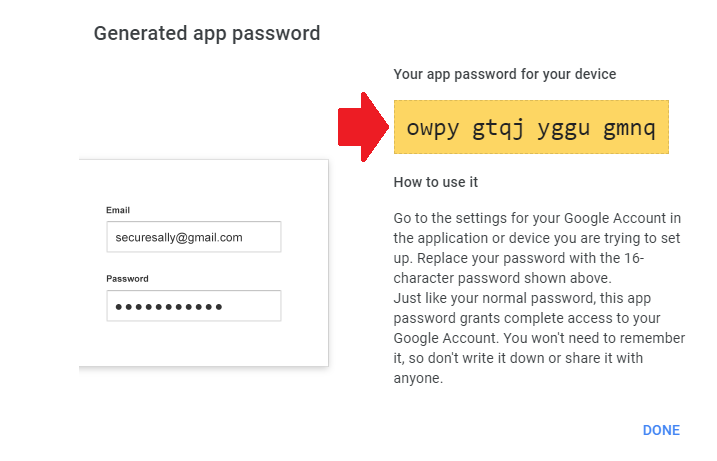
- SAVE the record then log out of RentalPoint and back in again, then follow the steps in Password Verification below using the app password you generated above instead of your regular email password. The app password is specifically for use in RentalPoint operator settings, when logging into your email you will still use your regular email credentials.

Password Verification
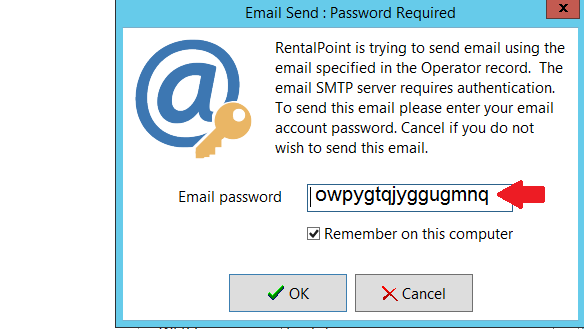
- When password verification is needed it will be be launched when RentalPoint attempts to send the first email using new configuration settings; the user will be prompted for their password, which can be saved for future use.
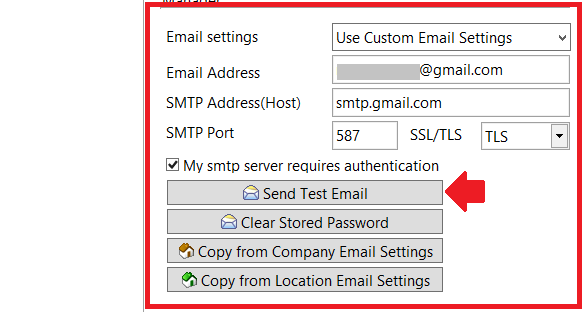
- Alternatively, once you have saved your email configuration settings, click 'Send Test Email' for testing and password verification
- If you have changed your email password for any reason, use the 'Clear Stored Email Password' option outlined below in order to re-activate Password Verification.
If using Gmail 2 Step Verification, then enter the App password(see steps above), otherwise use your regular email password. Click Remember on this computer and OK.
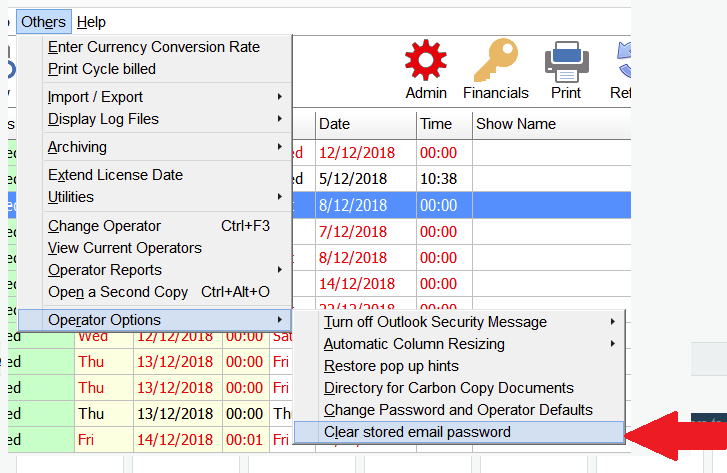
Clear Stored Email Password
The option below clears the stored email password for the current RentalPoint Operator
Distribution Lists & Auto Emailing
