The options below only apply to systems with the Multi-location module
Multi-Location in RentalPoint
When using a RentalPoint Multi-Location license, most features simply become 'location' aware as outlined below:
- On all multi-location systems, location 0 is your main location which is usually your current main office. Regions can also be used to further organize locations.
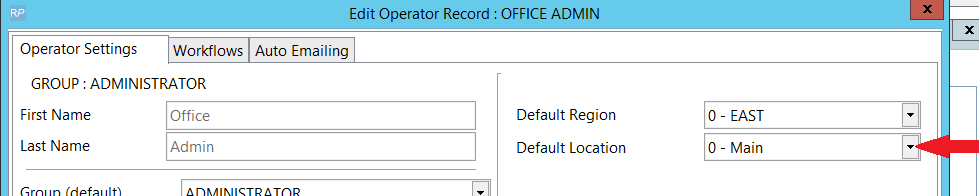
- Each user record has a default location (per settings in their operator record), so that on login the system is set to display the bookings at the default location assigned. Multi-location security is also available
 .
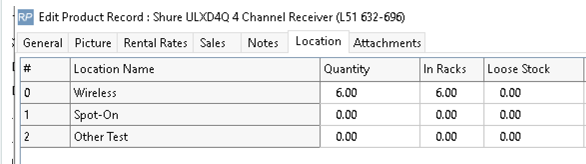
. - Inventory/Equipment becomes location aware and there are a new changes in how equipment is displayed.
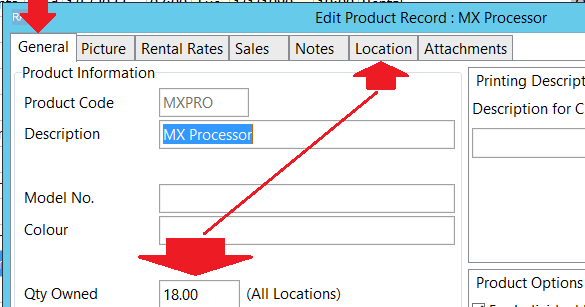
- The Qty Owned field once you have moved to a multi-location system, becomes read only and not editable like it is in your current system. This is because a new 'Location' tab appears and this displays the number of items at each location.
- The location tab, now keeps track of where products are.
- Figures here can still be updated from one way transfers that may not have been completed yet. On completion of a one way transfer (i.e. check out from source and check in to destination OR archive of transfer booking), the stock qty for the source location is decremented while the stock count for the receiving location is incremented. Until the transfer is completed, it will show up on the running balance for stock movement.
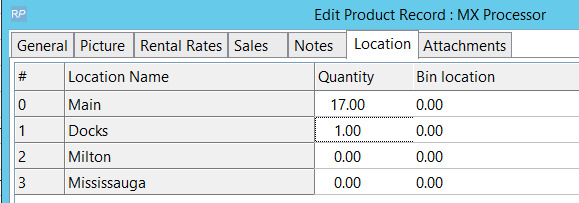
- Stock packed in racks will also show here
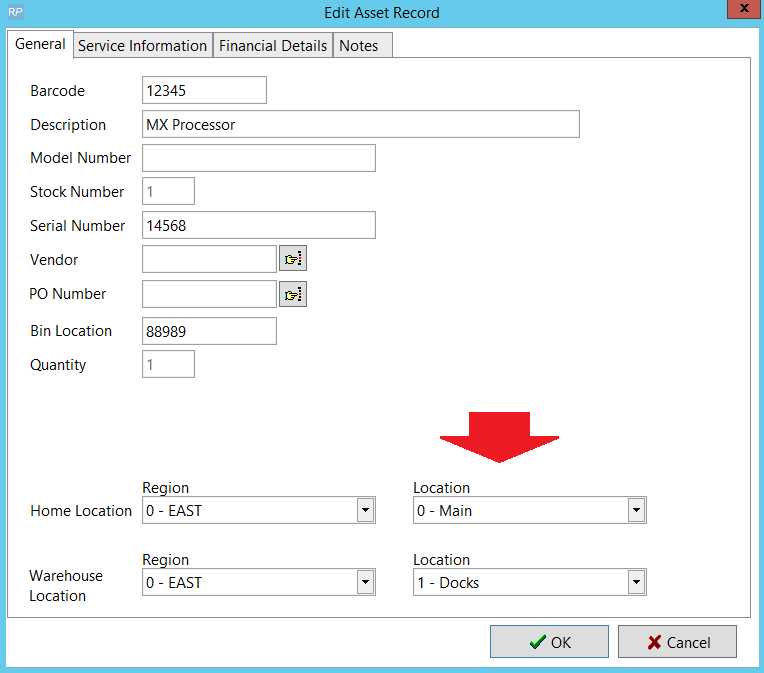
- An asset record also becomes location aware showing both a 'Home Location' (i.e. ownership), and a Warehouse Location (i.e. current location of the asset).
- Figures here can still be updated from one way transfers that may not have been completed yet. On completion of a one way transfer (i.e. check out from source and check in to destination OR archive of transfer booking), the stock qty for the source location is decremented while the stock count for the receiving location is incremented. Until the transfer is completed, it will show up on the running balance for stock movement.
- The Qty Owned field once you have moved to a multi-location system, becomes read only and not editable like it is in your current system. This is because a new 'Location' tab appears and this displays the number of items at each location.
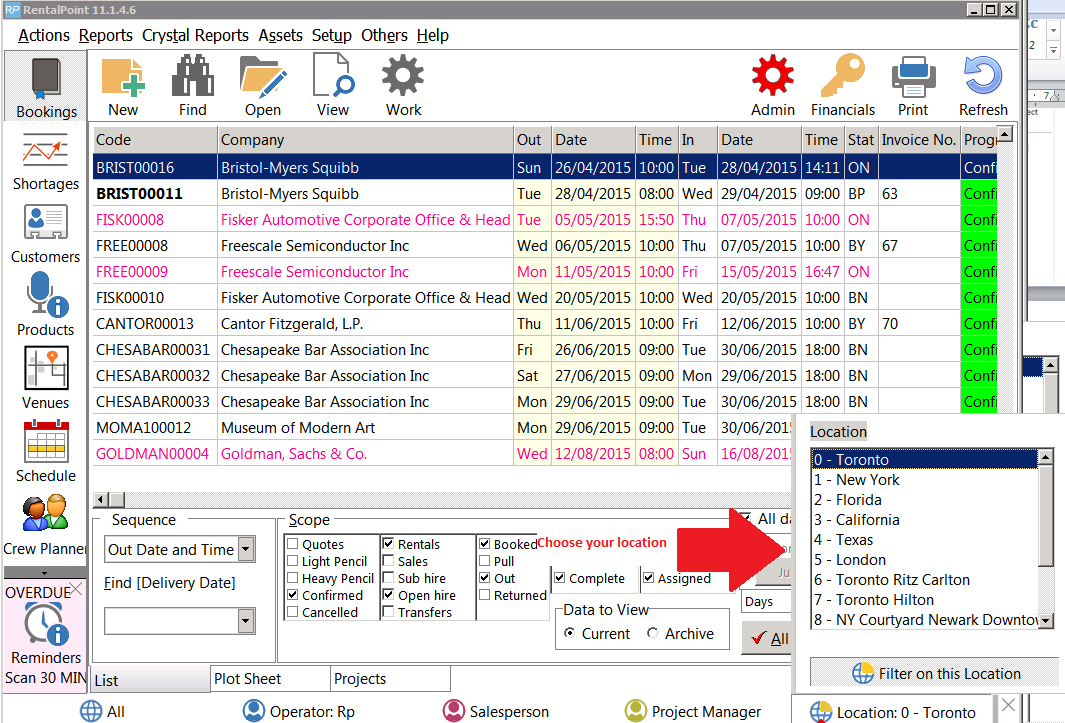
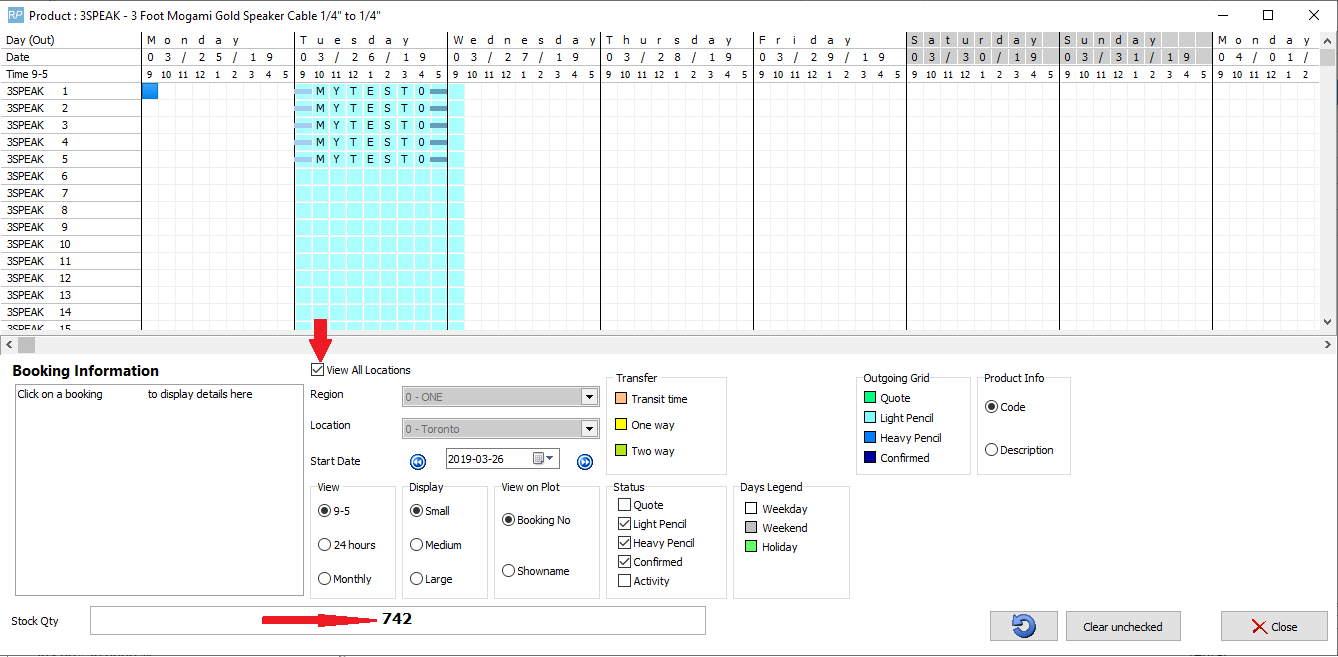
- The Booking Grid Scope will show an extra option to move between locations (per the screenshot below).

- The ability to move between locations to view data is further controlled by operator privileges
- Each booking becomes location aware so that inventory can be tracked to and from that location.

- The Equipment grid can be set to show consolidated location quantities or only show quantities available for the selected location.
- Inventory can be transferred to and from locations using Location Transfers and/or to and from specific bookings via Asset Transfers
 .
.


Upgrade from Single Location to Multi-Location
Upgrading from a single location to a multi-location system will require an upgrade to your license file. Please contact support@rentp.com for more details. Once you have received your license file update, follow the steps below:
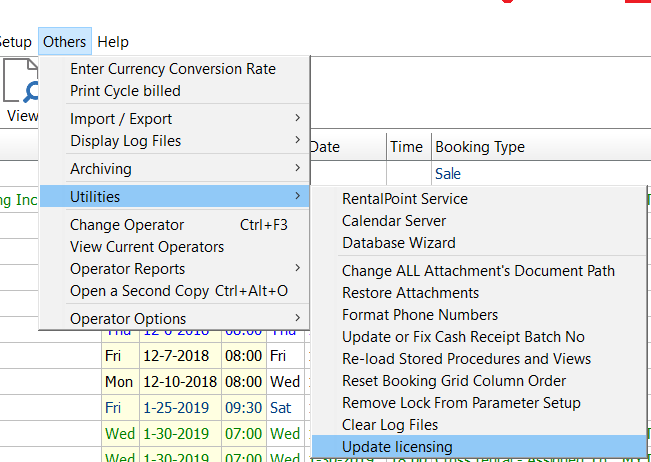
Step 1: Copy the new multi-location license file to your RentalPoint\sys folder on each machine that has RentalPoint installed on it OR have each user execute the other-->utilities -->Update Licensing option from the RentalPoint main menu
Step 2: Set up your new locations (see Setup Locations menu option above for more information)
Step 3: Convert Location Quantities
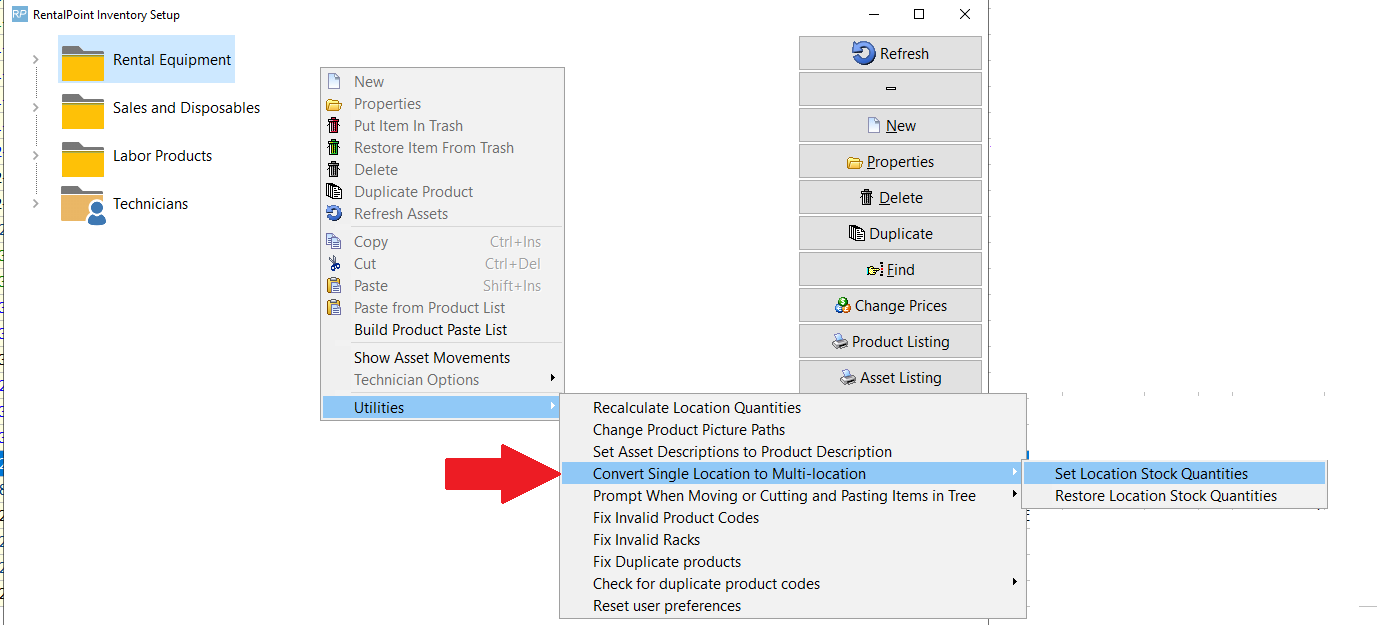
- Open Inventory Setup (F10)
- Right click, select Utilities --> Convert Single Location to Multi-Location --> Set Location Stock Quantities as shown below.
- Then enter the password provided to you with your new license when requested
This utility updates all products in your system to be at the first location entered in Setup Locations. You can now add new products to a new location, and transfer products to other locations, as well create bookings for each location you have entered. This utility should ONLY be run immediately after the system is changed to a multi-location system. If it is run by mistake there is a Restore Location Stock Quantities in the same area
Setup Locations
This area allows you to set up different locations for your company. Locations are useful to track inventory, revenue and bookings. Click Add New to add a new location to your company. To set up a main office for your company highlight the location that you would like to use and click Main Office.

Regions Setup
Enabling Region Support allows you to manage your locations more effectively. As an example, you have several locations in the Eastern Time Zone, you can group them together within a region.
Enabling Region Support allows you to manage your locations more effectively. As an example, you have several locations in the Eastern Time Zone, you can group them together within a region. (Note: Regions support is only available if you have the multi-location version)
To use the regions functionality it must first be enabled. Go to the Parameters option of the setup menu. Open Operational #174 - Enable Region Support. Set this to Yes and restart RentalPoint.
Once you have restarted RentalPoint, the option for adding regions will be enabled. When RentalPoint is run again you will notice a region scope option at the bottom as well as a new option under the setup menu that allows you to configure regions.
To configure the regions, select the Regions option from the setup menu. By default the system will create a region for you, you can change the name to make it more descriptive. Once a Region has been added to the system it can be renamed but not deleted.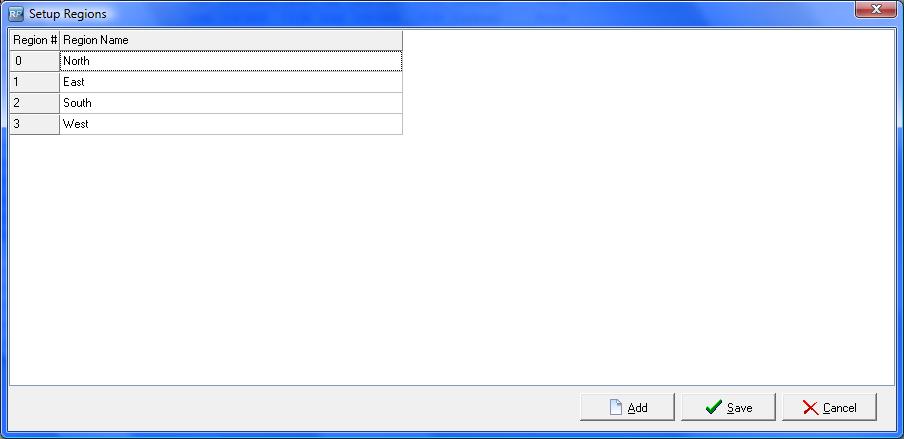
After entering Regions, go into Setup Locations and assign each of your locations to a Region.
Please note, once a Region has been created, you can rename it but not delete it. Bookings and other information in the system will still be linked to the region for reporting information.
Scope and Searching
The secondary scope in RentalPoint can also be sorted by regions. If you select a region from the secondary scope, any bookings that are assigned to that region, or to the locations in that region, are displayed. The secondary scope applies to other areas of RentalPoint, including the Shortages List, Products, and Purchase Orders.
When creating a booking, you can select a region from the list. Only the locations associated with that region display in the location drop down list.
Equipment Availability
Searching for equipment based on a region is quick and easy. Enabling Operational Parameter #127 – Equipment Search Location Sensitive displays an extra search tab in the equipment grid of the booking. Select the region, then continue entering your equipment as normal. Availability is based on location but the tree view and the search are based on the quantities in the region.
Technicians
When entering a technician, the region in which they work can be specified. Then when a booking is created only those technicians that work in the region specified in the booking can be selected.
Custom Printing
When printing custom templates throughout the system, you can specify region specific templates. For example, your Eastern region may have different printouts then your Western region. Using the custom printing option, you can easily organize your templates, so the Eastern region does not accidentally use a Western region template.
Reports
Several reports in the system, such as the Booking Cross Section, Invoice Register and Revenue Report can be sorted by regions, making accounting duties much more simplified.
Consolidated Product Availability (RentalPoint v12)
Some companies may want to consider the overall availability in addition to the availability at a specific location when adding equipment to a booking.
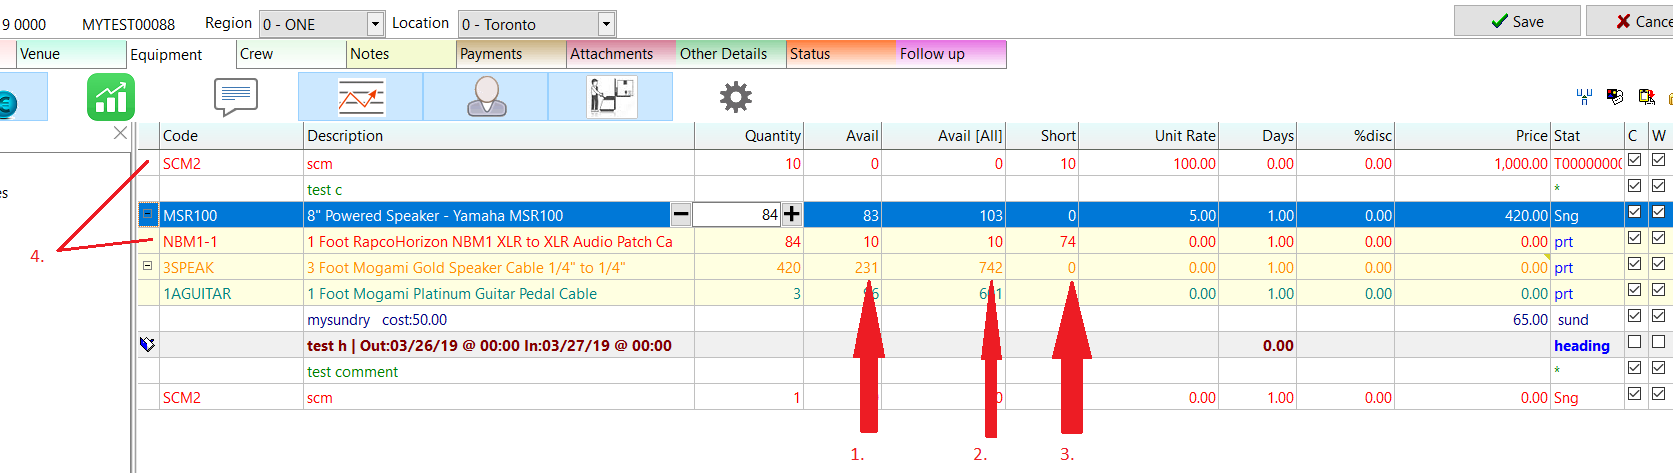
To enable this option open Operational parameter #6 and select View total availability for all locations from the Multi-location options tab.

Once enabled the availability at all locations can be shown by clicking the  button at the top of the equipment grid in the booking. This is a toggle option, so you can click to activate/de-activate calculation of availability at all locations.
 In Use (i.e. Toggle ON - see screenshot above)
- The column Avail still displays the availability at the current location
- The Avail [All] column shows the overall availability at all locations.
- The shortage amount will be based on the availability at all locations.
- When a shortage occurs at the current location ONLY, the line will display in orange as a warning, but the short column will remain at zero.
- If the line quantity is increased to cause a shortage at all locations then the line will show in red.
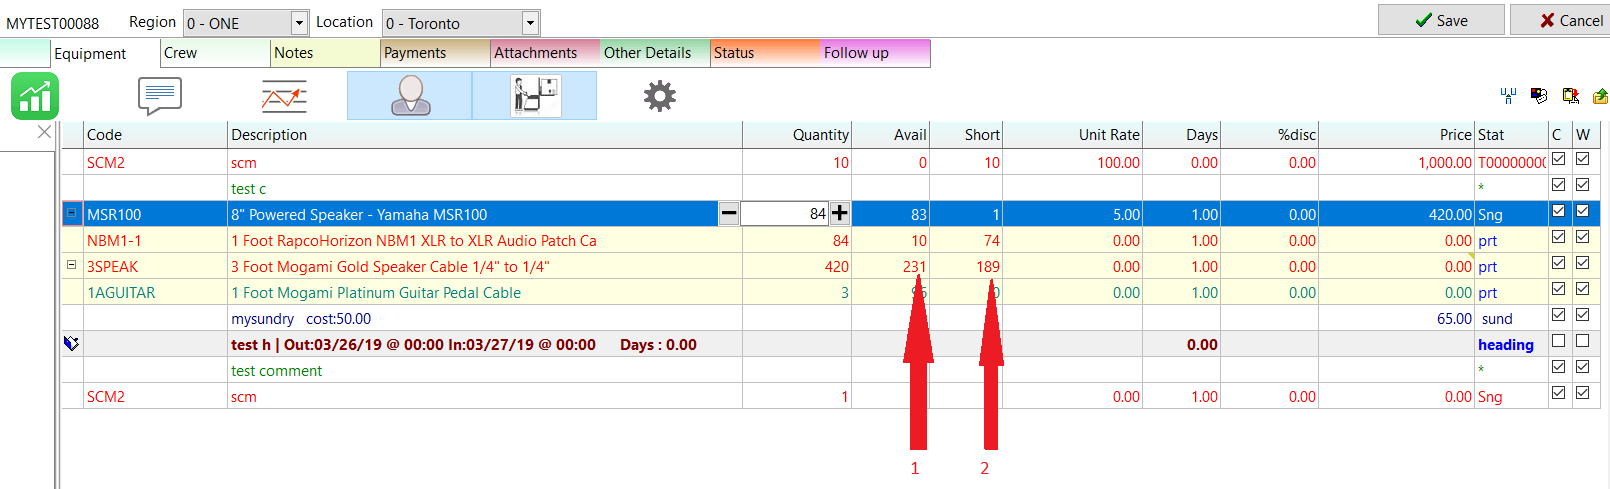
 NOT in Use (i.e. Toggle OFF - see screenshot below)
- Availability is calculated and displayed for current location only
- All shortages show in red
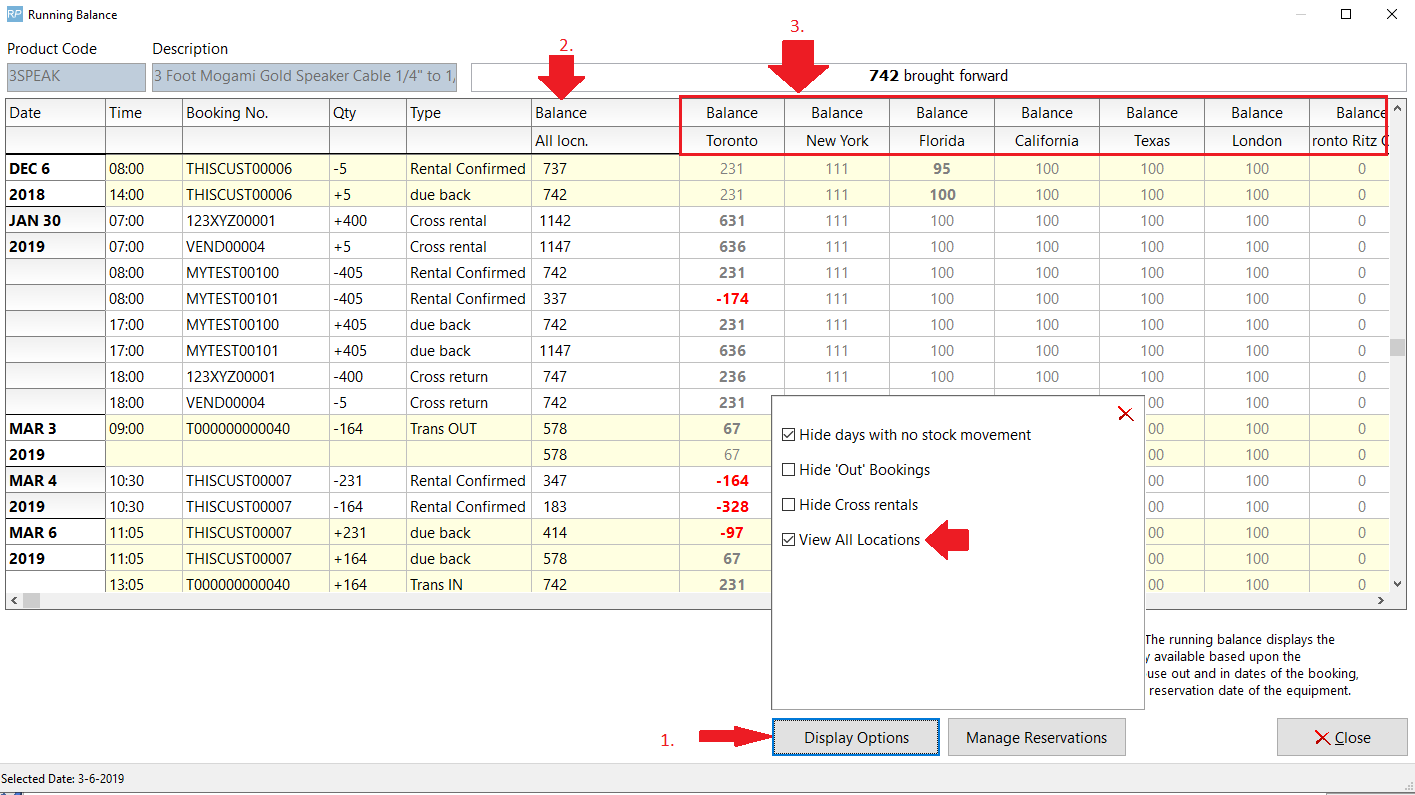
Running Balance
- For running balance enable the View All Locations option by clicking Display Options.
- The first balance column will start with the overall stock quantity and will be affected by all the transactions at all locations.
- Each separate location will start with the balance at that location and only be affected by the transactions at that location.
Plot Sheet
On the plot sheet the View All Locations checkbox will again display the overall stock and all transactions will appear on the plot sheet.
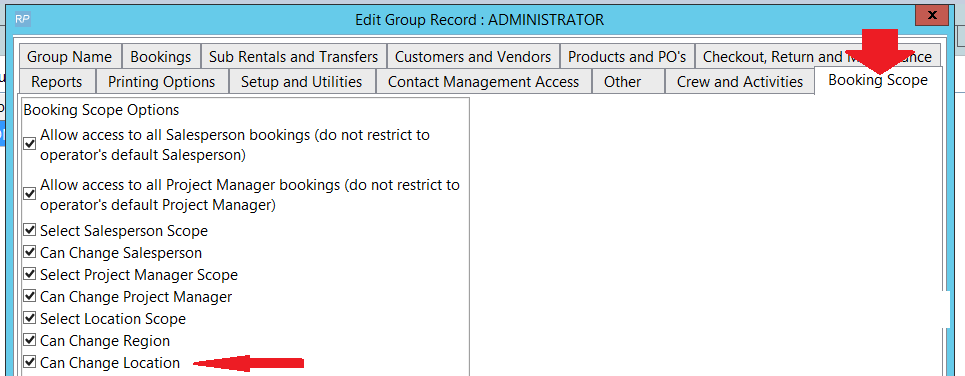
Multi-Location Security
When using the multi-location module, RentalPoint offers the ability to assign different access rights for the SAME operator at each location.
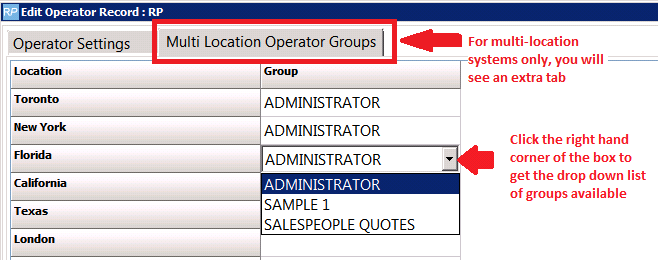
When using RentalPoint, Operator privileges will be applied on a location basis entirely dependent upon the location the user has selected.