RentalPoint Fast Reports at a Glance
Fast Report has been integrated into RentalPoint in order to add flexibility to output documentation and report generation. Unlike RTF templates where you could only use a certain set of data, with Fast Report you can use any data from the RentalPoint Database to create your personal templates.
As we transition to Fast Reports, users will have the option to use both report outputs in RentalPoint. There are now two menu options, Print and Print [Fast Report]
- All the main functionality of Fast Report is integrated into RentalPoint, so in order to use the templates of Fast Report you do not need any additional licensed software. All you need is a PDF file viewer program, which is freely available!
- Fast Report templates are NOT STORED in the DOCS folder as RTF templates, so constant access to this folder is NOT needed. Instead, when you import a Fast Report template to Rentalpoint, it is STORED IN THE DATABASE.
- The main types of Fast Report templates will be available when you install RentalPoint v11.0.8.0
- You can download any new Fast Report Template to Rentalpoint. See ‘How to Load New Fast Reports’ for further details.
Enable Fast Report Option in RentalPoint
- Open Parameters setup.
- Go to Operational parameter # 84 and select “Both” (Default option) to use Fast Reports and RTF or Fast Report/RTF only.
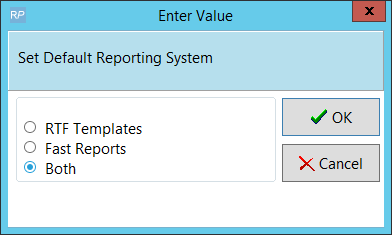
- Log out of Rentalpoint and back in again
- Fast Report Options will now be available throughout Rentalpoint.
Print/Preview Fast Reports
There are several ways to access the print options – see illustrations below
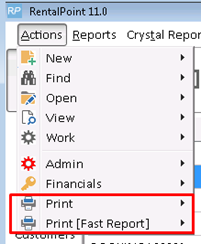 | From the Rentalpoint Main Menu, click Actions
|
When merging the report, choose the ‘preview’ option. This function provides the user with the ability to view and make changes to the merged document before sending it off to clients.
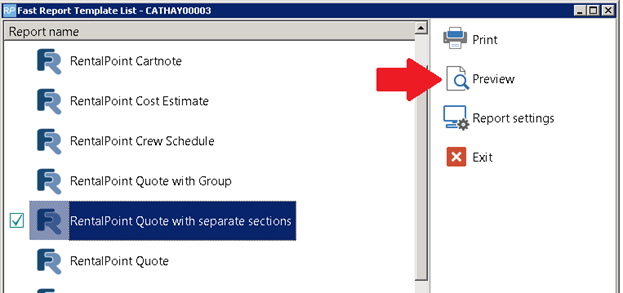
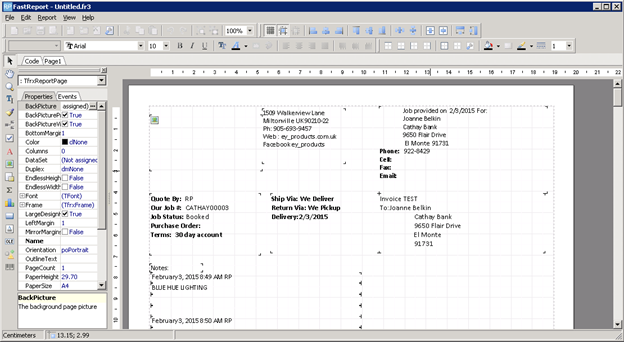
Click the edit button to make slight changes to your ouput IF NEEDED
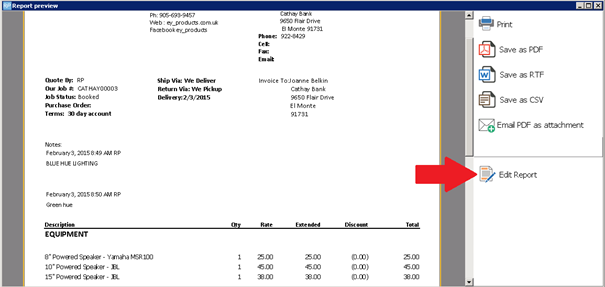
Click X to close and YES to save your changes
 |
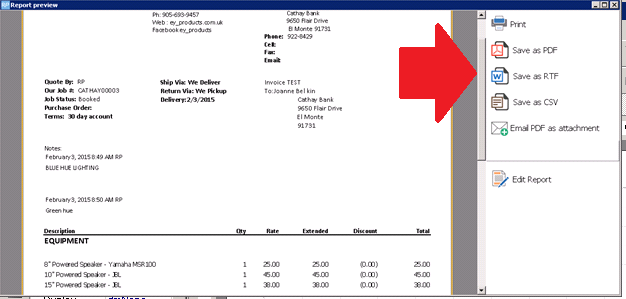
Then choose how you would like to save/send your file.
Load New Fast Reports
4. How To Load New Fast Reports
- In order to load the new FastReport template into RentalPoint:
- First save your new Fast Report template to any folder and remember the path to it. The default path will be DOCS\FastReportTemplates
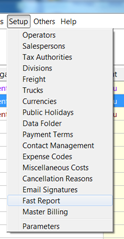
- From the main Rentalpoint menu, goto setup-->Fast Reports.
- Click “Load from file” button and browse to find the template that you saved earlier.
- Then ‘Double Click’ on your template and it will appear in your list.

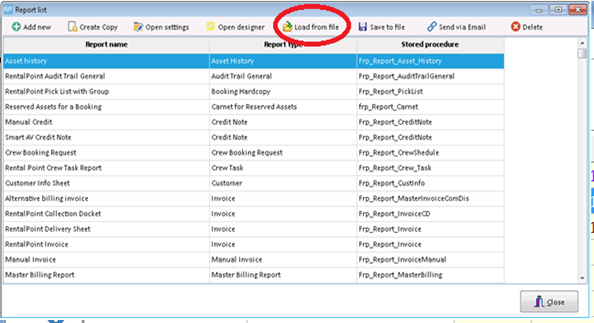
The Report List Window
The Report List window this is the main window for working with Fast Report templates. Here we can create new templates or edit existing ones, and also import or export templates:

- Add new – Adds new blank report template
- Create Copy – Copies selected report template
- Open settings – Opens template settings
- Open designer – Opens template designer, you can add data fields there or delete them.
- Load from file – Loads template to RentalPoint
- Save to File – Saves FastReport template to selected folder
- Send via Email – Send your template via Email
- Delete – Deletes selected template
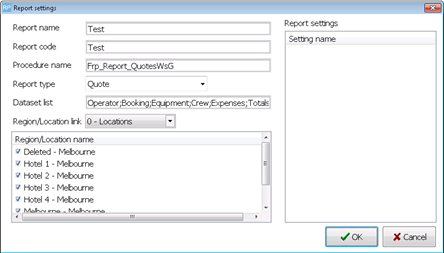
Add New - Adds new blank report template
Creating a new template requires knowledge of Fast Report functionality, Details can be found on the Fast Report website. Knowlege of Fast Reports is assumed when covering the details below.
To create a foundation for your future report, click ‘Add New’ button, then fill in the blanks as per field descriptions below.
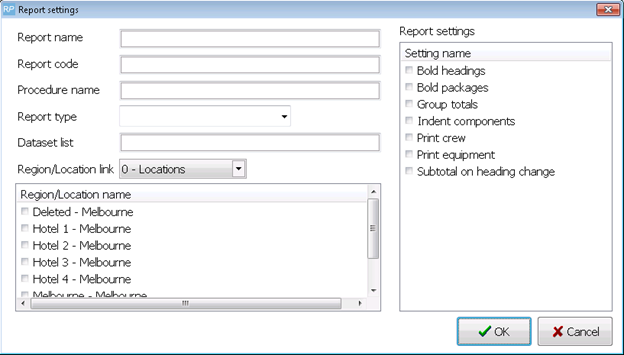
Field Descriptions:
- Report name – in this field, you must specify the name of your future template (this name will appear in the program as a template name);
- Report code – in this field, you must specify a unique code that will be assigned to the report. This code will be used by the program to recognize your template to import or export files (it will not be displayed anywhere);
- Procedure name – in this field, you must specify the stored procedure name from Data Base. You can create a new one or just copy the same;
- Report type – in this field, you select the type of your future report. Depending on the type of the template, the program will place it in the correct form of the program;
- Dataset List – in this field, you must specify all the data set names that the stored procedure returns (for example: Operator;Credit;Customer;Booking;Equipment... so on);
- Region/Location Link – in this field, you need to select the regions and locations that will be available to your report;
- Report settings – in this field, you can choose formatting options for your template.
- When all fields are filled just click Ok button. And our template appears in the list of templates.
Open settings – Opens template settings
The “Open settings” button allows you to view and edit Report settings in templates that were saved previously. Most often, this functionality is used to change the name of the report and the availability in the regions and locations.
Just click Open settings button, then in the window that appears, make your changes and click the OK button.
Open designer – Opens template designer, you can add data fields there or delete them

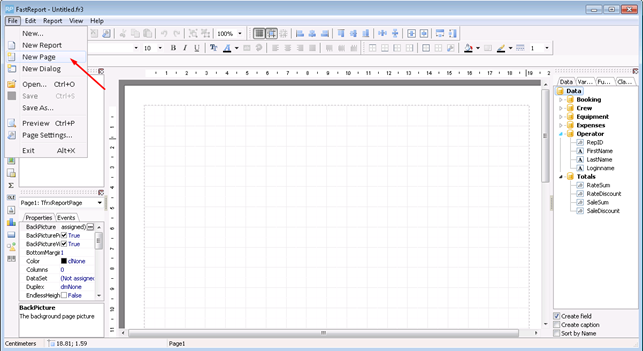
Creating a New Fast Report Template
Now we pass directly to the creation of the template. Please be aware that knowledge of Fast Report Design is necessary prior to proceeding with this help document, Details can be found on the Fast Report website.
Select the new template you just added and click the “Open designer” button.
And now we can begin to create our design template as per Fast Report Design functionality Details can be found on the Fast Report website.
Modifying an Existing Fast Report Template
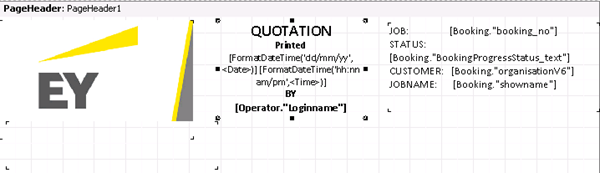
Consider a few simple examples on how to format an existing report/template. For this we chose Quote Fast Report.
If a user attempts to edit a default Fast Report, Rentalpoint will advise that this report is READ ONLY and cannot be modified. You can take a copy of the report to modify it; the copy function will also make a copy of the stored procedure used to run the report.

Replace an existing field on a Fast Report Template
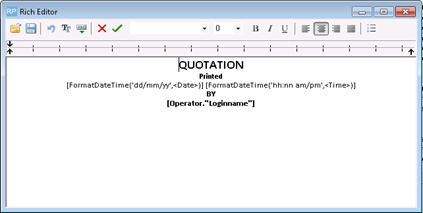
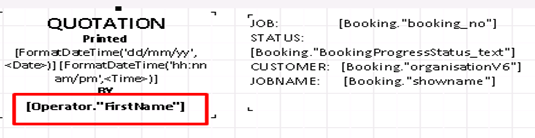
Let's change the [Operator.”Loginname”] field to the [Operator.”Firstname”] and [Operator.”Lastname”].
 First Double Click on the area of the field that we want to edit.Then select [Operator.”Loginname”] record and click Delete button on your keyboard.
Once we removed the field that we want to replace let's add new fields:
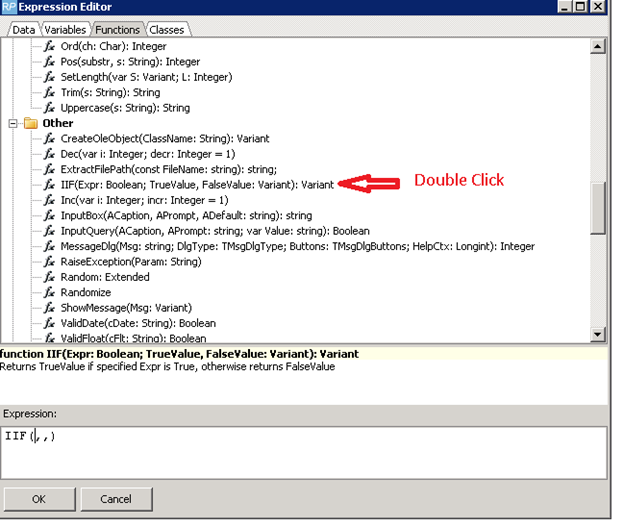
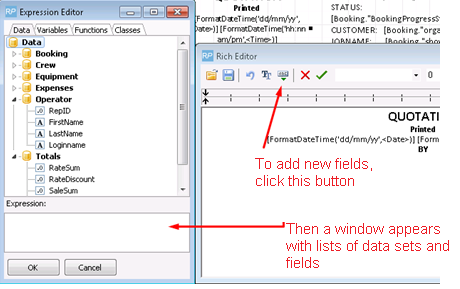 In the Expression Editor list (see prev screen shot), select the needed fields and click the OK button.
- In our option we need to select Operator/ FirstName and click OK
- Then select Operator/ LastName and click OK.
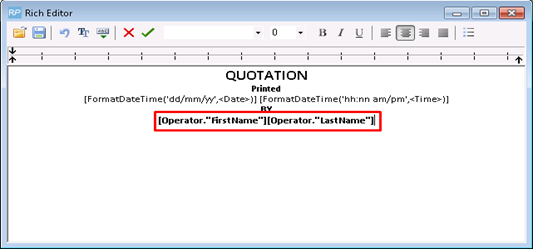
- We also have the ability to format the text as desired.
If you did everything correctly you should get this record:
After that you need to click OK button

And you should see the next image Note: (the full text is hidden under another field):
Now we need only save our report and try to print it to see that what we've got.
- To save the report, click File/ Save As.
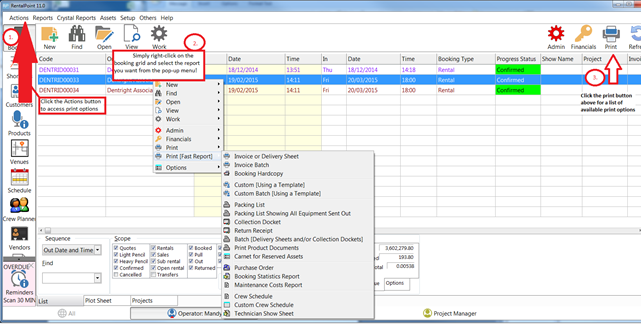
- Close all windows and go to the Booking tab.
- Right-click on any booking you would like to test your report on.
- In pop-up menu select Print [Fast Report]/ Custom [Using a Template], then choose our edited report:
And we see that our changes have been successfully applied in the report

Add a New Field to a Fast Report Template
 |
|
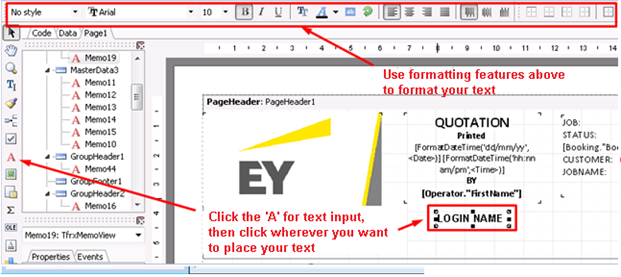
Let’s add for example the Login name and sign it. In this case the sequence is not important. You can add a caption for the field first, and then the field or vice versa.
For the purpose of this illustration, let’s add the caption first:
.
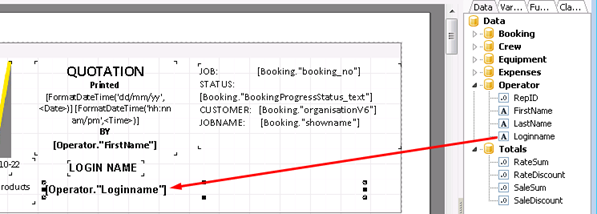
Now let's add the field itself with the data. You can simply select the desired field from the list on the right hand side, hold it and drag it to your report:
You can choose the size of the field and its location relative to the inscriptions.
Save our report. And let's print it out to make sure everything is working properly:

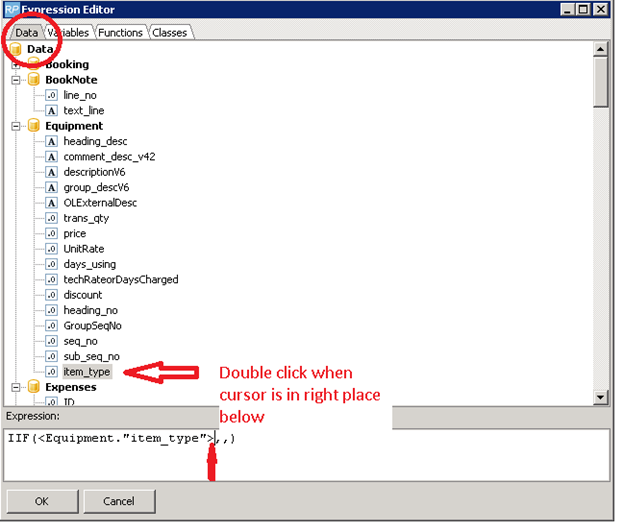
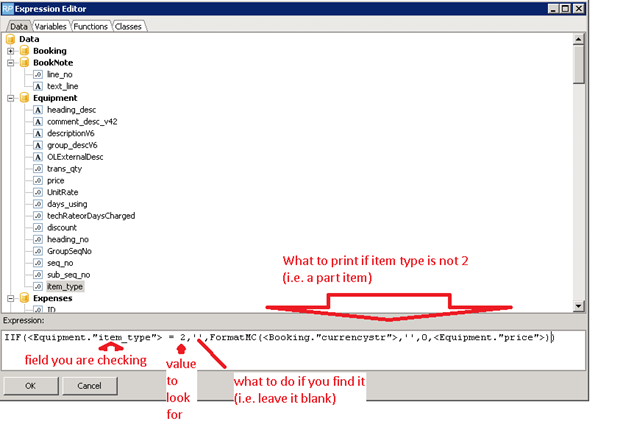
Use of IF statement in a Fast Report Template for line item fields
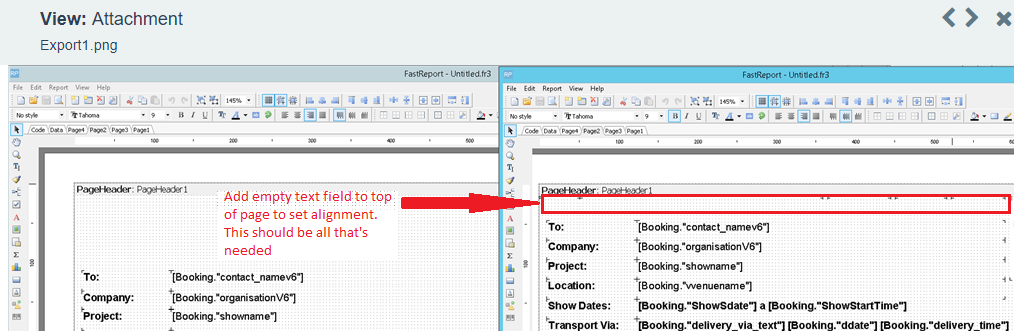
How to Fix Fast Report Alignment issues
In general RTF export uses tables for exported page layout. The layout is determined from the first field in the fast report.
If your report is exporting with alignment issues, adding a text line to the top of your fast report should resolve the issue. If not, check the vertical alignment of your fields via 'properties' instead of re-positioning the fields with your mouse. Should alignment issues persist please email support@rentp.com for assistance.
 Export to RTF
 Export to RTF
- Ensure Operational Parameter 208 'Show Fast Report export dialog before export' is set to YES
- Ensure your page header is free of alignment issues (see above section for more details)
- Print your Fast Report
Limitations of Fast Report Export when using Header/Footer option in Export:
- Page numbers should not be exported in headers/footers since the first page header/footer is used for all pages
- Headers/Footers will appear on every page in your exported document
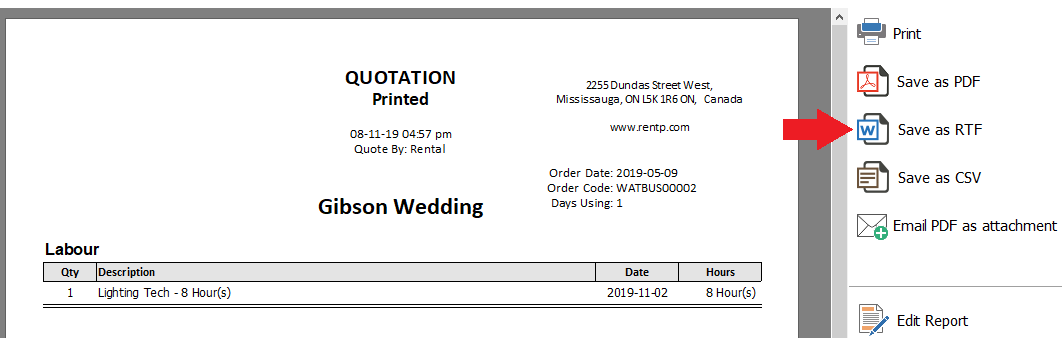
Click Save as RTF
Export with header/footer to show headers and footers in your Fast Report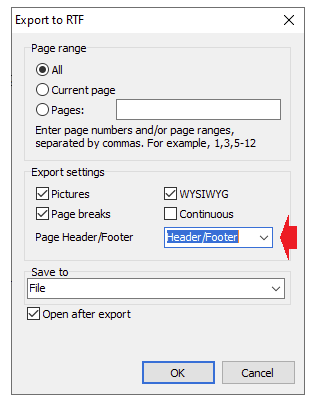


List of the Standard Fast Report Templates Available and How to Access Them
- RentalPoint Delivery Sheet – Right Click on a booking – Print[Fast Report] – Invoice or Delivery Sheet
- RentalPoint Collection Docket - Right Click on a booking – Print[Fast Report] – Invoice or Delivery Sheet
- RentalPoint Invoice - Right Click on a booking – Print[Fast Report] – Invoice or Delivery Sheet
- RentalPoint Quote with separate sections – Right Click on a booking – Print[Fast Report] – Custom[Using a Template]
- RentalPoint Quote with Group – Right Click on a booking – Print[Fast Report] – Custom[Using a Template]
- Customer Info Sheet – Right Click on a customer – Print – Print Selected Customer [Using a FastReport]
- Reserved Assets for a Booking – Right Click on a booking – Print[Fast Report] – Carnet for Reserved Assets
- RentalPoint Crew Schedule – Go to Crew Planner – Select a booking – Click on a Reports button – Crew booking request
- Crew Booking Request – Go to Crew Planner – Select a booking – Click on a Reports button – Crew booking request
- RentalPoint Project Invoice (Direct Billing) – Open Projects tab – Select a project – Press on a Project invoice button at the bottom – In opened window Check ‘Use FastReport’ – Click Ok
- RentalPoint Project Quote (Direct Billing) – Open Projects tab – Select a project – Press on a Project Quote button at the bottom – In opened window Check ‘Use FastReport’ – Click Ok
- RentalPoint Project Invoice Bill – Open Projects tab – Select a project – Press on a Project invoice button at the bottom – In opened window Check ‘Use FastReport’ – Click Ok
- RentalPoint Project Invoice – Open Projects tab – Select a project – Press on a Project invoice button at the bottom – In opened window Check ‘Use FastReport’ – Click Ok
- RentalPoint Project Quote – Open Projects tab – Select a project – Press on a Project Quote button at the bottom – In opened window Check ‘Use FastReport’ – Click Ok
- Master Billing Report – Open Reports (Top left of the main Rental Point window) – Financials – Master Billing Report
- RentalPoint Pick List with Group – Right Click on a booking – Print[Fast Report] – Pick List
- RentalPoint Cartnote – Right Click on a booking – Print[Fast Report] – Custom[Using a Template]
- RentalPoint Return Receipt – Right Click on a booking – Print[Fast Report] – Return Receipt
- RentalPoint PO – Go to POs tab – Right Click on a PO – Print – Print Order (FastReport)
- RentalPoint Sub Rental PO – Go to POs tab – Right Click on a Sub Rental – Print Order (FastReport) – Purchase Order
- RentalPoint Project Invoice (Alternative) – Go to Projects tab – Select Project – Press Project Invoice button – on appeared tab check “Use Fast Report”
- RentalPoint PackingSlip – Right Click on a booking – Print[Fast Report] – Packing list – Select session
- Alternative billing invoice – Go to Projects tab – Select Project – Press Project Invoice button – on appeared tab check “Use Fast Report”
- RentalPoint Collection Docket – Right Click on a booking – Print[Fast Report] – Invoice or Delivery Sheet
- RentalPoint Quote – Right Click on a booking – Print[Fast Report] – Custom[Using a Template]
- Asset history – Reports – Product Reports – Asset Reports – Asset History
- RentalPoint SalesPerson Commission – Reports – Financials – SalesPerson Commission
- RentalPoint Project Crew – Go to Projects tab – Select Project – Press Project Crew button
Table of Additional Fast Report Fields and Parameters that could be included to Stored Procedures
| Parameter name | Description | Parameter Type |
| Operator_id | OperatorId | varchar100 |
| BackCalcDaysCharged | BoolToIntinstallation_rec.CustomDocs_BackCalcDaysCharged | varchar100 |
| DefCurrName | installation_rec.localCurrencyName | varchar100 |
| Company_name | installation_rec.company_name | varchar100 |
| Company_addr1 | installation_rec.c_adl1 | varchar100 |
| Company_addr2 | installation_rec.c_adl2 | varchar100 |
| Company_addr3 | installation_rec.c_adl3 | varchar100 |
| Company_State | installation_rec.c_State | varchar100 |
| Company_Country | installation_rec.c_Country | varchar100 |
| Company_PostCode | installation_rec.c_PostCode | varchar100 |
| Company_PhoneCC | installation_rec.c_PhoneCC | varchar100 |
| Company_PhoneAC | installation_rec.c_PhoneAC | varchar100 |
| Company_phone | installation_rec.c_phone | varchar100 |
| Company_FaxCC | installation_rec.c_FaxCC | varchar100 |
| Company_FaxAC | installation_rec.c_FaxAC | varchar100 |
| Company_fax | installation_rec.c_fax | varchar100 |
| Company_fax | installation_rec.c_fax | varchar100 |
| Company_MainLogo | installation_rec.MainLogoFileName | varchar100 |
| DeliveryChargeBreakdown | BoolToIntinstallation_rec.DeliveryChargeBreakdown | varchar100 |
| Truncate insurance | BoolToIntinstallation_rec.bTruncateinsurance | varchar100 |
| UseEventManagement | BoolToIntinstallation_rec.bUseEventManagement | varchar100 |
| VATRoundingdown | BoolToIntinstallation_rec.VATRoundingdown | varchar100 |
| NoTaxOnSettlementDiscount | BoolToIntinstallation_rec.NoTaxOnSettlementDiscount | varchar100 |
| DiscountTermsPerc | installation_rec.bUseEventManagement | varchar100 |
| insurancePerc | installation_rec.insurance_perc | varchar100 |
| insuranceRateTwo | installation_rec.ins_rate_two | varchar100 |
| DamageWaiverCalculation | ordinstallation_rec.DamageWaiverCalculation | varchar100 |
| ApplyinsuanceToEverything | BoolToIntinstallation_rec.bTruncateinsurance | varchar100 |
| insuranceBasedonCost | BoolToIntinstallation_rec.insurance_Basedon_Cost | varchar100 |
| instWePickup | installation_rec.Term_wepickup | varchar100 |
| instWeDeliver | installation_rec.Term_wedeliver | varchar100 |
| instDelPickup | installation_rec.termdelpickup | varchar100 |
| instCollection | installation_rec.Term_collection | varchar100 |
| Term_EventManagementFeeTitle | EventManagementTerm | varchar100 |
| Term_ConfirmedTechCaption | installation_rec.zConfirmedTechCaption | varchar100 |
| Term_WhereToMeetTechCaption | installation_rec.zWhereToMeetTechCaption | varchar100 |
| Term_CrewChief | trimfinstallation_rec.term_CrewChief | varchar100 |
| Term_GeneralLocation | trimfinstallation_rec.term_GeneralLocation | varchar100 |
| Term_CrewCustomString | trimfinstallation_rec.term_CrewCustomString | varchar100 |
| Term_CrewCustomDateTime | trimfinstallation_rec.term_CrewCustomDateTime | varchar100 |
| Term_CrewCustomList | trimfinstallation_rec.term_CrewCustomList | varchar100 |
| Term_CrewCustomInt | trimfinstallation_rec.term_CrewCustomInt | varchar100 |
| Term_CrewCustomReal | trimfinstallation_rec.term_CrewCustomReal | varchar100 |
| Term_Projectmanager | installation_rec.TermProjectmanager | varchar100 |
| Term_Salesperson | installation_rec.TermSalesperson | varchar100 |
| Term_DriversLicense | installation_rec.DriversLicense | varchar100 |
| Term_Location | installation_rec.term_Location | varchar100 |
| Term_venue | installation_rec.term_venue | varchar100 |
| Term_invoicedate | installation_rec.term_invoicedate | varchar100 |
| Term_insuranceName | installation_rec.insuranceName | varchar100 |
| Term_labour | installation_rec.term_labour | varchar100 |
| Term_barcode | installation_rec.term_barcode | varchar100 |
| Term_LossesAndBreakages | installation_rec.Term_LossesAndBreakages | varchar100 |
| Term_CustomCreditNote | installation_rec.Term_CustomCreditNote | varchar100 |
| Term_BookingHardcopyTitle | installation_rec.TermBookingHardcopyTitle | varchar100 |
| Term_PATHistReportTitle | installation_rec.PATHistReportTitle | varchar100 |
| Term_Weight | installation_rec.Term_Weight | varchar100 |
| Term_Volumn | installation_rec.Term_Volumn | varchar100 |
| Term_hire | installation_rec.Term_hire | varchar100 |
| Term_Long_hire | installation_rec.Term_Long_hire | varchar100 |
| Term_postcode | installation_rec.Term_postcode | varchar100 |
| Term_State | installation_rec.TermState | varchar100 |
| Term_Strike | installation_rec.Term_Strike | varchar100 |
| Term_subhire | installation_rec.Term_subhire | varchar100 |
| Term_organisation | installation_rec.term_organisation | varchar100 |
| Term_adr2 | installation_rec.term_adr2 | varchar100 |
| Term_adr3 | installation_rec.term_adr3 | varchar100 |
| Term_RentalDiscount | installation_rec.Term_RentalDiscount | varchar100 |
| Term_SalesDiscount | installation_rec.Term_SalesDiscount | varchar100 |
| Term_TotalDiscount | installation_rec.Term_TotalDiscount | varchar100 |
| Term_CRDateRequired | installation_rec.Term_CRDateRequired | varchar100 |
| Term_CRReturnDate | installation_rec.Term_CRReturnDate | varchar100 |
| Term_CRTransportCollection | installation_rec.Term_CRTransportCollection | varchar100 |
| Term_CRTransportReturn | installation_rec.Term_CRTransportReturn | varchar100 |
| EventManagementFeeTitle | EventManagementTerm | varchar100 |
For example, I have a Procedure with next parameters:
ALTER PROCEDURE [dbo].[Frp_Report_CustInfo] (
@Customer_code varchar(8),
@Operator_id decimal(10,0),
@RepID decimal(10, 0))
So If I need to insert Company_MainLogo, I will:
ALTER PROCEDURE [dbo].[Frp_Report_CustInfo] (
@Customer_code varchar(8),
@Operator_id decimal(10,0),
@RepID decimal(10, 0),
@Company_MainLogo varchar(100))