What is Stripe?
Stripe is an online 3rd party software package that allows you to send Pay Online links to your clients. Your clients can use this link to pay with Visa, MasterCard or American Express. Payments made by your clients are automatically sent to your Stripe account.
Using Stripe in RentalPoint
Stripe must be configured before it can be used in Rentalpoint and is supported from Rentalpoint v11.1.5 upwards. Please see detailed instructions in section two of this document for “Configuring Stripe Integration”.
Once Stripe is configured, you can use Rentalpoint to send Pay Online links to your clients.
After invoicing a booking, you can send a Pay Online link via an email or within a custom RTF invoice.
- For an .rtf template the &STRIPELC& can be added to have the link appear in the document itself.
Sample document extract:
Follow the link to pay this invoice using Stripe! &STRIPELC&
(the insert field above will be replaced with the configured link when the invoice is generated)
An email to your client may look something like this, note the {PAYONLINE} link:

Sample recipient email ....

On clicking the link to pay the invoice, enter payment information:

On clicking  a brief confirmation will be displayed

and a payment receipt will be emailed to the address used

Payments made by clients via Stripe are automatically recorded in the RentalPoint Customer record

RentalPoint Cloud Hosted Setup
For RentalPoint Cloud clients:
- If you don't already have one, Create a Stripe Account
- Then simply set Accounts Parameter #23 to use the RP3 Stripe option along with the other settings
- If you don't know your RP3 url needed for the server name, please email support@rentp.com requesting the link.
- For multi location users, if you have separate Stripe accounts for each location, check 'use separate Stripe Accounts for Locations', then goto setup-->locations and enter Stripe keys under the Accounting tab for each location.

RentalPoint Local Installation Setup
When RentalPoint is locally install on your company server, PHP is used to communicate with Stripe. Therefore, Stripe Integration must first be configured before it can be used in RentalPoint. There are three main areas to configure, with each area detailed below:
Stripe Configuration on Ubuntu Server
Some users choose to have an Ubuntu server running apache2 with PHP 7.4 (or greater) to host the Stripe Integration front end for the customer

To configure this setup:
- First set up ODBC, SQL 2012 is acceptable: Installing MS ODBC driver for SQL Server
- Then install drivers for PHP 7.4: Installing MS Drivers for PHP on Linux
- Next, create a simple php file:
<?php
phpinfo();
?>
When you open this file under your browser, you can see all relevant PHP information

PHP Extensions should be all green if enabled correctly

Company Settings URL should match your ddns

See troubleshooting section for resolution to specific errors when testing Stripe
Stripe Configuration on Windows Server
Server Configuration involves downloading and installing some files that Stripe requires, then configuring the server roles and IIS.
1.1 Download and Install Required Files
First check your SQL Version - use 'Select @@version' in SQL Server Management Studio
- For this example SQL Version is 15.0.21017 SQL Server 2019
Then find the PHP driver for SQL Server 2019
- https://learn.microsoft.com/en-us/sql/connect/php/microsoft-php-driver-for-sql-server?view=sql-server-ver16
- Download PHP 8.2 (NTS version) – download https://windows.php.net/download#php-8.2https://windows.php.net/downloads/releases/php-8.2.5-nts-Win32-vs16-x64.zip
- Copy PHP files to C:\Program Files\PHP_82
- Add CGI to IIS in Server Manager


After you’ve completed this step, restart your server if it didn't restart automatically.
1.2 Configure IIS CGI Handler Mappings
Launch the Internet Information Services (IIS) Manager
In the IIS Manager locate your server name in the left hand Connections pane and click it. The right pane will refresh with the available features for your sever. Locate the Handler Mappings feature and double click to launch it.

In the Handler Mapping list, search for PHP_via_FastCGI. (Don’t worry if it doesn’t exist, we’ve included instructions on how to add it.)

If the PHP_via_FastCGI module mapping doesn’t exist, navigate to the Actions pane on the right hand side, click Add Module Mapping...

and enter the following information...
For older versions - the default PHP folder is located in C:\Program Files (x86)\iis express\PHP\v5.6, however this may differ from your installation. You can use any version of PHP – provided that you select the appropriate path and executable.
Click OK to save your changes.

There’s one final step that you need to complete (regardless if you added the mapping yourself, or the mapping was already in the list).
- Double click to open the PHP_via_FastCGI mapping.
- Click
 and configure the Mapping as follows:
 and configure the Mapping as follows:
Click OK on all dialogs to save the configuration, then proceed to Stripe Configuration.
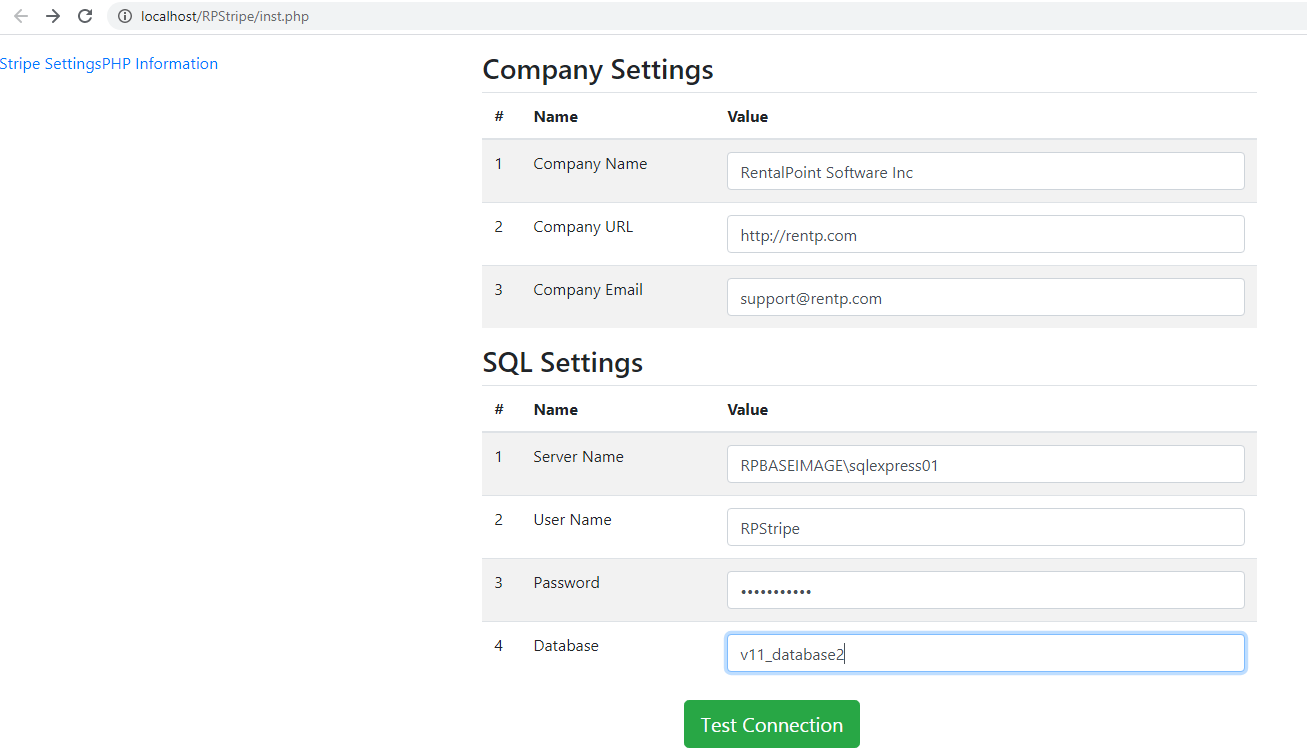
1.3 Check PHP: http://localhost/RPStripe/phpinfo.php
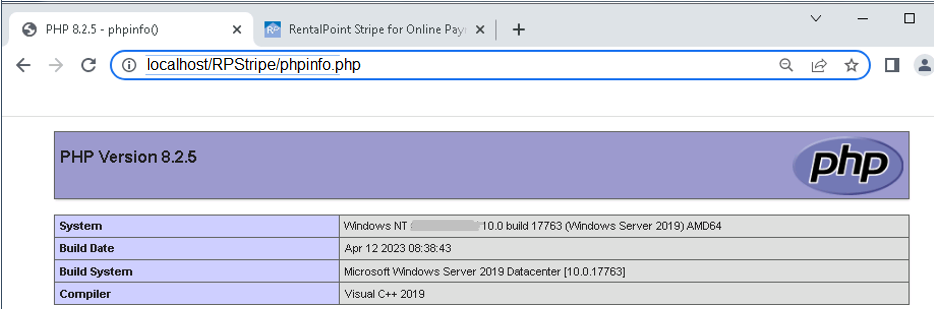
1.4 Check PHP modules for RPStripe: http://localhost/RPStripe/inst.php?idx=1

1.5 Copy PHP drivers for SQL from the install files to c:\program files\PHP_82\ext folders

1.6 Install/Enable PHP Extensions
- Copy/rename php.ini-production to php.ini
Change Settings in php.ini”
extension_dir = "C:\Program Files\PHP_82\ext"
uncomment:
extension=php_ldap
extension=curl
extension=gettext
extension=intl
Add:
extension=php_pdo_sqlsrv_82_nts_x64.dll
extension=php_sqlsrv_82_nts_x64.dll
1.7 Check PHP modules for RPStripe: http://localhost/RPStripe/inst.php?idx=1

With PHP now installed and configured, you can delete phpinfo.php as a security precaution.
Stripe Configuration in SQL Server
Following successful server configuration Create a Stripe Account
Manually Create an SQL user (if you skip this step you can create the user from RentalPoint configuration later)
Next, launch SQL Management Studio
 SQL Server should be set up for both Windows and SQL Authentication via SQL Server Properties

Create a special database user for Stripe (ie. RPStripe)
- Configure the user with SQL Server authentication, give the user a password and select Enforce Password Policy.
- Ensure that you set your Default Database and Default Language accordingly.
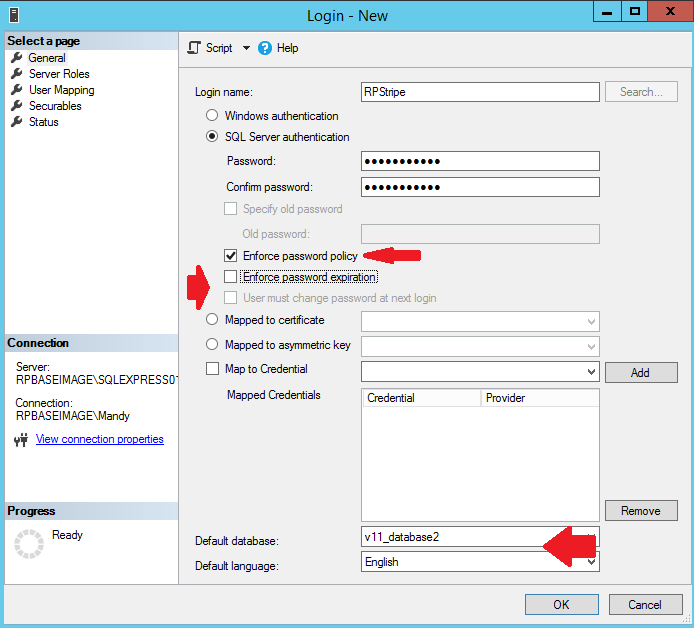
- This user should have the public and sysadmin role assigned


This user is only mapped to your RP database. Click OK to save your new user.
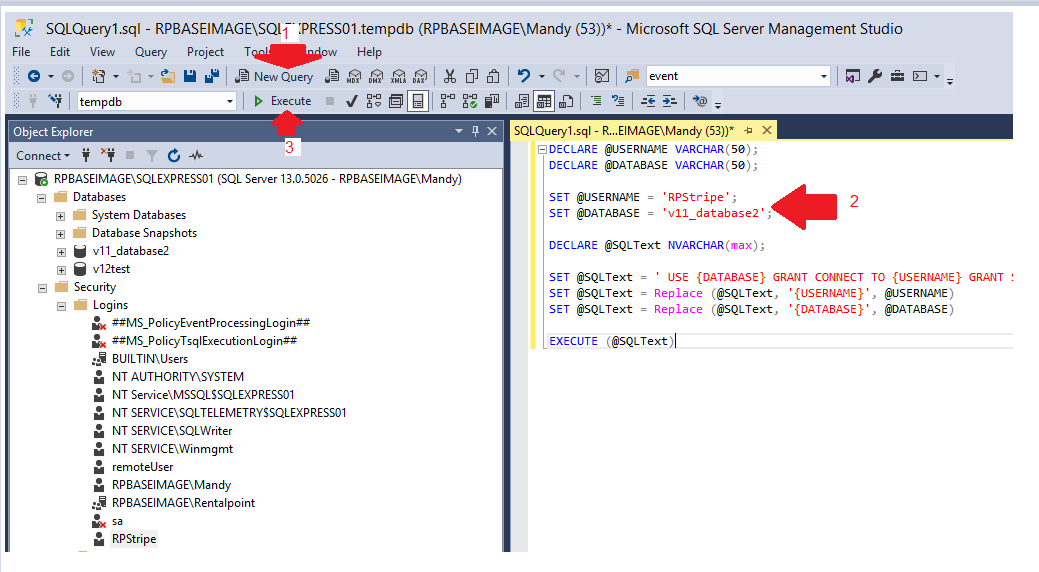
Use the following SQL script to grant the required permissions to this user.
 Ensure that you are running RentalPoint 12.0.0.10 or higher (if not you will get an error running the script). Also ensure that you enter the appropriate USERNAME and DATABASE values (bolded below). This user will be used in your Stripe integration to ensure that your data is not leaked (see screenshot below for substitute values based on this installation)
DECLARE @USERNAME VARCHAR(50);
DECLARE @DATABASE VARCHAR(50);
SET @USERNAME = 'UserName';
SET @DATABASE = 'DatabaseName';
DECLARE @SQLText NVARCHAR(max);
SET @SQLText = ' USE {DATABASE} GRANT CONNECT TO {USERNAME} GRANT SELECT ON [dbo].[vwWebPayData] TO {USERNAME} GRANT SELECT ON [dbo].[tblInvhead] TO {USERNAME} GRANT SELECT ON [dbo].[tblParameters] TO {USERNAME} GRANT SELECT ON [dbo].[tblLocnlist] TO {USERNAME} GRANT SELECT ON [dbo].[tblbookings] TO {USERNAME} GRANT SELECT ON [dbo].[tblCurrency] TO {USERNAME} GRANT SELECT ON [dbo].[tblCurrencyName] TO {USERNAME} GRANT SELECT ON [dbo].[tblCust] TO {USERNAME} GRANT UPDATE ON [dbo].[tblCust] TO {USERNAME} GRANT SELECT ON [dbo].[tblStripeSessions] TO {USERNAME} GRANT INSERT ON [dbo].[tblStripeSessions] TO {USERNAME} GRANT DELETE ON [dbo].[tblStripeSessions] TO {USERNAME} GRANT INSERT ON [dbo].[tblPayment] TO {USERNAME} GRANT INSERT ON [dbo].[tblReceipt] TO {USERNAME} GRANT INSERT ON [dbo].[tblInvhead] TO {USERNAME} GRANT INSERT ON [dbo].[tblWebPaylog] TO {USERNAME} GRANT EXECUTE ON [dbo].[WebCharge] TO {USERNAME} GRANT EXECUTE ON [dbo].[WebGetInvoice] TO {USERNAME}';
SET @SQLText = Replace (@SQLText, '{USERNAME}', @USERNAME)
SET @SQLText = Replace (@SQLText, '{DATABASE}', @DATABASE)
EXECUTE (@SQLText)
Installing Stripe

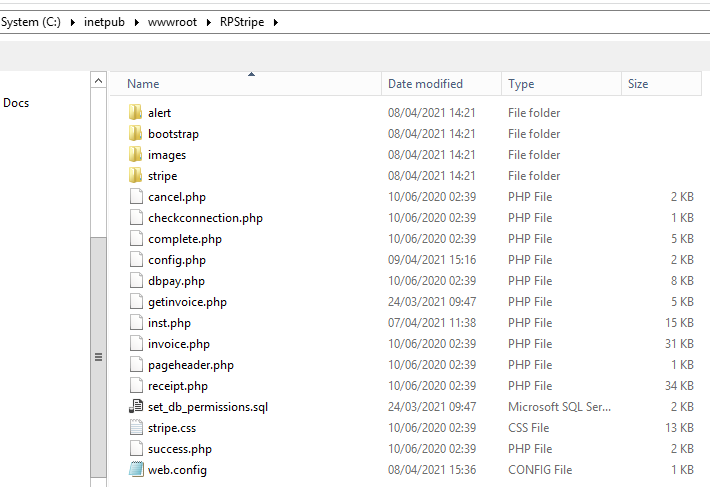
Unzip the downloaded file to C:\inetpub\wwwroot\RPStripe (or leave it as StripeSCA). Whatever name you use for this folder will be referenced throughout the setup.
Next, you’ll need to ensure that you have write permissions to the config file. The write permissions will only be used during the setup phase. Once Stripe is configured and running properly, you can remove the write permissions on the file for security reasons.
Navigate to your Stripe directory and find your config_example.php file (named so as not to overwrite customized config.php when upgrading in the future). Since this is your first installation, rename this file to config.php and ensure your users have either Full Control or Read and Write. Please note your group name may be different than the group name listed in the screenshot below.

The final step for installing the Stripe service is to make a change to your default php file.
Navigate to and open php.ini.
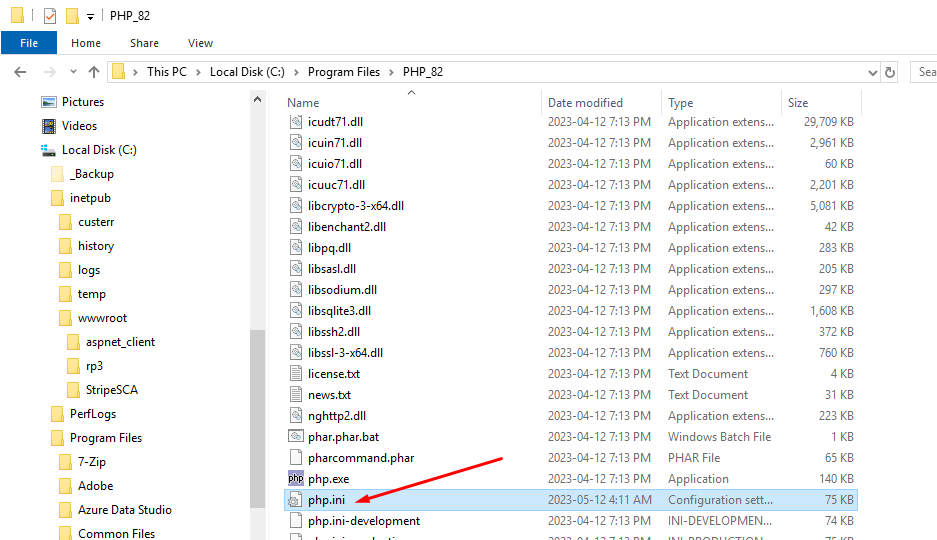
Search for the Miscellaneous section and add the line extension=php_intl.dll

Save and close the file
 If you’re having trouble locating the php.ini file, try running a search in your C drive. Your file may be located in a different folder, depending on your OS version and PHP version
RentalPoint Configuration LAN Access
- Launch RentalPoint
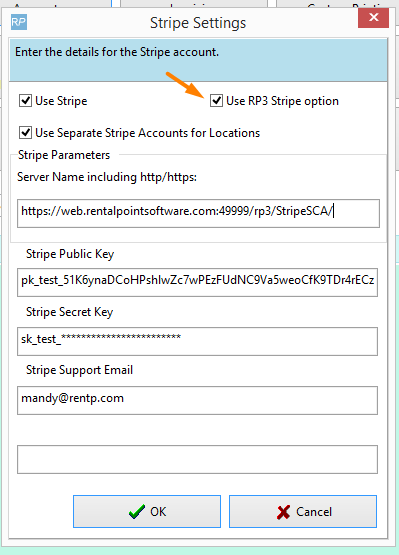
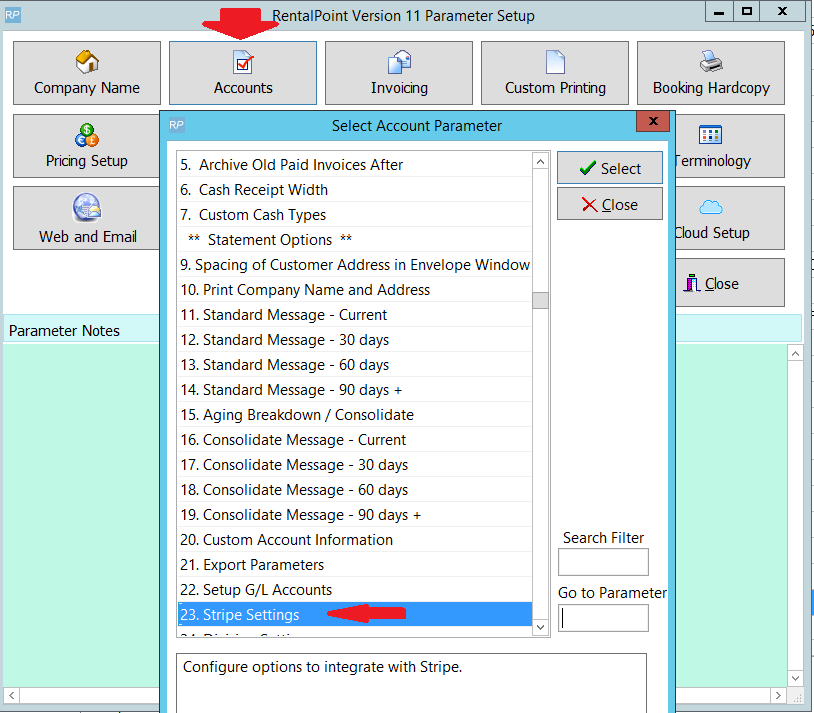
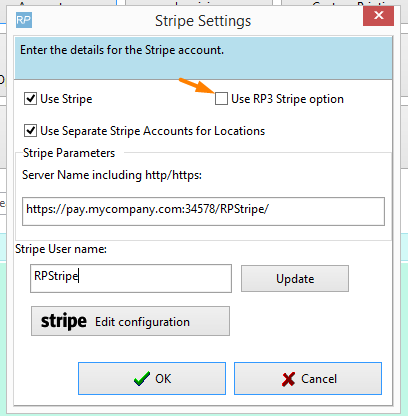
- Navigate to Setup ->Parameters ->Accounts -> #23 Stripe Settings
- Check Use Stripe checkbox
- Enter 'localhost' and stripe location to confirm LAN access
- Enter the Stripe username you created in Stripe Configuration above
- Leave the 'Use RP3 Stripe option' unchecked
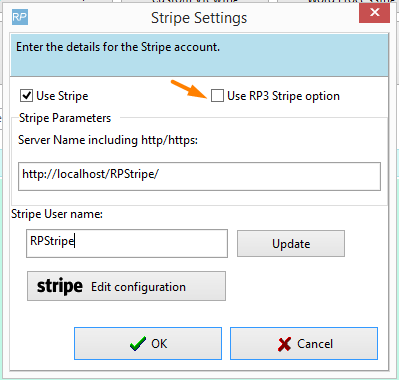
- Click UPDATE to check your Stripe username permissions, RentalPoint will
- Check Admin permissions in SQL Server
- Check/create an SQL Server login if needed
- Check/create an SQL Stripe user if needed
- Execute a script to GRANT necessary permissions for SQL Stripe user
- Click

- Enter your Company Settings (your clients will see this information the Payment Receipt window)


Then click 
You should get the following message

This confirms Local Area Network (LAN) connection.
RentalPoint Configuration WAN Access
You'll need to provide Wide Area Network (WAN) access through your router & firewall before changing settings from http://localhost/RPStripe to your WAN address
Ubuntu:
- First set up a DDNS record that points to the external IP address of your server (eg: pay.ddns.net)
- Then ensure you have ports available (eg: 80,443, 44) to communicate via your ddns (eg pay.ddns.net)
Windows:
- First set up a DNS "A" Record that points your DNS to the external IP address of your server.
- For example: pay.mycompany.com
- Then set up a hole in your router / firewall to allow a random port to be redirected to port 80 of the internal IP address of the IIS server
- For example: port 34567
Next change the setup in RentalPoint to your ddns/dns address and test the connection
- Ubuntu: https://payonline.ddns.net/RPStripe
- Windows: https://pay.mycompany.com:34567/RPStripe
- Leave 'Use RP3 Stripe option' unchecked
- For multi location users, if you have separate Stripe accounts for each location, check 'use separate Stripe Accounts for Locations', then goto setup-->locations and enter Stripe keys under the Accounting tab for each location.
- Click UPDATE to check your Stripe username permissions, RentalPoint will
- Check Admin permissions in SQL Server
- Check/create an SQL Server login if needed
- Check/create an SQL Stripe user if needed
- Execute a script to GRANT necessary permissions for SQL Stripe user

RentalPoint Stripe Settings
Once you've established a successful connection, the next step is to enter your Stripe information (from your Stripe Account Dashboard). You can use Test API Keys or move right to your live API keys


Finally, navigate to your RPStripe folder to remove/relocate/rename your inst.php (in case you need it again for change of address) and change permissions on config.php

Update Existing Stripe Installation
RentalPoint v12.0.0.10 Stripe Integration has been enhanced, so that the Stripe payment amount now considers any payments or credits already applied against the invoice. This enhancement requires the revised SQL security query for Stripe to be executed. If you had Stripe installed with an earlier version of RentalPoint and have now upgraded to RentalPoint v12.0.0.10 or higher, please follow the extra upgrade steps below.
- Upgrade to RentalPoint 12.0.0.10 or the latest posted RentalPoint release
- Download
 from RentalPoint Updates
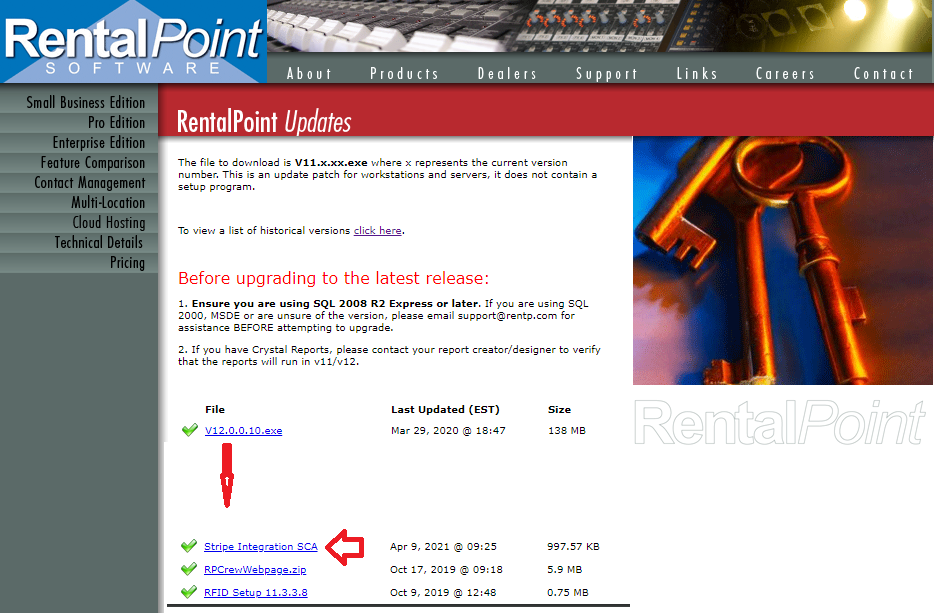
- Locate your current RentalPoint Stripe installation folder - this could be RPStripe or whatever you named your Stripe folder during installation. Make a copy of config.php as this has your company settings in it. You'll need to copy this file back after step 4.
- Unzip
 to your Stripe installation folder
 - Replace config.php with your copy so that your company settings are intact.
 from
from 

 to your Stripe installation folder
Automatic Permissions Update
RentalPoint v12.0.0.11 has been enhanced to automatically update SQL permissions for the SQL Stripe user when necessary. A one-time manual update is required to RentalPoint Accounts Parameter #23 (Stripe Parameter) in order to facilitate this functionality. Once set up, RentalPoint will automatically take care of Stripe user permissions updates for all future upgrades.
Navigate to Setup ->Parameters ->Accounts -> #23 Stripe Settings

Enter the Stripe the username you created during Stripe Configuration (usually part of your stripe server name)

- Click UPDATE to check your Stripe username permissions, RentalPoint will
- Check Admin permissions in SQL Server
- Check/create an SQL Server login if needed
- Check/create an SQL Stripe user if needed
- Execute a script to GRANT necessary permissions for SQL Stripe user
- Click


Now that the above has been set up, RentalPoint will automatically take care of Stripe user permissions updates for all future upgrades.
Manual Permissions Update
Not needed if Automatic Permissions update instructions have been followed above.
Open SQL Server Management Studio and use the following SQL script to grant the required permissions to this user.
 Ensure that you are running RentalPoint 12.0.0.10 or higher (if not you will get an error running the script). Also ensure that you enter the appropriate USERNAME and DATABASE values (bolded below). This user will be used in your Stripe integration to ensure that your data is not leaked (see screenshot below for substitute values based on this installation)
DECLARE @USERNAME VARCHAR(50);
DECLARE @DATABASE VARCHAR(50);
SET @USERNAME = 'UserName';
SET @DATABASE = 'DatabaseName';
DECLARE @SQLText NVARCHAR(max);
SET @SQLText = ' USE {DATABASE} GRANT CONNECT TO {USERNAME} GRANT SELECT ON [dbo].[vwWebPayData] TO {USERNAME} GRANT SELECT ON [dbo].[tblCurrency] TO {USERNAME} GRANT SELECT ON [dbo].[tblCurrencyName] TO {USERNAME} GRANT SELECT ON [dbo].[tblCust] TO {USERNAME} GRANT UPDATE ON [dbo].[tblCust] TO {USERNAME} GRANT SELECT ON [dbo].[tblStripeSessions] TO {USERNAME} GRANT INSERT ON [dbo].[tblStripeSessions] TO {USERNAME} GRANT DELETE ON [dbo].[tblStripeSessions] TO {USERNAME} GRANT INSERT ON [dbo].[tblPayment] TO {USERNAME} GRANT INSERT ON [dbo].[tblReceipt] TO {USERNAME} GRANT INSERT ON [dbo].[tblInvhead] TO {USERNAME} GRANT INSERT ON [dbo].[tblWebPaylog] TO {USERNAME} GRANT EXECUTE ON [dbo].[WebCharge] TO {USERNAME} GRANT EXECUTE ON [dbo].[WebGetInvoice] TO {USERNAME}';
SET @SQLText = Replace (@SQLText, '{USERNAME}', @USERNAME)
SET @SQLText = Replace (@SQLText, '{DATABASE}', @DATABASE)
EXECUTE (@SQLText)

Configure RentalPoint Templates
Once Stripe is ready to use, the next step is to include the stripe insert field in any emails and custom templates where you want to provide the client with an option to pay online
Custom RTF
For an .rtf template the &STRIPELC& can be added to have the link appear in the document itself

Fast Report Custom Template
Initial Setup
For any Fast Report custom template (pre v12.0.0.10), the StripeWebLink field must be made available in the templates stored procedure. Please contact support@rentp.com for assistance with this step if needed. For those familiar with SQL and stored procedures, the required code modification is detailed below.
- Add a parameter to the templates Stored Procedure with the name @StripeWebLink varchar(512)
- Select this parameter in any select statement

Ongoing use
In the Fast Report editor, add the Stripe link to any object as follows:
First ensure the text field name is prefixed with the same stripe username (case sensitive) you have used throughout setup i.e. RPStripe or StripeSCA, then highlight the field


Then in the property editor, expand the hyperlink property and add the field name to the value field

4.3 RentalPoint Email Template An email to your client may look something like this, note the {PAYONLINE} link:

Sample client email

Additional Options
Configure a Custom Image for your Stripe Payment and Receipt Windows
Both the Payment and Receipt windows are populated with a default RentalPoint image.
To configure a custom image....
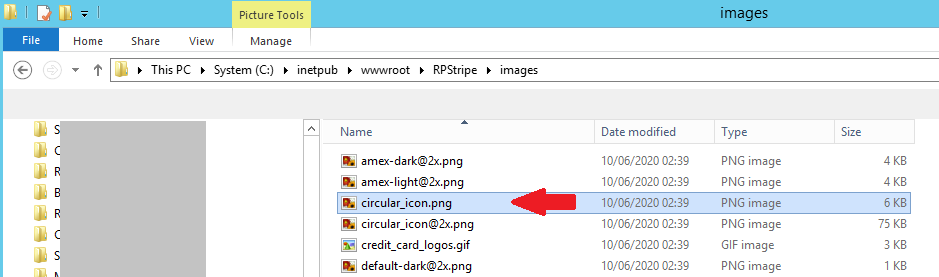
- Navigate to your Strip default Images directory; C:\inetpub\wwwroot\RPStripe\images. This directory contains all images that are used in the Stripe service.
- To customize the image, simply replace image in the file 'circular_icon.png' with an image of your choice. The name of the file should NOT be changed. RentalPoint Cloud Hosted clients should send a copy of the file to support@rentp.com for installation.

Troubleshooting Setup Issues (for local RentalPoint installations)
Cannot Access Stripe Edit Configuration
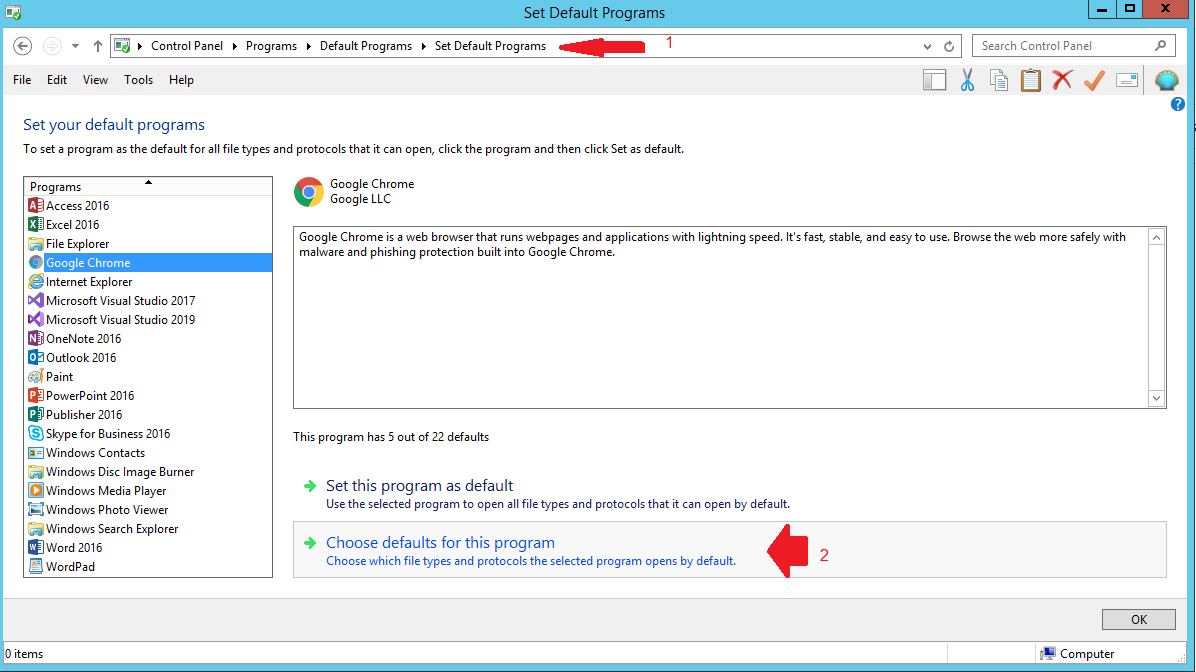
You may encounter an error when attempting to access your Stripe configuration file. The most common reason is that HTTP and HTTPS files are not associated with a specific program.
To address the issue:
- 1. Open Control Panel and navigate to Control Panel\Programs\Default Programs\Set Default Programs
- 2. Highlight the browser you are using (can be any browser)
- 3. Click

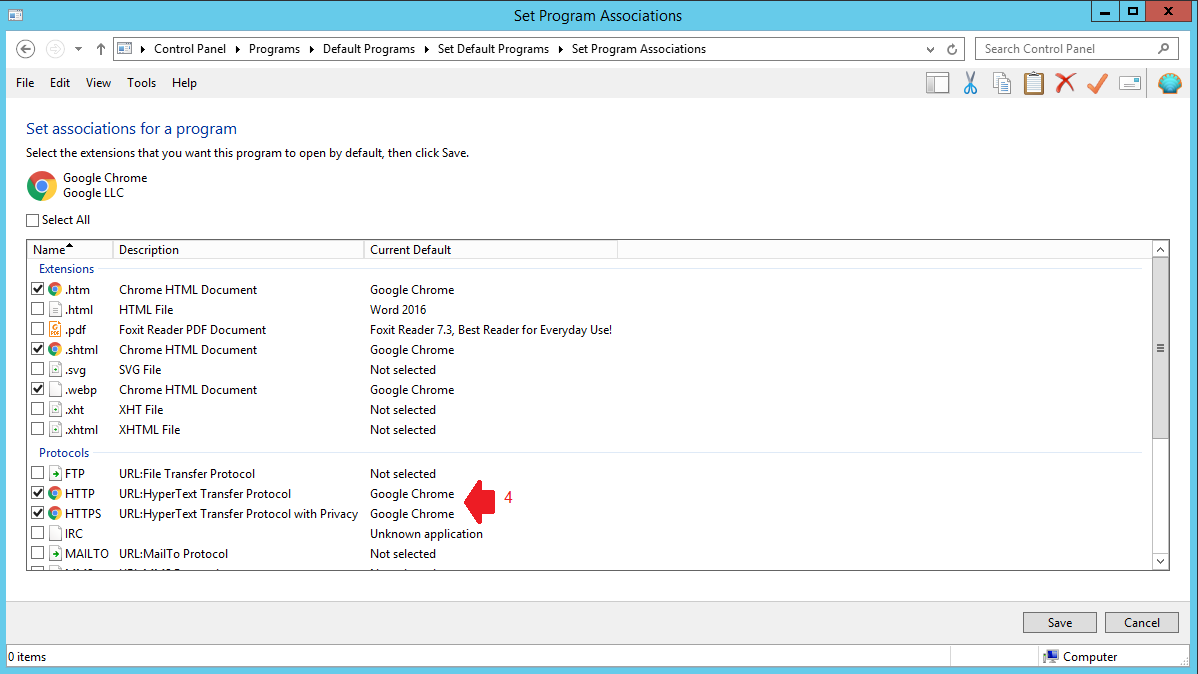
- 4. Ensure that HTTP and HTTPS are checked


PHP Manager for IIS failed to install

First Click here to navigate to the site to download PHP Manager
Then click 

Download the file

Double Click the downloaded msi file to install 
IIS Manager
Open IIS Manager -> PHP manager


Register the installed PHP version

Under  click
click 
Ensure the following are enabled

Verify TLS Support
By default TLS 1.1 & TLS 1.2 are enabled on server 2012 & server 2012r2. So they should be available and working unless you've turned them off.
If you still have issues with TLS version, please consult the articles below from Microsoft:
TLS Support Article Blog from Microsoft
TLS Support Article from Microsoft
Manually Install Microsoft Drivers
Click to Download the Microsoft Drivers for PHP for SQL Server
Then, click located on the screenshot below

Next, double click the downloaded file to unpack


Click to Download the Microsoft ODBC Driver for SQL Server
Then click 

Then double click the downloaded file to install 
HTTP Error 403


HTTP Error 500.0 Internal Server Error

Open IIS Manager-->PHP Manager

Ensure PHP version is correct and pointing to the correct executable. Use the

Use the  links provided to register/change PHP version used.
Checklist (contact support@rentp.com to review the list below if needed):
- Next ensure all PHP extensions are enabled per directions below. HTTP Error 500 will always occur of pdo_sqlsrv or sqlsrv are not enabled.
- Ensure you have read/write/execute permissions for user “RPStripe” (See Stripe Configuration section above) http://rentp.com/KnowledgebasePDFs/Rentalpoint%20Stripe%20Integration%20r5.pdf Page 14 or use attached script
- The latest version of RPStripe uses stored procedure “WebGetInvoice” – ensure you have this procedure in the database. If not use the sql query under 'Update an Existing Stripe Installation' above to add it.
- In /StripeFolder/getinvoice.php , check line 41 has a call to WebGetInvoice

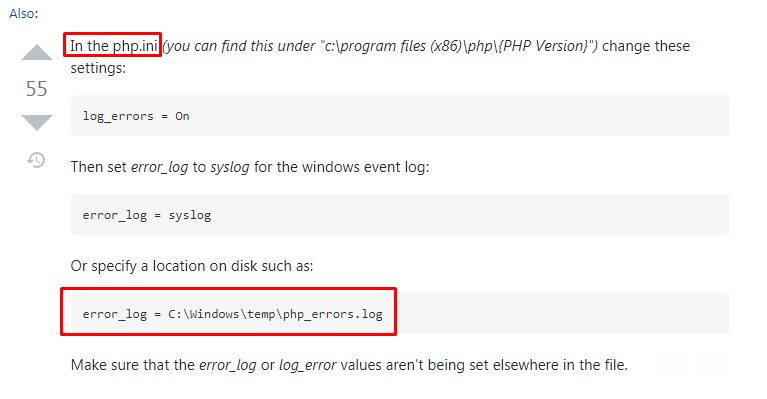
- PHP error log file usually located in C:\Windows\Temp\ - for example: “C:\Windows\Temp\PHP56ForIISExpress_errors.log” – please verify the error log exists and resolve/report any issues reported within.


PHP Extensions Not Enabled

Open IIS Manager -> PHP manager

Under click

Ensure the following are enabled
Now all show enabled

Array_Key_Exists
“array_key_exists” is deprecated in PHP since version 7.4
Stripe has new library version without the “array_key_exists” call which can be downloaded at the link below
Undefined variable: SERV_URL
-> verify variable $SERV_URL in config.php (last variable in file).
$inc_url = "https://www.mycompany.ca";/* URL on receipt page. */
$SERV_URL = "https://payonline.ddns.net/"; /* root folder for stripe */
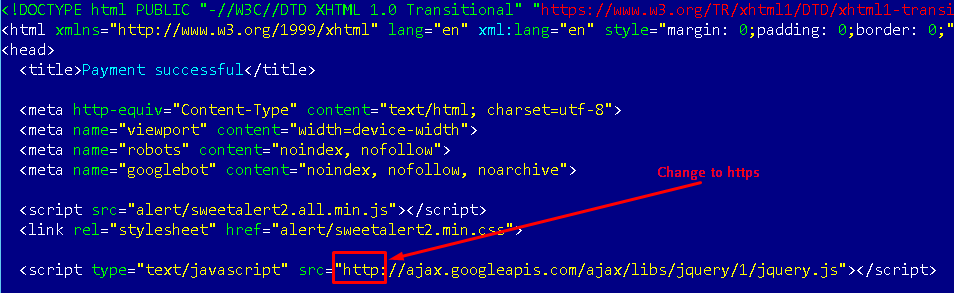
Success Page is Blank
In the file “success.php” , replace http by https in the link outlined below:i