Inventory Setup is a dedicated area of the system that allows you to set up and manage your company inventory. There is a difference between the Inventory Setup Menu (where you can set up and manipulate inventory) and the Products Menu (where you can view & report on products).
1.Accessing Inventory Setup
Accessing Inventory Setup
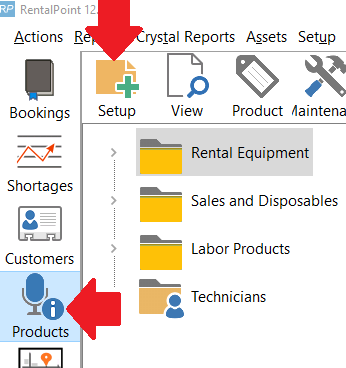
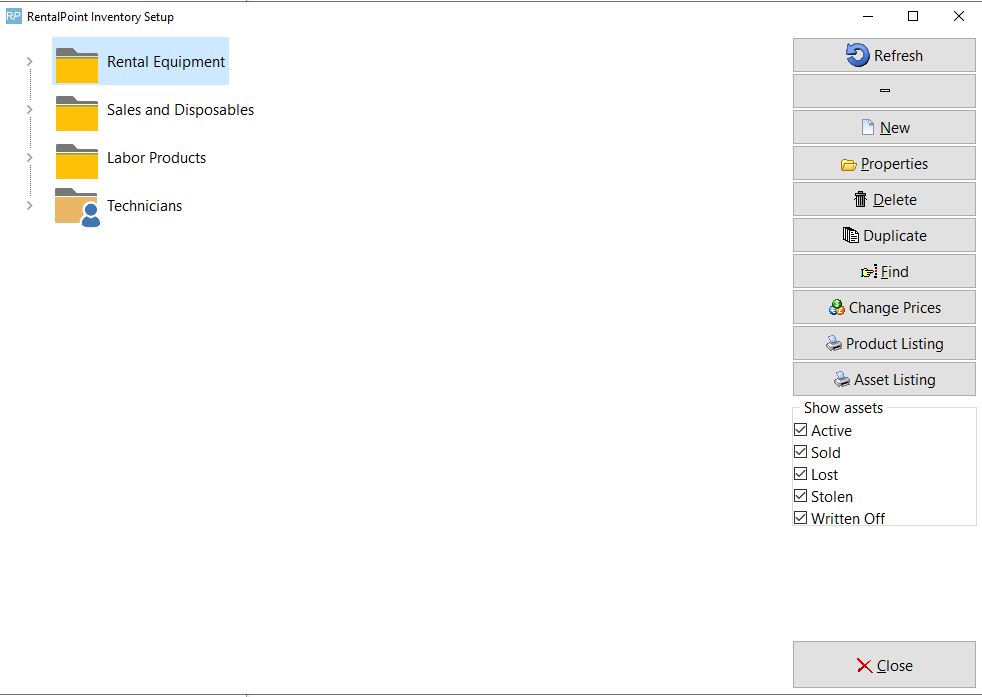
Press the F10 key to launch the Inventory Setup window or access from the ‘Setup’ option on the Products menu.
The Inventory Treeview
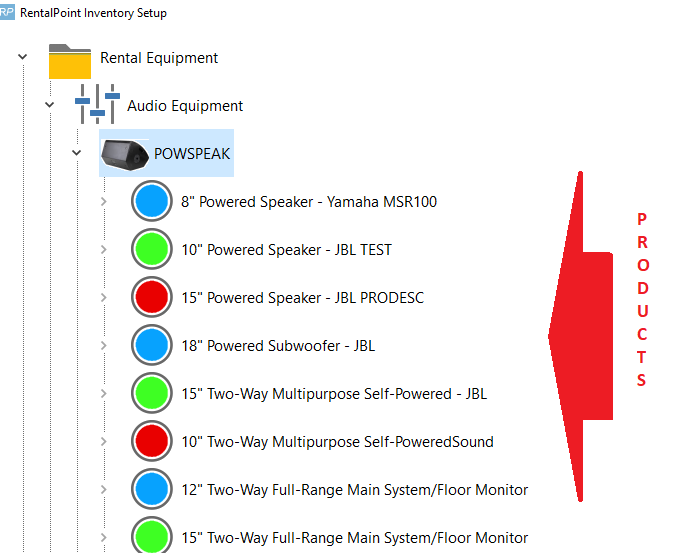
RentalPoint uses a treeview structure to organize products. There are four main folders (listed below), these folders cannot be renamed or moved, these are the root structures of the tree
- Rental Equipment,
- Sales and Disposables,
- Labour Products,
- Technicians
Within these root structures you can create Groups, Categories, Subcategories, Products and Assets.
 Ensure boxes are checked for all assets you want visible in the Inventory Tree
Customize icons for group, category, product within the setup of each record
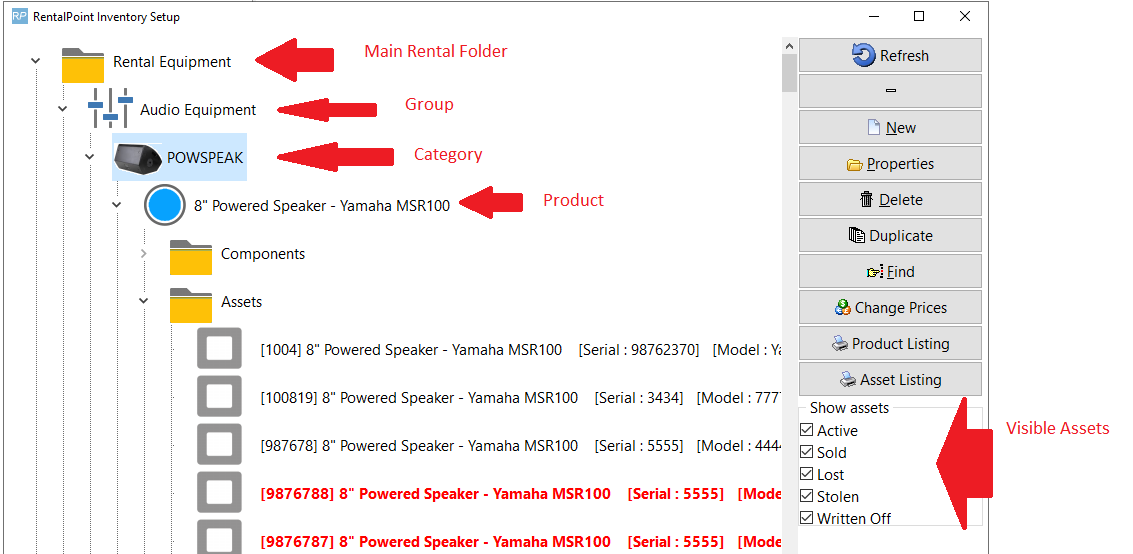
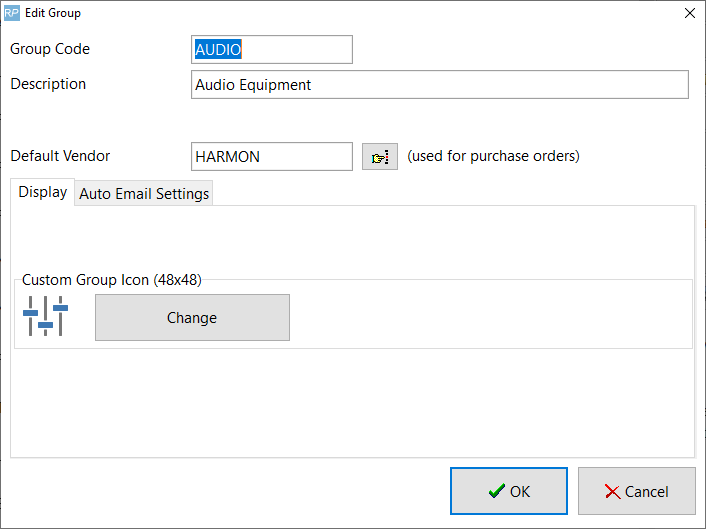
Group
Groups are used to separate large areas of equipment. An example of a group may be Audio, Lighting or Staging.
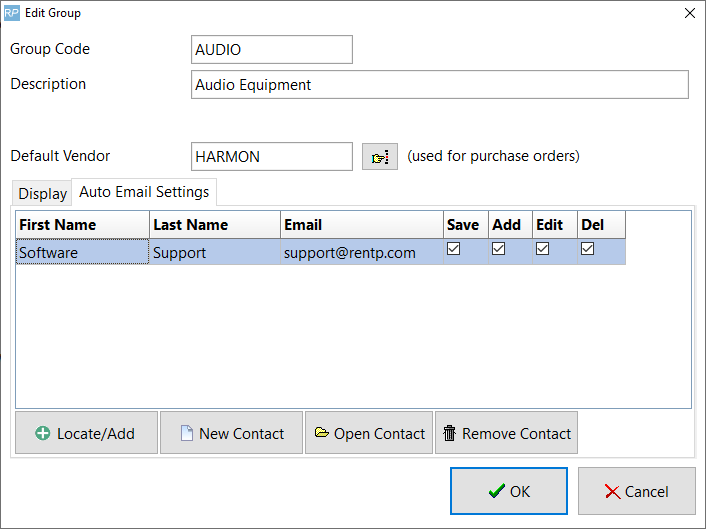
Group Auto Email Settings
Available in later releases - auto email a list of contacts when a product is added or modified on a booking
- Setup all applicable contacts via the Contacts Menu.
- Edit the group and add the contact to the Auto Email Settings.
- The check boxes will determine when the contact is emailed.
- Add will only email a contact when equipment is first added to the booking.
- Edit will email the contact each time the equipment changes on the booking.
- Del will email the contact only when ALL equipment for that group is deleted from the booking.
There is no parameter to control this functionality. Simply put; If the user is on the list, the system will auto email. If there's no one in the list, no emails will be sent.
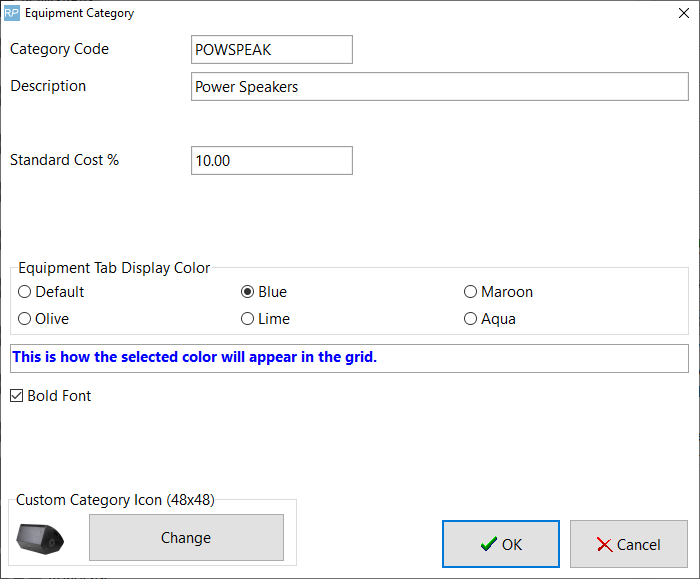
Category
A category helps to further split up the main group folder. So within the Audio group, you may want to use categories such as Power Speakers, Microphones or Sound Boards.
Standard Cost %
This is used in the Profit Analysis Report (also the 'Analyse' button in the booking) It adds a percentage of the rental price to the cost of the equipment. If the 'Standard Cost %' in the category record is blank this report will use the default percentage set up in Pricing Parameter 79.
Equipment Tab Display Colour
Used to designate the display colour when adding products from this category on the equipment grid of a booking
Sub Category
Subcategories can be enabled via Operational Parameter #194. This allows further organization of your categories. So within the Microphone category you may want subcategories of Wired Mics, Wireless Mics or Lapel Mics.ducts
Product
A product is the information related rental/sales items used on bookings.
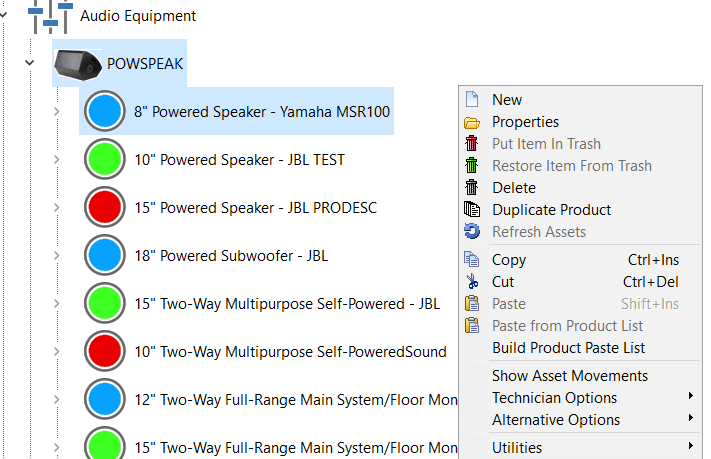
Assets
Assets are the individual items that are sent to a client. You may have five microphones in your warehouse and each has a barcode. You would enter these microphones individually into the Asset folder.
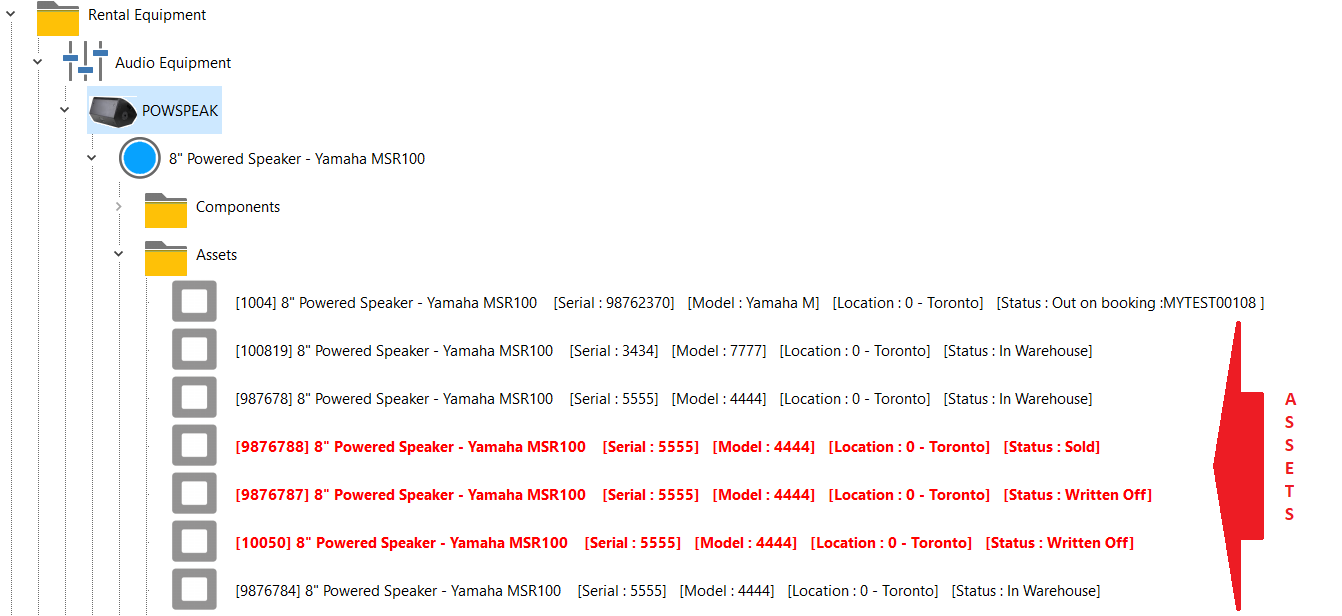
To add new assets:
Click on the Asset folder under any product
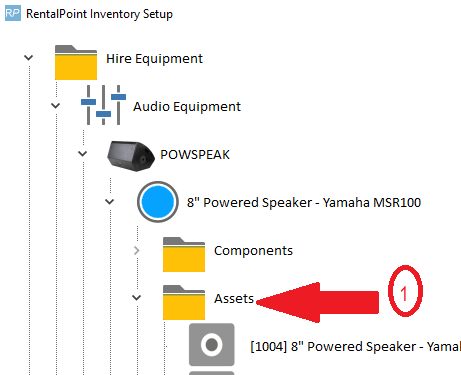
Or any existing asset in that folder, then click new
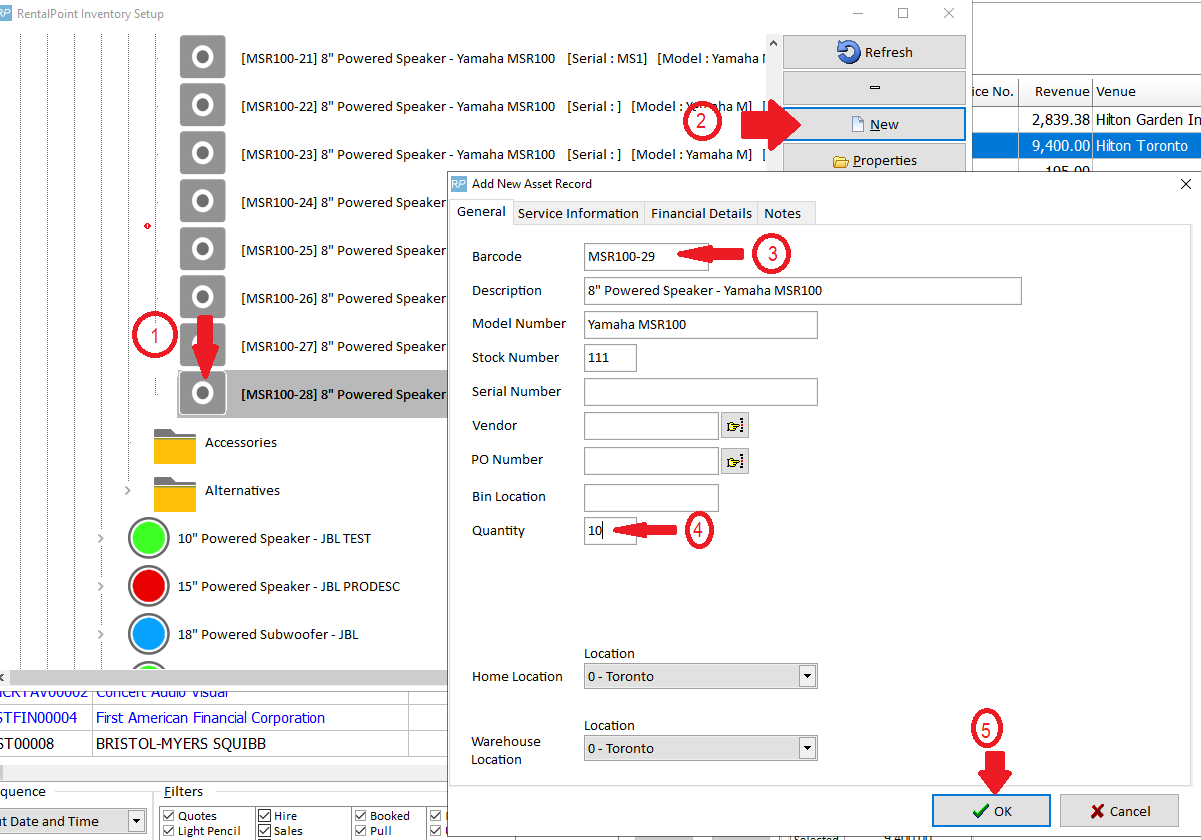
- Click asset folder or any existing asset for the product
- Click new
- If assets already exist for the product, then next barcode in sequence is already set for you, however you can change the barcode if you prefer. If entering the first asset for this product, enter the barcode of your choice.
- Enter the number of assets to add (if more than one, RentalPoint will increment the barcode for every asset in sequence).
- Click OK, then confirm asset addition to proceed.
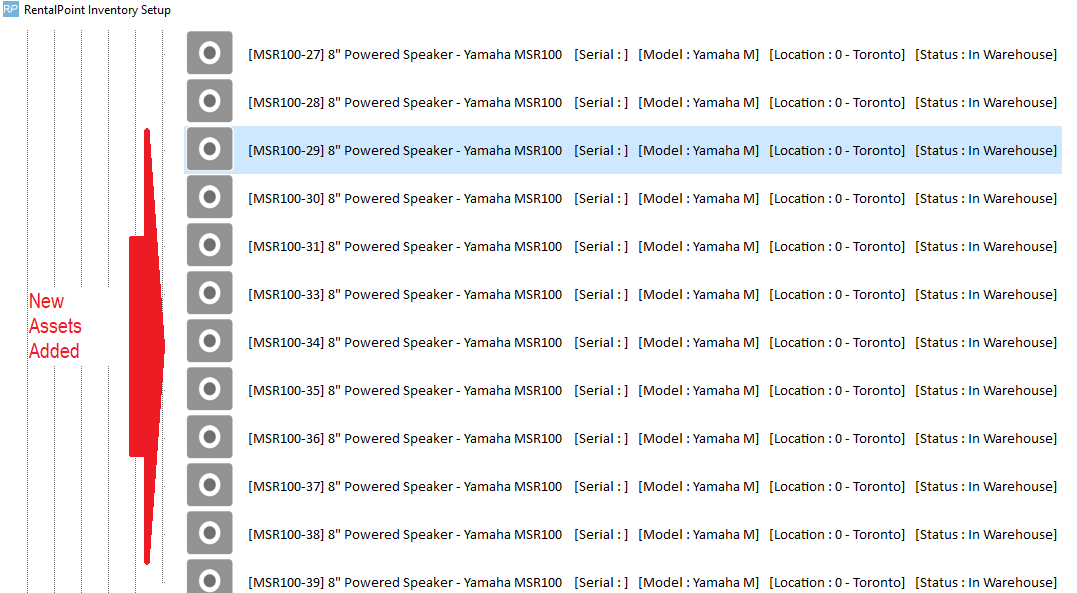
Asset will be added to the inventory tree per screenshot sample below
Importing Products
This is normally accomplished with the aid of an Implementation Specialist during your Rentalpoint Implementation Phase. A brief description is provided below. Extreme caution should be taken if importing products to an existing live environment so as not to mistakenly overwrite existing data. Please take a backup of your database before importing new products.
- Import inventory to RentalPoint via comma separated or tab delimited files. Both of these file formats can be opened and edited in Excel. Product information can be updated via the import procedure.
- Please note, CSV stands for ‘Comma Separated Values’. This means that each field in the file is separated from the next field by a comma. Commas must be removed from within your data prior to importing. Alternatively the file can be saved in tabular delimited format. Quotation marks are not permitted in product codes.
- Users can contact RentalPoint support to obtain a template of the data that RentalPoint expects for input. Once a template is filled with the corresponding information it can then be imported into the system.
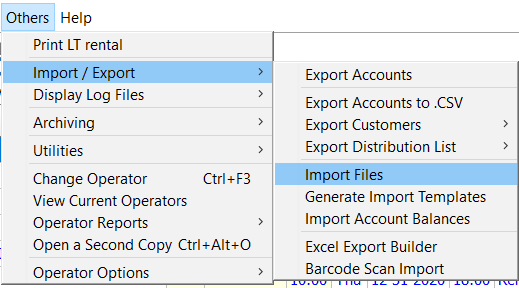
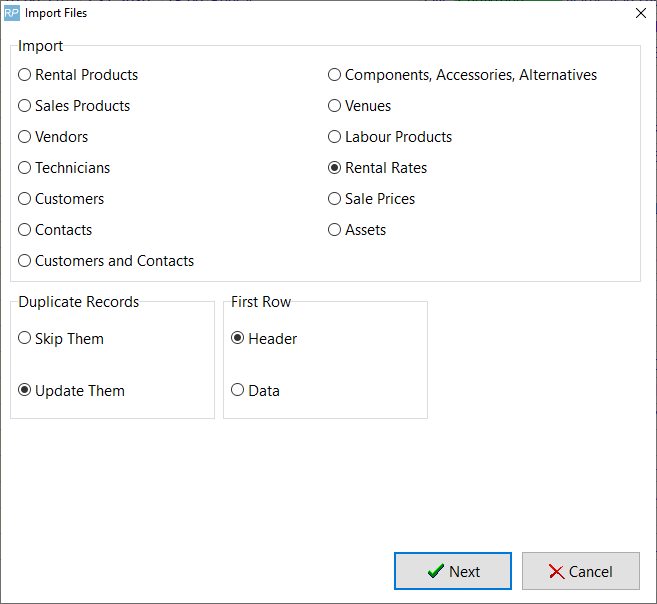
To import, click the ‘Others’ menu option, click Import/Export and click Import Files.

Select the type of import that you wish to complete. Once selected, search for the file that you wish to import.
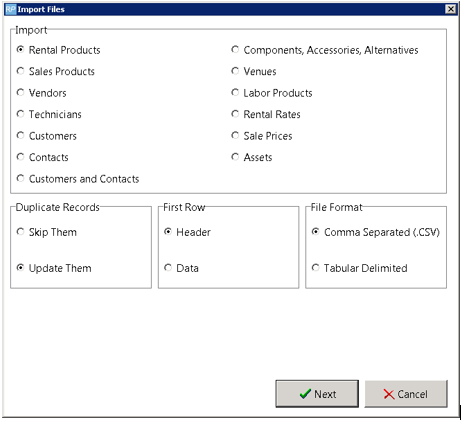
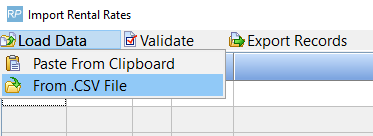
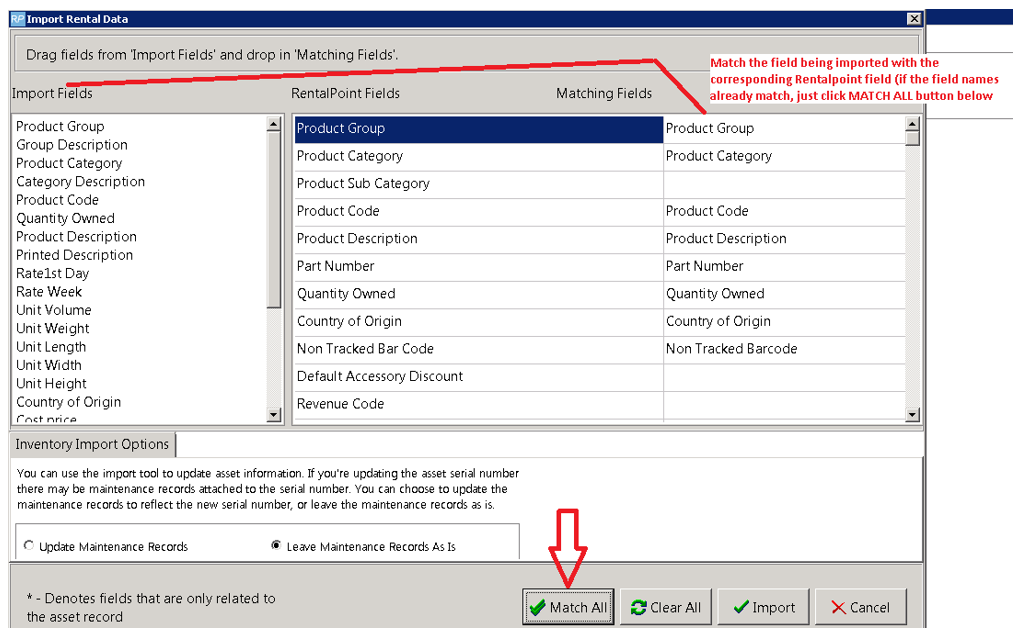
You will be prompted with a screen to match/pair the columns from the spreadsheet to the fields that RentalPoint expects to be filled. Remember to also choose how you would like maintenance records to be treated. Once this is complete click Import and the system will begin to import the products.
Importing Assets
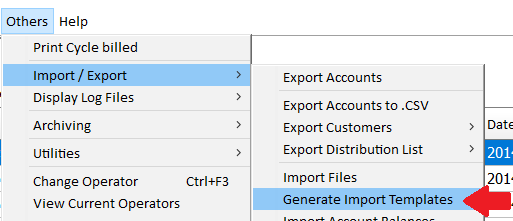
Asset import template can be access via others-->import/export-->generate import templates
Add up to 100 assets to an excel file (using RentalPoint import template), and import per screenshots below

For each field loaded, the headers need to be matched to tell RentalPoint what information is in that field. You can click the right hand side of the field to reveal the down arrow and select from the field list or choose 'Ignore' to ignore that field for import....

Or.......If your the headers in your csv file match the field headers that RentalPoint uses, you can use the 'Match Headers' option.
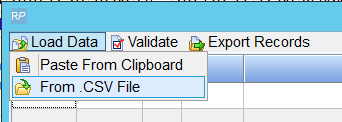
Then validate the fields to highlight any errors....
If you're importing a large file, you'll need to wait a while for the validation to complete......
After a few minutes the items should show validated as below, click import now to import
....again with a large file you'll need to wait for the 'processing' window to appear and for the import to complete
General Functions in the F10 Window
Most clients prefer to import their inventory in several large import files (see Importing Inventory section for more information), however, once that’s completed you still may want to make adjustments to your inventory from time to time.
Move
To move items from folder to folder or to organize your inventory you can drag and drop the items in the treeview or you can use the right click options to cut and paste where you need them.
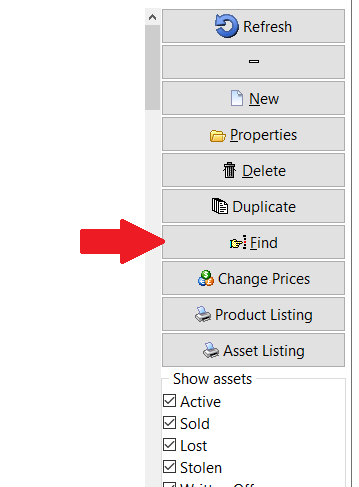
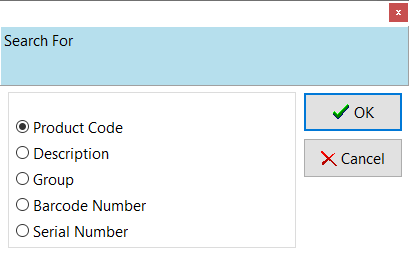
Find
To find items within your inventory simply click  or Ctrl + F, select the field that you want to search on and enter your criteria. If the system doesn’t find an exact match for your query, it will search through all folders starting at the top of the tree and look for the keyword in the product.
 |  |
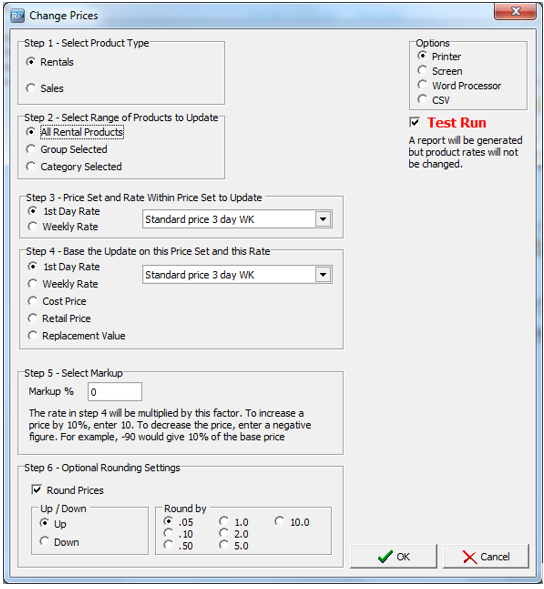
Change Price Utility
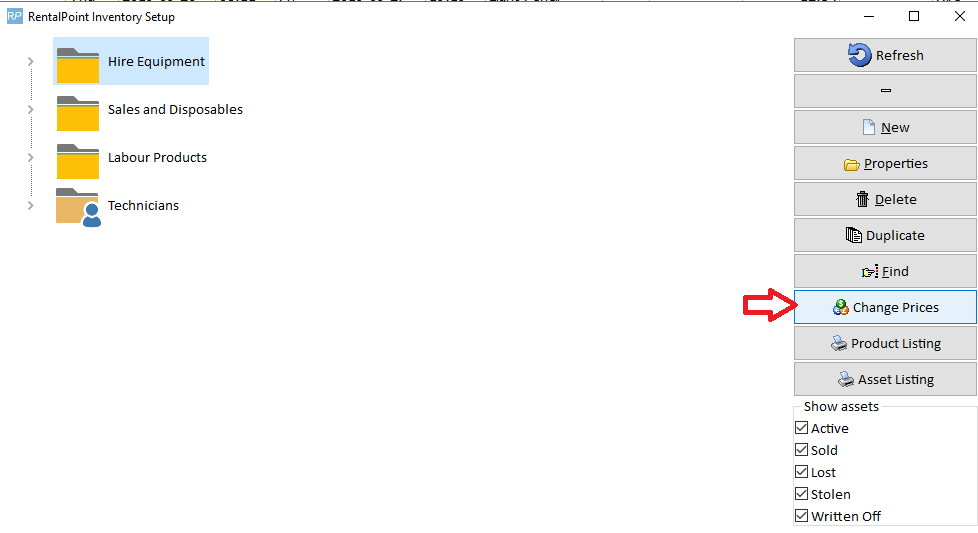
- Located in the Inventory (F10) window, the Change Prices utility will increase (or decrease) the price of your products by a percentage that you set. By default the system will perform a Test Run to calculate and display the values of your inventory before you actually update. Please be advised that there is no ‘undo’ function for this utility. The only means of an undo would be to restore a backup of your database.
- When using the rounding option, the system will first calculate your new prices by adding the Markup % that you choose, then rounding up or down by the factor that you select.

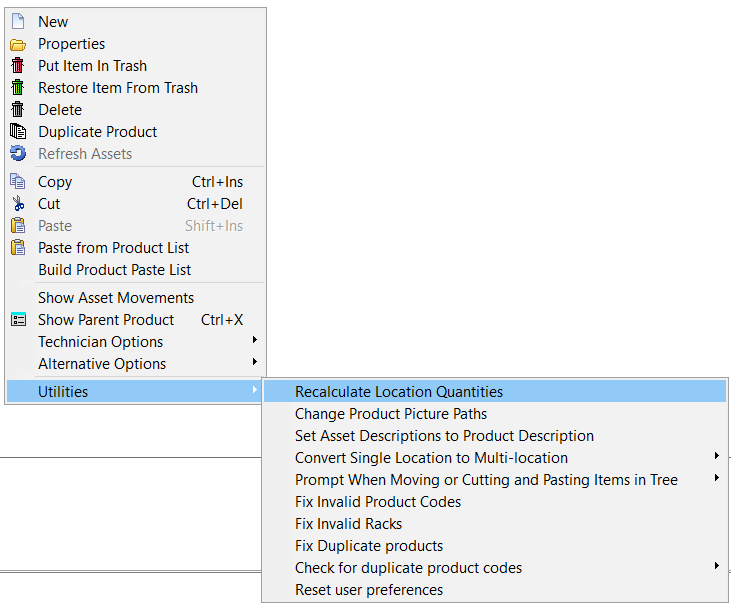
Inventory Utilities
RentalPoint has a number of Inventory Utilities that can be found in Inventory Setup (F10), then right click anywhere in the Inventory Setup window.

Recalculate Rental Stock Quantity
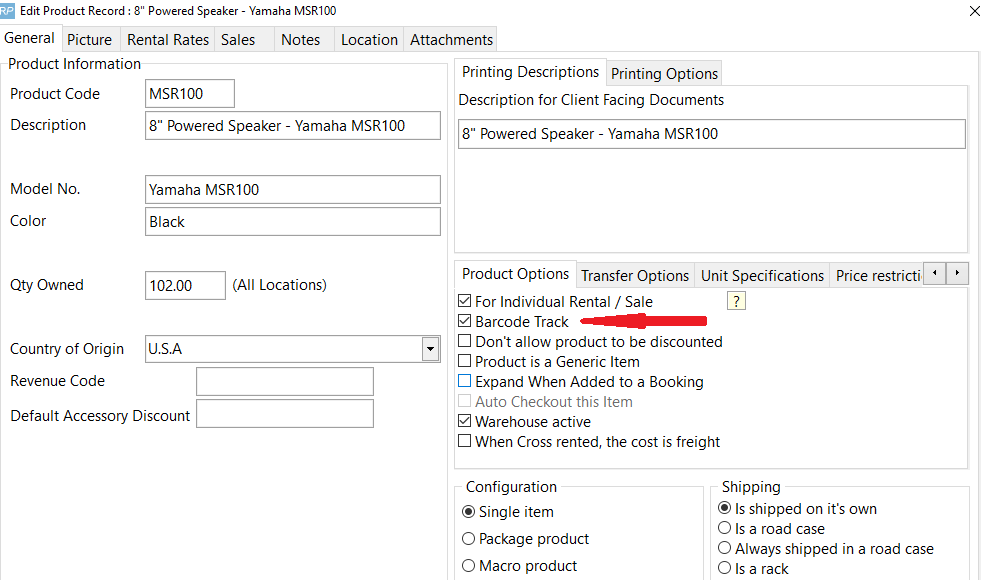
If you have asset records for all products, then you may want to set Operational Parameter 65 to YES so that the stock quantity for each product is counted from the asset records.
You also need to set 'Barcode Track' to YES on the Product Record.
How it works
- If ALL assets records are present then this is the most reliable method to keep the product quantities accurate, if there are products with no asset records then this method will NOT be used on that product.
For example:
- There may be hundreds of products which do not have asset records (i.e. barcode tracking is NOT set for that product); in this case the quantities in the product record may be edited.
- On the other hand, if barcode tracking is set, then the qty owned is calculated from the number of assets associated with that product. Manual editing of qty owned will not be allowed.
- When this parameter is set to YES - if an asset is checked out of or returned to a different location, the asset will be moved to that location
- When the parameter is set to NO - if an asset is checked out of or returned to a different location, the the asset will NOT be moved to that location
How do I use it?
- Hit F10 to access Inventory Setup
- Right click to get actions menu
- Click utilities
- Run the utility to recalculate location/stock the stock quantities

Reset User Preferences
When clicked, deletes the registry keys that affect user preferences in the product setup area effectively resetting popup options to default values.
For Example: When adding a product as a component, a number of popups appear. The user can click the checkbox 'Don't show this message again', and 'save my selection for next time' respectively.
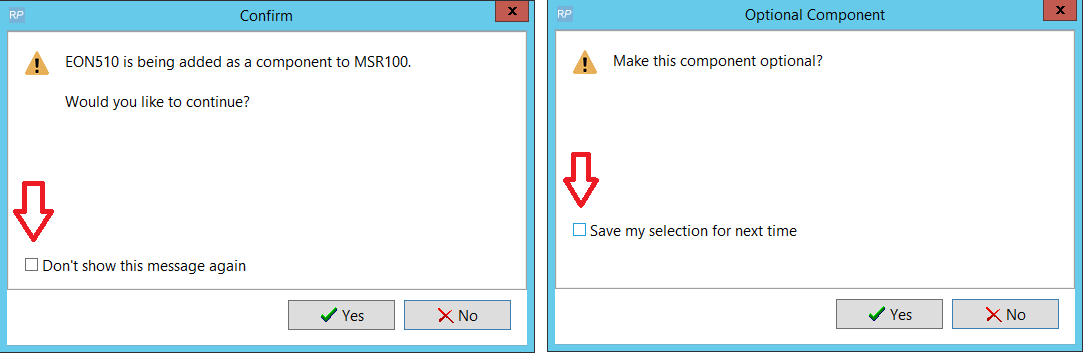
The user preferences are written to the windows registry and 'remembered' for all subsequent operations
Reset User Preferences, deletes these registry keys so that the popup windows appear again during component setup.
Populate Manufacturer Field
The manufacturer field is a later addition to the software. It can be populated by simply adding information in Inventory Setup per screenshot below

Alternatively you can bulk update manufacturer information for all product records where the field is currently blank using the utility available from Inventory Setup.
Right click anywhere in the Inventory Setup window, then navigate to Utilities-->Populate Manufacturer Field

Reference Screenshot below for Utility Features:
A list of manufacturers is provided with the utility.
1. To add to the existing list, use the add option
2. Use the delete option to remove manufacturers from the list as needed.
3. To populate the Manufacturer field for existing product records, use the Run Update option. Here's how it works!
- The utility scans each product description and searches for matches against the manufacturers listed in the window. When a match is found, the product's Manufacturer field is automatically updated.
- A report of all matched records is generated as a downloadable file, which can be reviewed in Microsoft Excel or Notepad


When Populate Manufacturer Fields is selected, click yes to populate blank manufacturer fields with values from the list:

The output file will be stored in your RentalPoint Data folder and opened automatically once the utility completes.
All products updated will show a match and 'updated' action

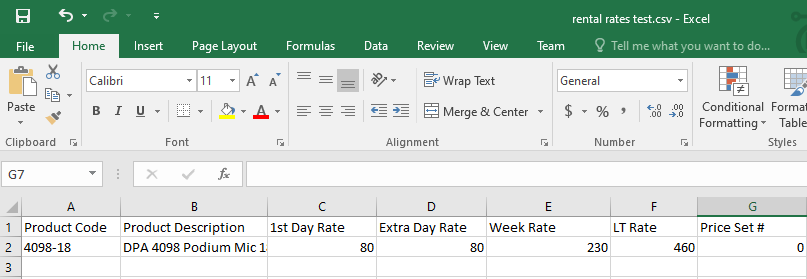
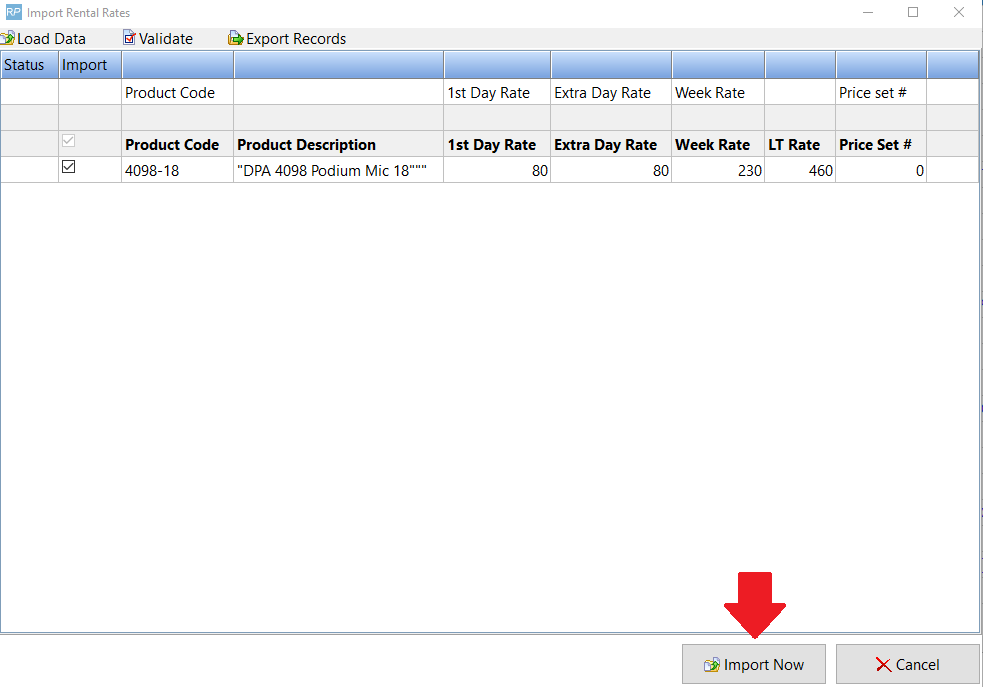
Import Rental Rates
You will need these columns of information to import rental rates:
- Product Code
- Product Description
- 1st Day Rate
- Extra Day Rate
- Week Rate
- LT Rate
- Price Set #
The columns should be labelled as above so that they will be auto matched by the RentalPoint import window, otherwise you need to click on the heading of each column to identify the data in each column. The 'Price Set #' column (as set in Pricing Parameter 4) is needed even if you only have one price list, in which case a zero should be entered in the Price Set Column.
Sample csv file