Built-in Colours for Line Items
RentalPoint uses 'built in' colours on the Equipment Grid of each booking to communicate some inventory issues/status as follows:
Red: Equipment is not available/short for the time period of the rental

Purple: Light Pencil overlap - i.e. while the product is available, there is a light pencil booking in the system that, if confirmed, will cause a shortage against this product for this time.

Teal over yellow: identifies a part product

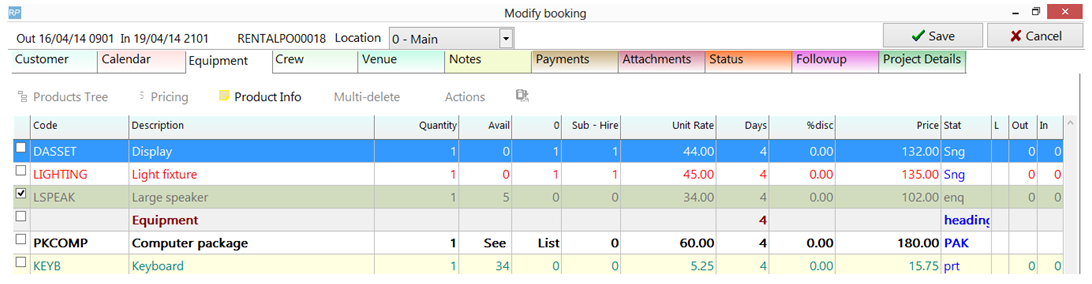
Light Gray: identifies gear in 'enq' status - i.e. an inquiry for pricing is being made against the item BUT it cannot be saved like that, you'll need to delete the item or double click it to change the status to an SNG or PRT item

Custom Colours for Line Items
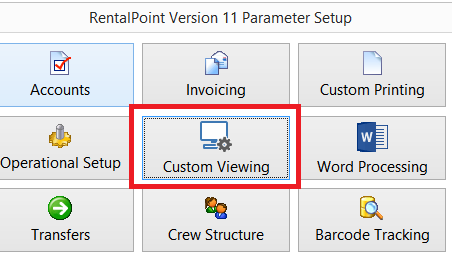
To enable custom colours on the Equipment Grid of a booking, Goto Setup-->Parameters off the main RentalPoint menu, then click 'Custom Viewing'
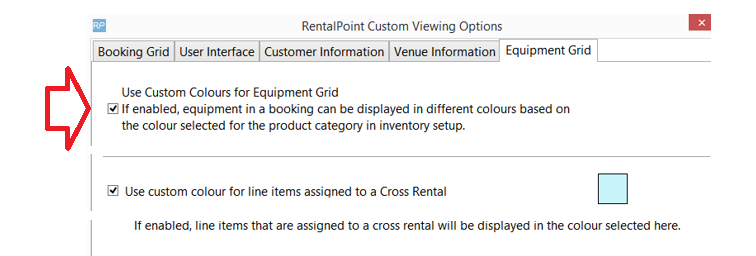
Click the Equipment Grid Tab
- Click 'Use Custom Colours for Equipment Grid' to have equipment display in the colour defined in Inventory Setup
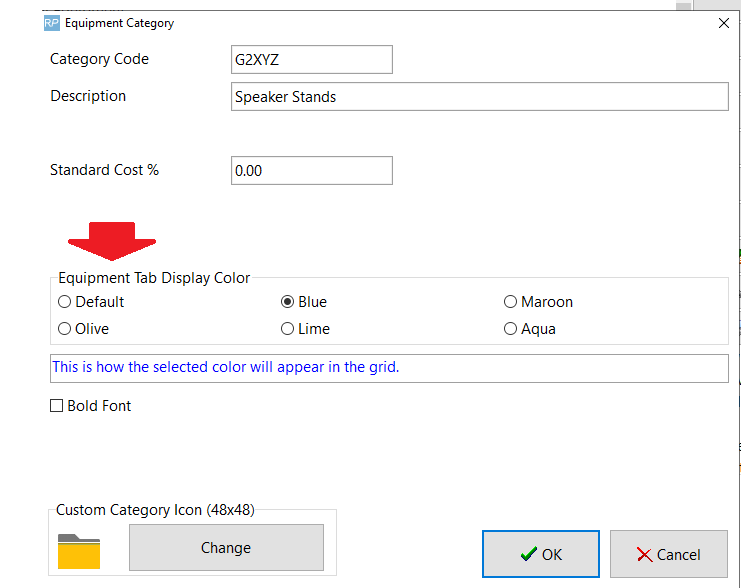
Define equipment grid colours for each category in inventory setup
Custom Colours for Assigned Cross Rentals
Goto Setup-->Parameters off the main RentalPoint menu, then click 'Custom Viewing'

- Click 'Use Custom Colour for line items assigned to a Cross Rental', to display assigned cross rentals in a different colour
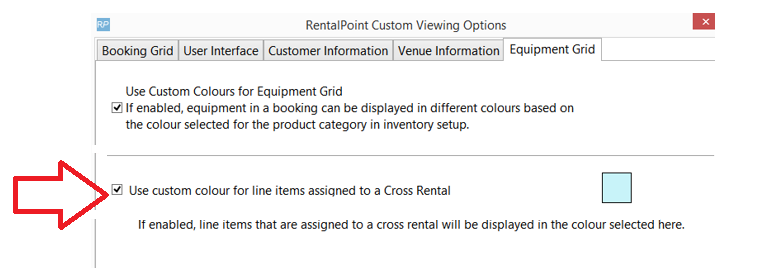

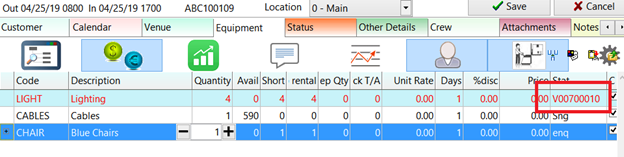
Below is a sample of how a line item with an assigned cross rental would display on the equipment grid of a booking, based on the colour settings in 'Custom Viewing' Equipment Grid Parameters

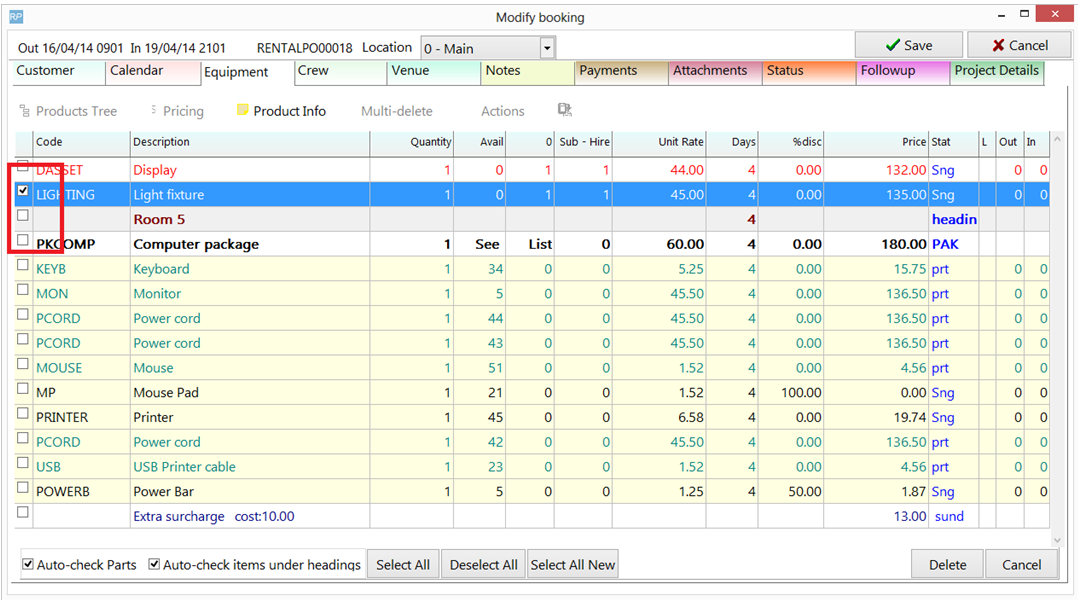
Using the multi-delete option multiple lines in the equipment grid of a booking can be selected for deletion.
To switch to multi-delete mode click the 'Multi-delete' button at the top of the equipment tab.
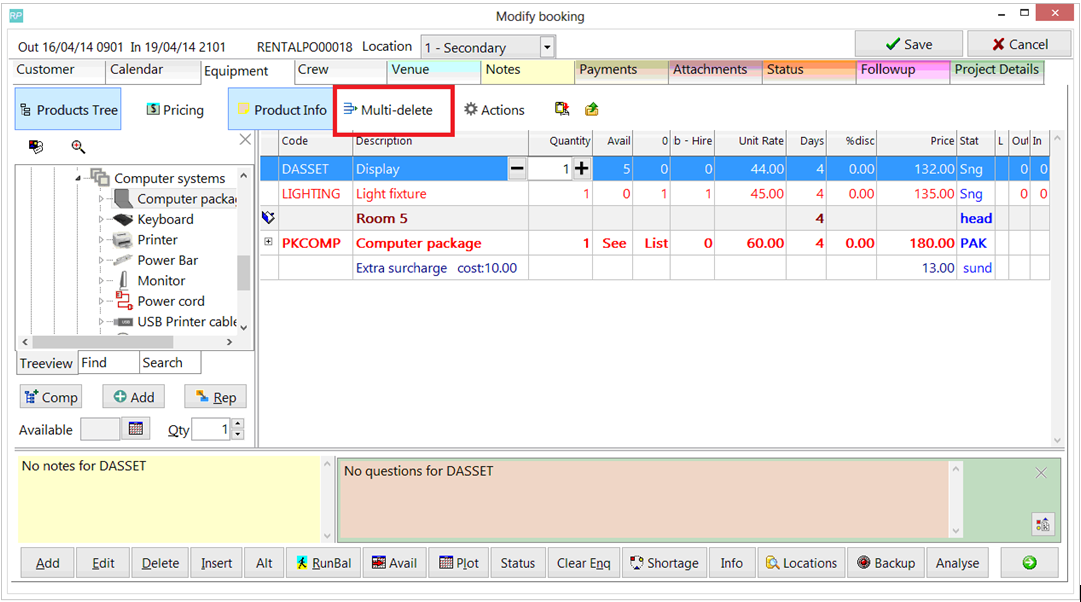
This will hide all windows except the equipment grid. The 'Product Info' button is still available if needed.
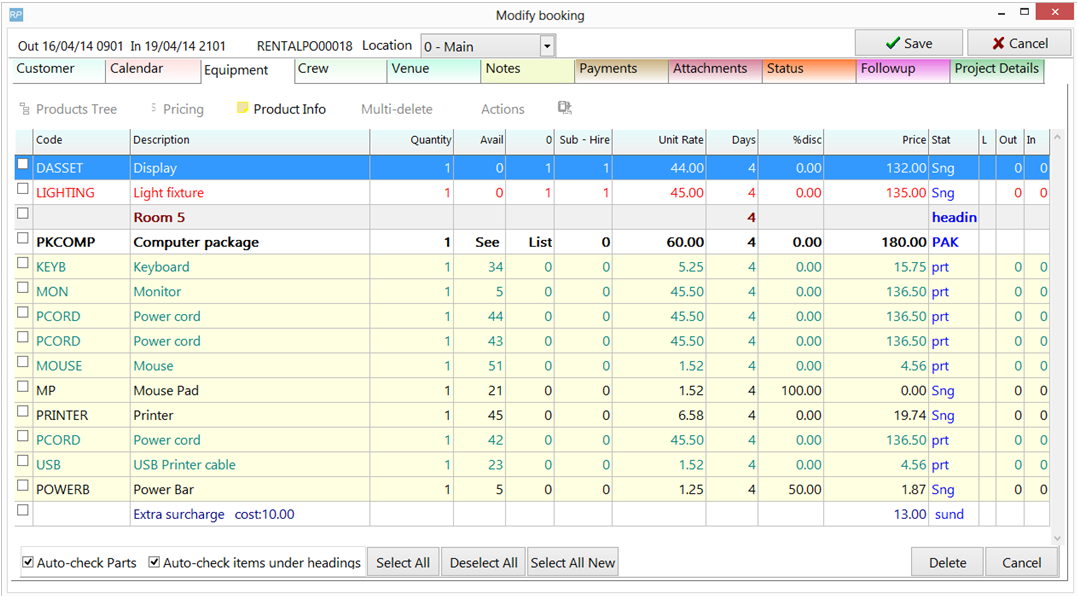
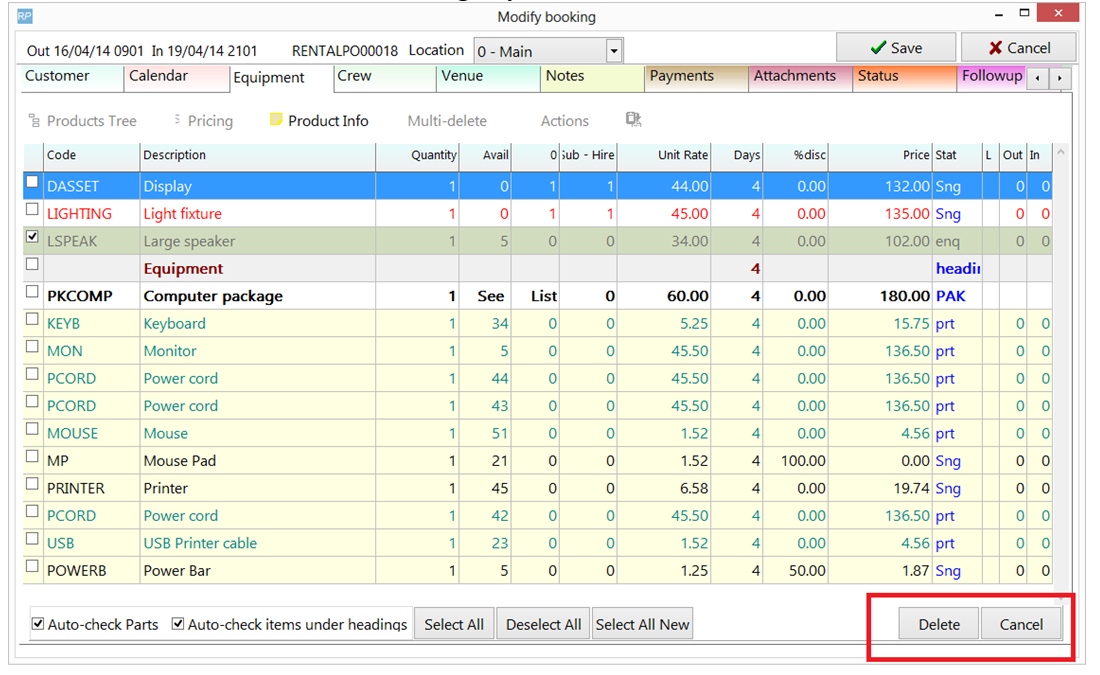
Selecting Lines
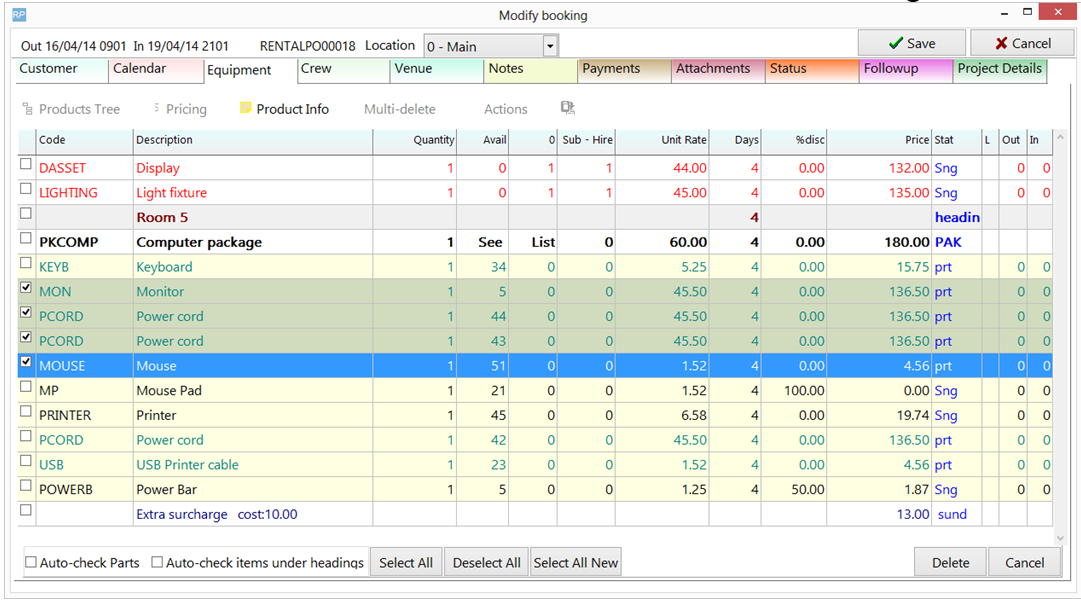
Select or de-select any line by clicking the checkbox in the first column.
Select a range of lines by clicking a checkbox holding down the shift key and clicking a checkbox above or below the selected line.
If you want to de-select a range uncheck a line and again hold down the shift key and click a checkbox above or below to clear all the checkboxes within that range.
The 'Select All' and 'Deselect All' buttons will check and uncheck all the equipment in the grid.
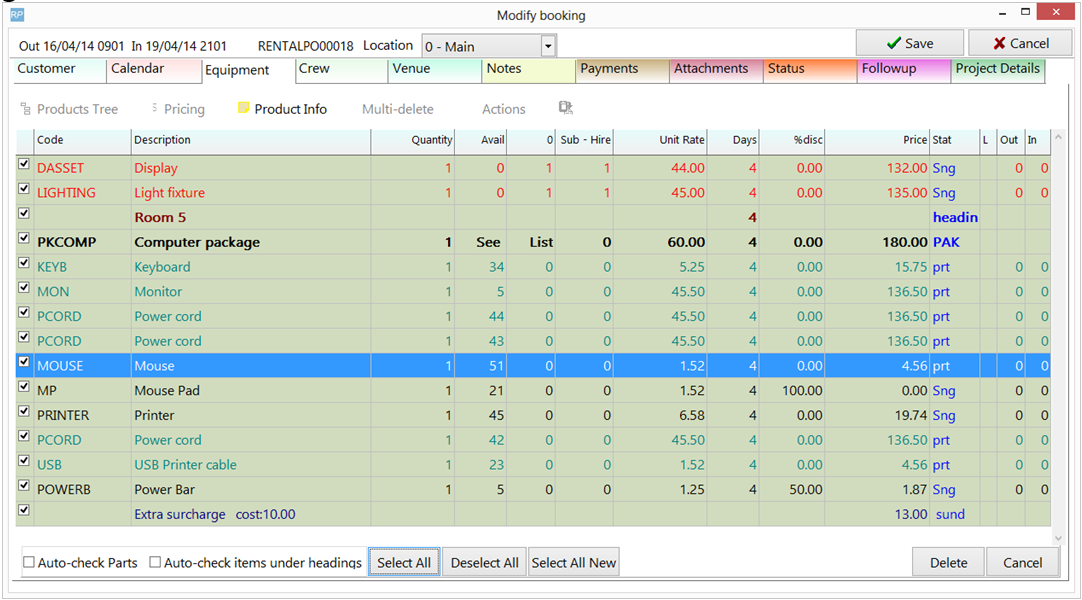
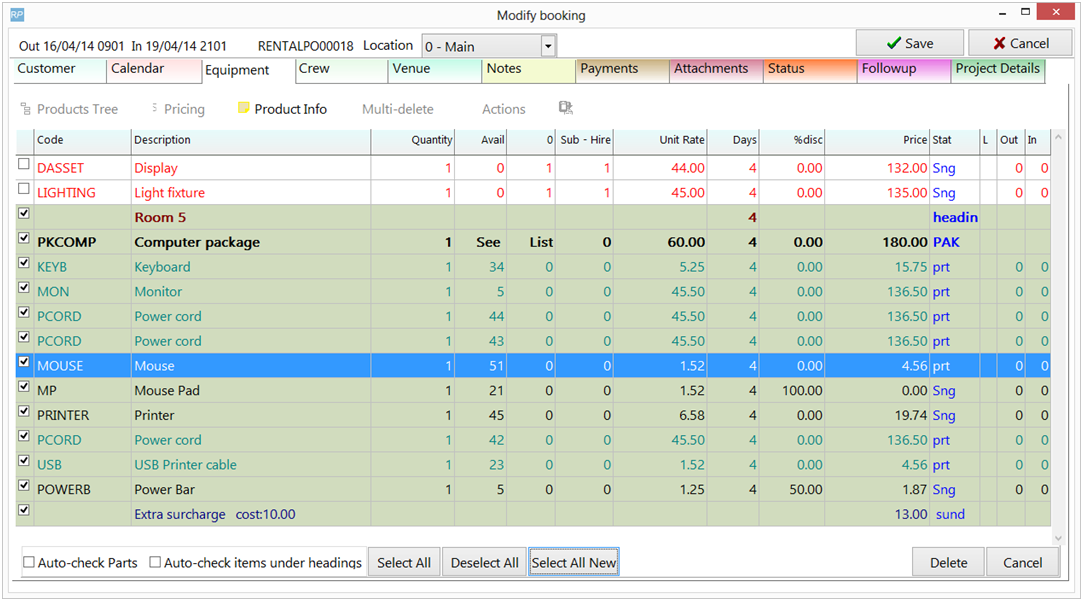
The 'Select All New' button will select any new lines added since the last save.
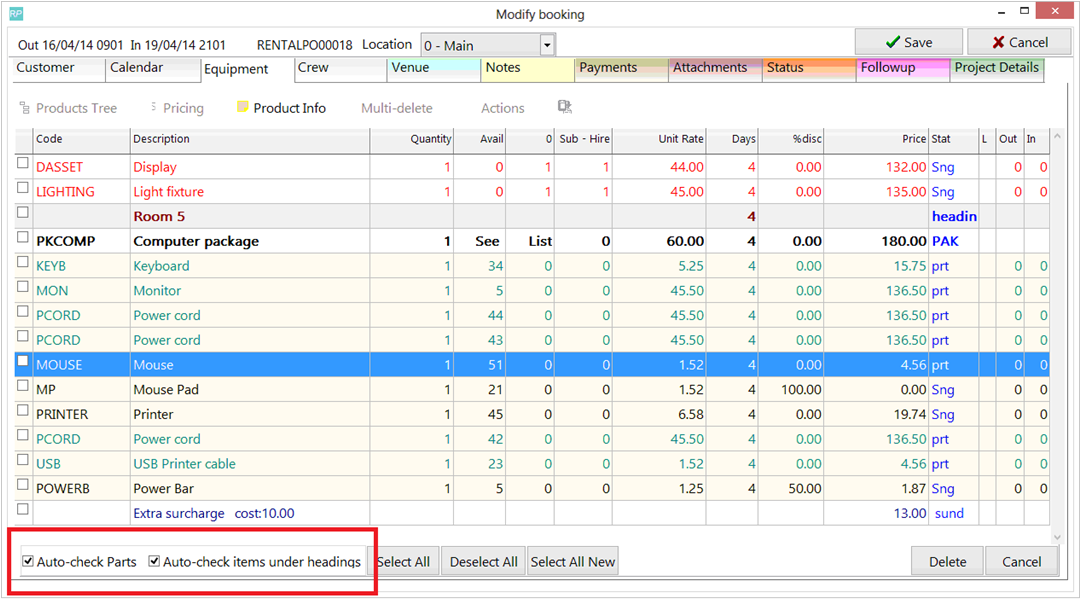
Auto Check Parts
The 'Auto-check Parts' option will cause all the components and accessories of a product/package to be selected if the parent product is selected.
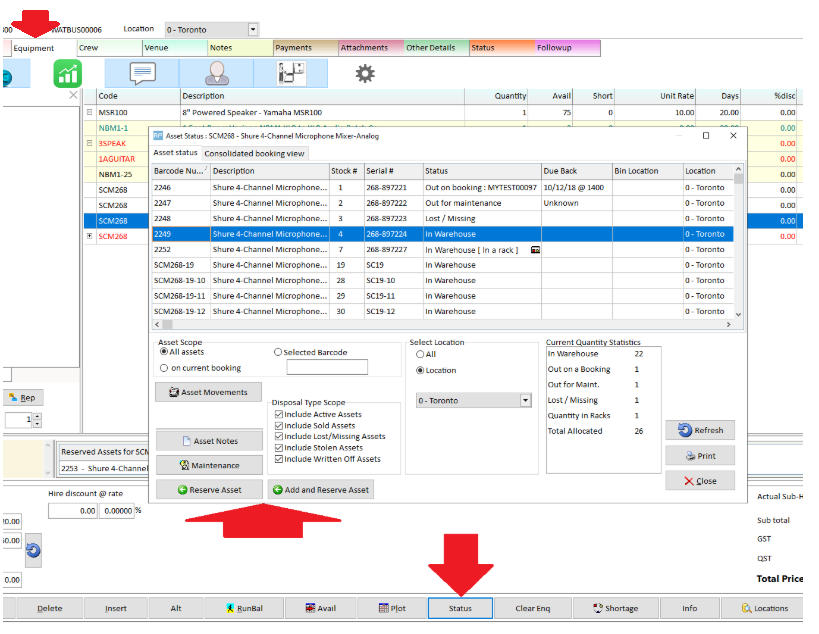
The 'Auto-check items under headings' option will cause all the items below a heading to be selected if the heading is selected.
Note: these options will not apply if range select is being used by holding down the shift key.
Enquiry status lines
When moving to delete-mode any lines with 'enq' status will be automatically selected. Uncheck any you don't wish to remove.
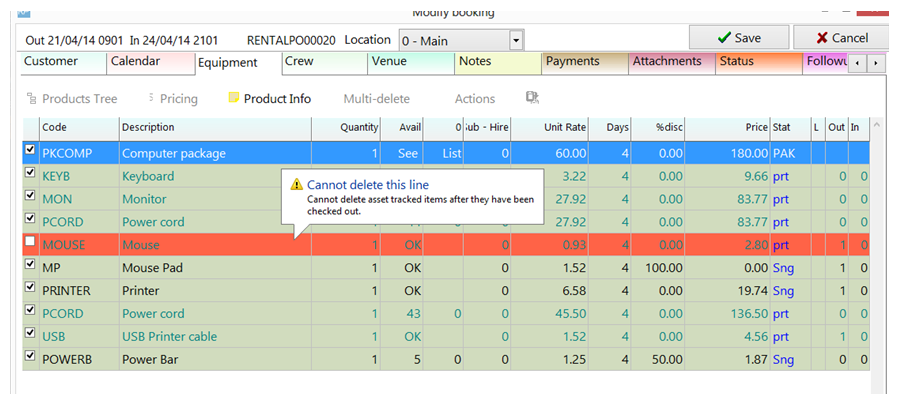
Invalid Selections
If you attempt to select a line that cannot be deleted it will display in red. Hovering over the line will display more information about why the line can't be deleted.
Deleting the lines
Once all the lines are selected click the 'Delete' button on the bottom right side of the screen to remove the selected lines and exit delete-mode.
To exit delete-mode without removing any lines click the 'Cancel' button.
For convenience and for empowerment the booking has the added ability to add Headers and Sundry Items in the Equipment Grid.
You can find this options in the Booking/ Equipment tab.
There are several variations to add a Heading or Sundry in the Equipment Grid:
You can also use hot keys. Just click “A” that would go to the Add menu or click “I” that would go to the Insert menu --> | 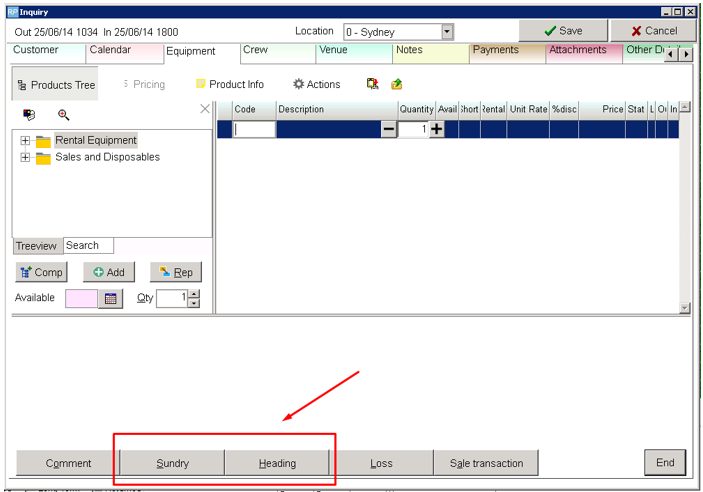 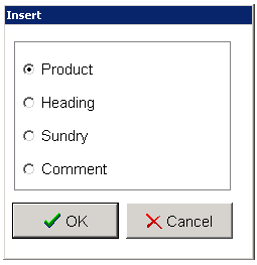 |
Now the details about the Heading and its capabilities.When you click Add and select Heading the blank line appears. You can name it manually or click this button and then you can select the room name (but room name you can select only If you have been added Venue). It will be applied to the description automatically. and then you can select the room name (but room name you can select only If you have been added Venue). It will be applied to the description automatically. | 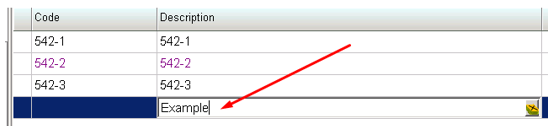 |
When you choose the name of Heading click enter. The following window appears:
| 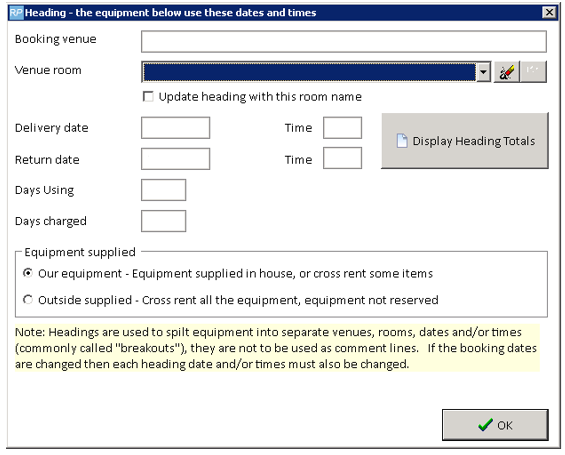 |
 | - with the help of this button you can clear the "Venue room" - with the help of this button you can edit Venue rooms - with the help of this button you can reach total amount the products that are situated under the Heading In the Equipment supplied field you can select what kind of products united this Heading. |
Sundry gives you the ability to add additional costs to your Booking. For example you are asked to pack products more reliable. Then you can create Sundry for example name “Additional packing” and add it under item that will need additional packaging: |
| When you click Add and selecting Sundry the following window appears: |
 |
 'Parameters' & 'Operator Privileges' necessary for this functionality are outlined at the end of this article.
Click on each screenshot for an enlarged view
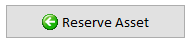
Open the Asset Status Window from the Equipment Grid using the  button (see screenshot below)
 reserves the selected asset against the existing highlighted product on the equipment grid.
 adds the product to the equipment grid and reserves the selected asset against that product.
Alternatively you can right click the asset in the Treeview
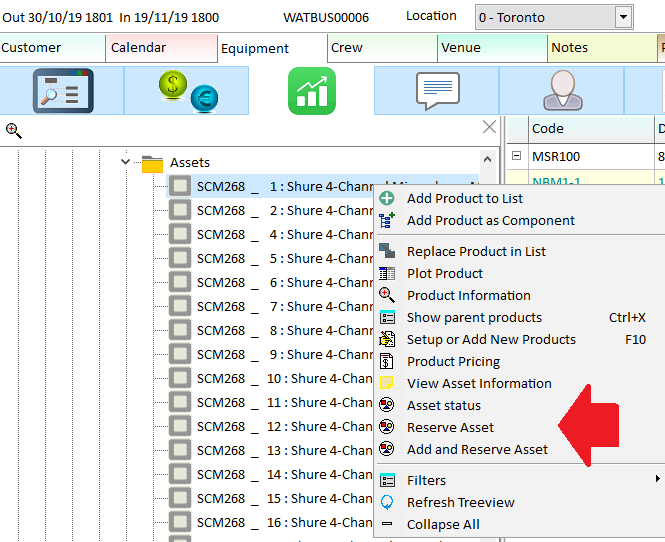
 adds the product to the equipment grid and reserves the selected asset against that product.
 reserves the asset against the existing highlighted product on the equipment grid.
 opens the Asset Status window (see screenshot above) where you can also reserve assets.
Once the booking is saved, the asset will be reserved to the booking.
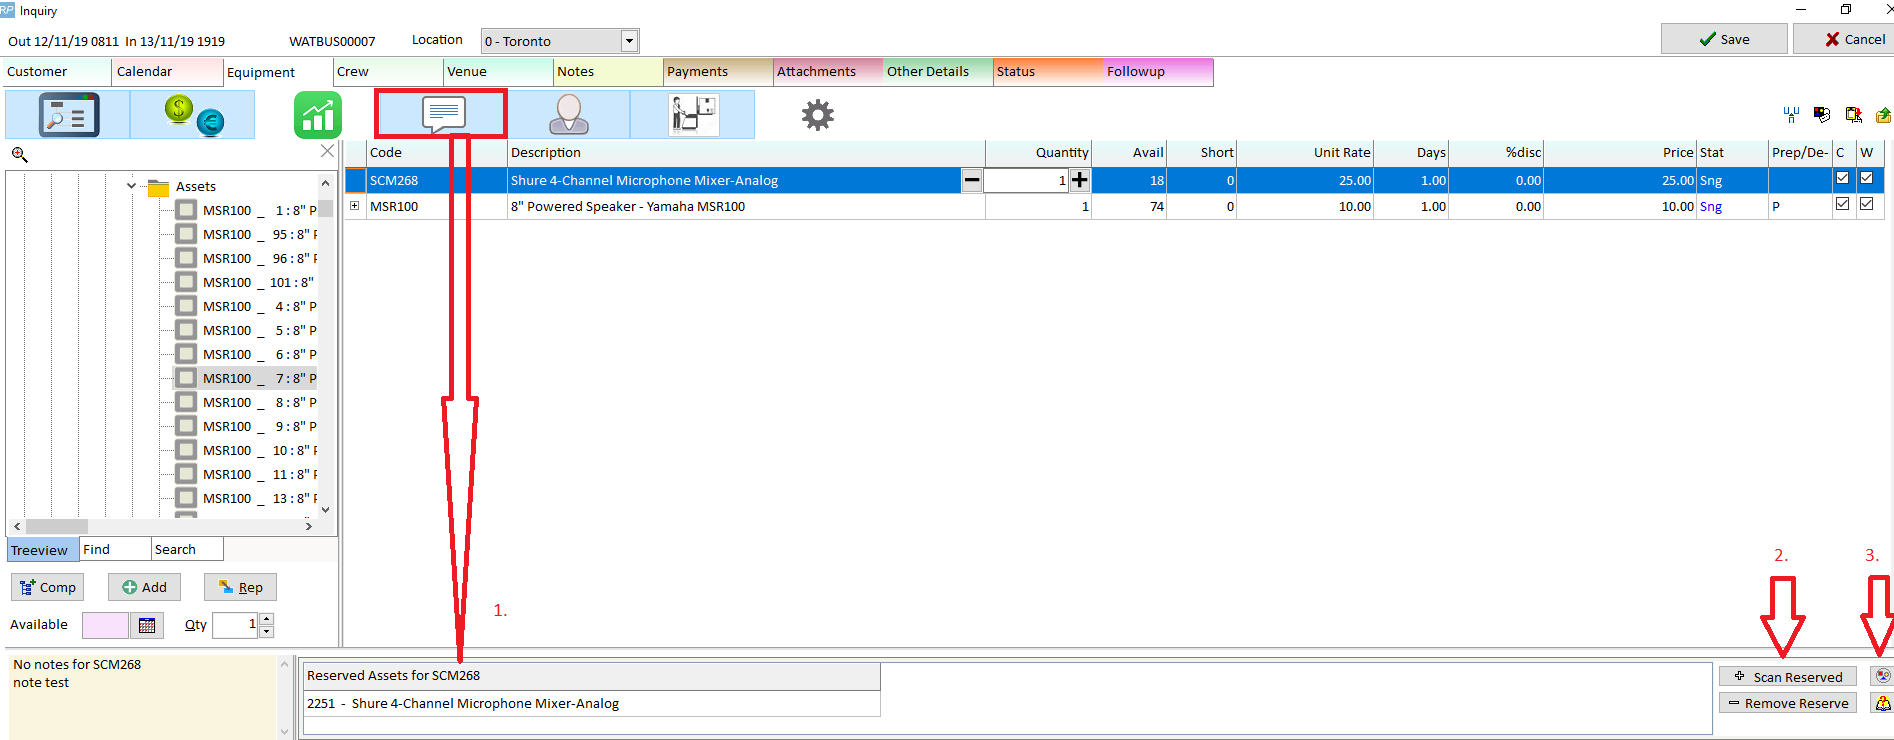
Ongoing List of Reserved Assets.....
- 1. Toggle the info panel for an ongoing list of reserved assets (this will only show once you have reserved your first asset via the right click option above)
- 2. Use the scan/remove buttons to add/remove reserved assets (this is the quickest way to remove a single asset reservation)
- 3. View all reserved assets for the booking
 If the notes window is showing instead, click the
  icon in the right hand corner to return to reserved assets window
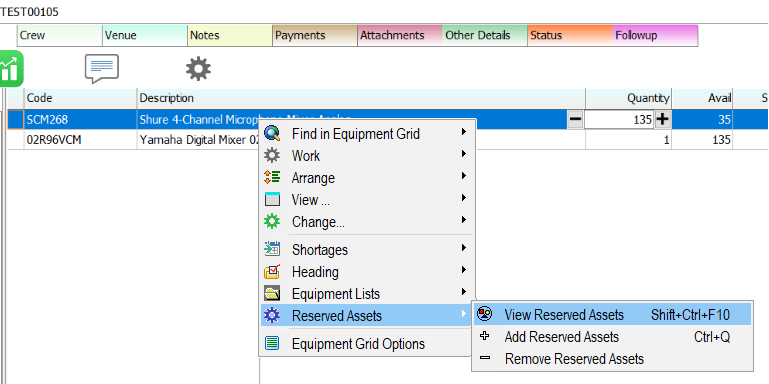
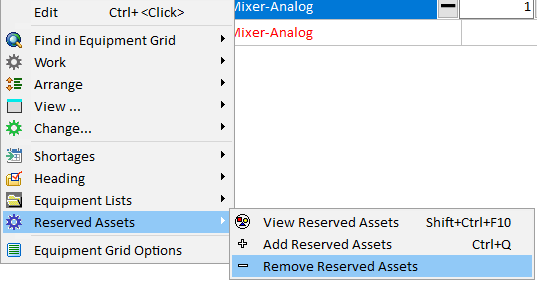
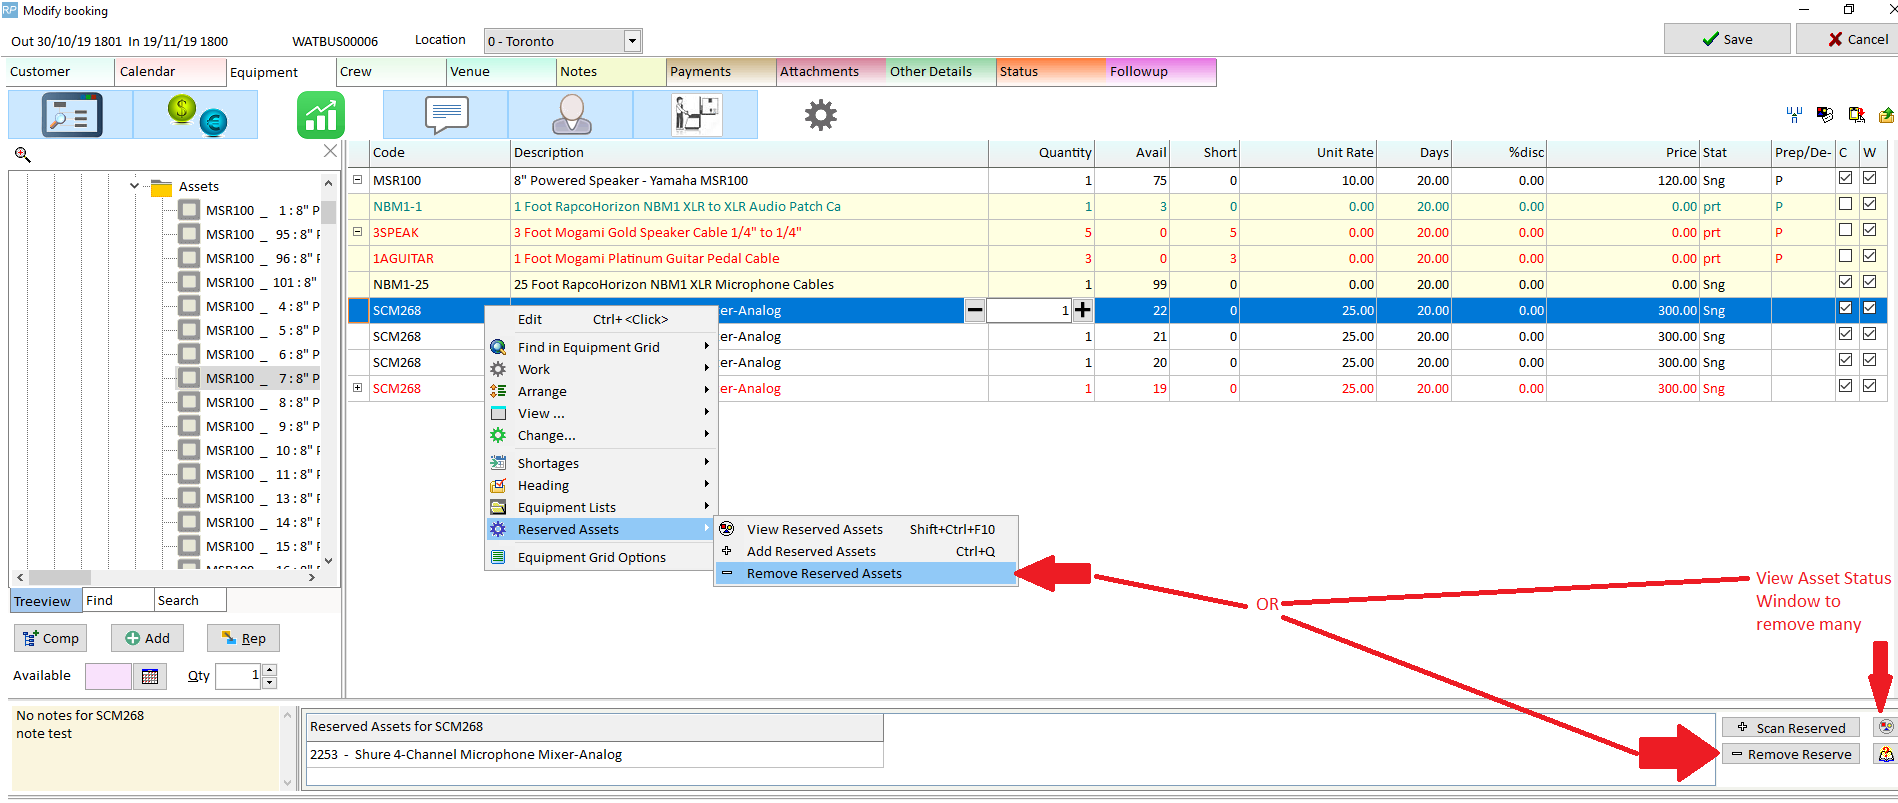
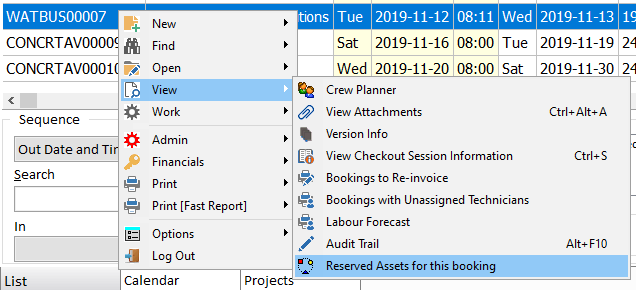
Or from the equipment grid, Right click-->Reserved Assets -->View Reserved Assets to see all reserved assets
A search window will display all reserved assets for the booking.
Pull up the same window from the booking grid via Right click option.

Remove Reserved Assets
- Right click option
- OR from the 'Reserved Asset' section at the bottom of the equipment grid (see Fig 1 below) Click
 which will remove the reserved asset from the highlighted product OR
 - Open the Asset Status window and delete the reservation (see Fig 2 below)

 which will remove the reserved asset from the highlighted product OR
Fig 1.
The search window will display all assets on the booking. Delete will remove assets.
Fig 2.
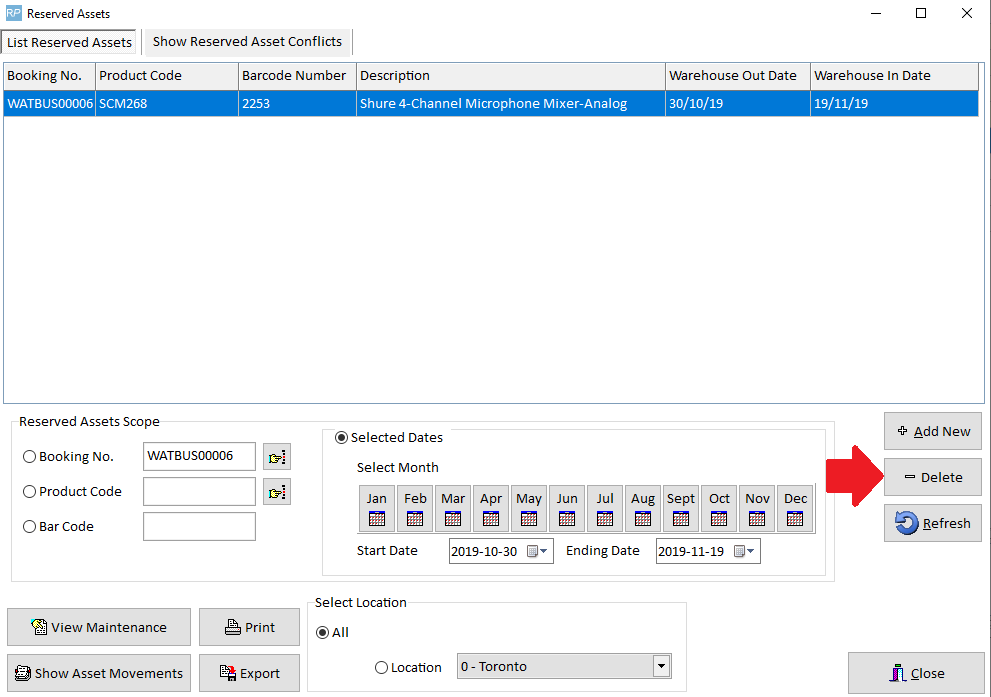
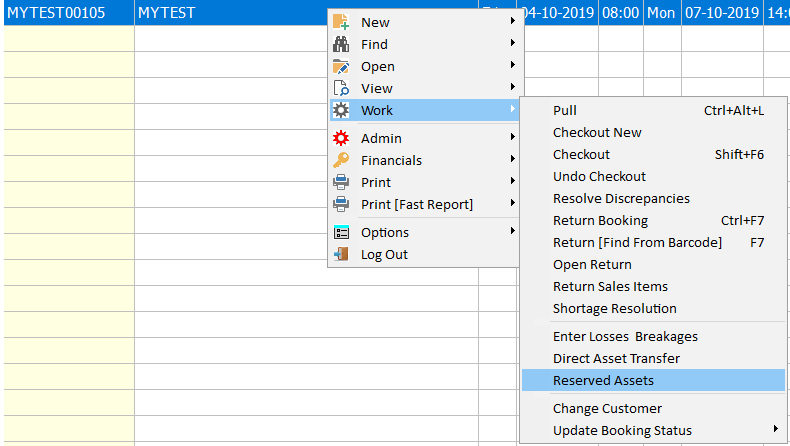
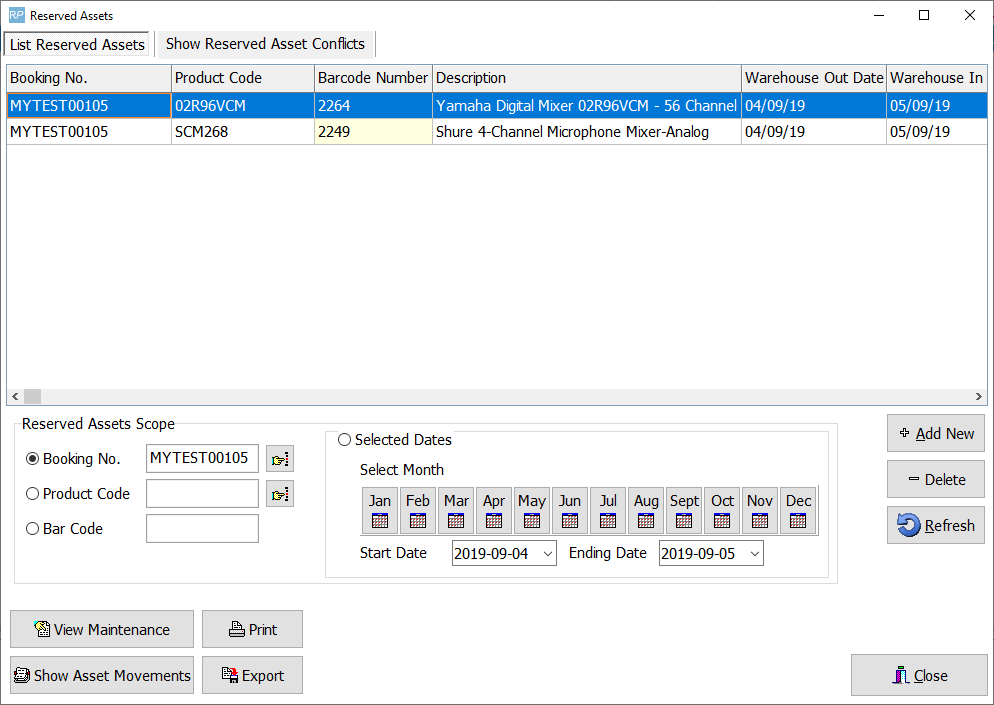
Maintain Reserved Assets from Outside the Booking
Right click on the booking to view reserved assets. You can also delete asset reservations from here.
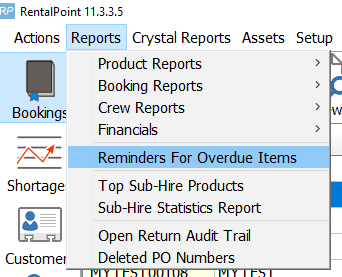
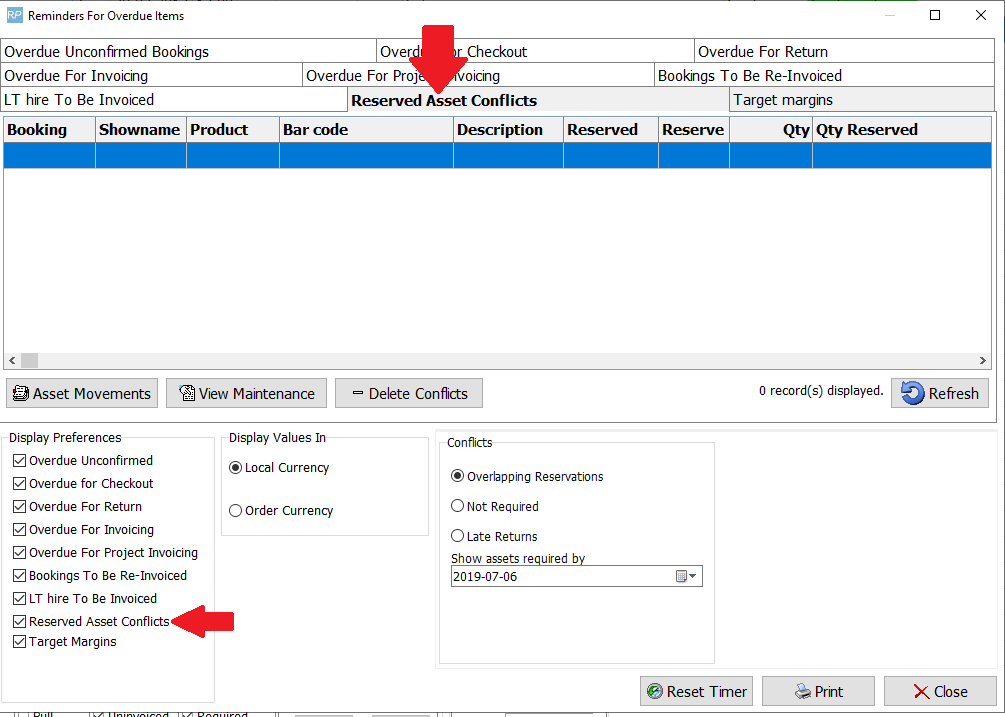
View Reserved Asset Conflicts from the Reminder Window
Booking HardCopy / PickList
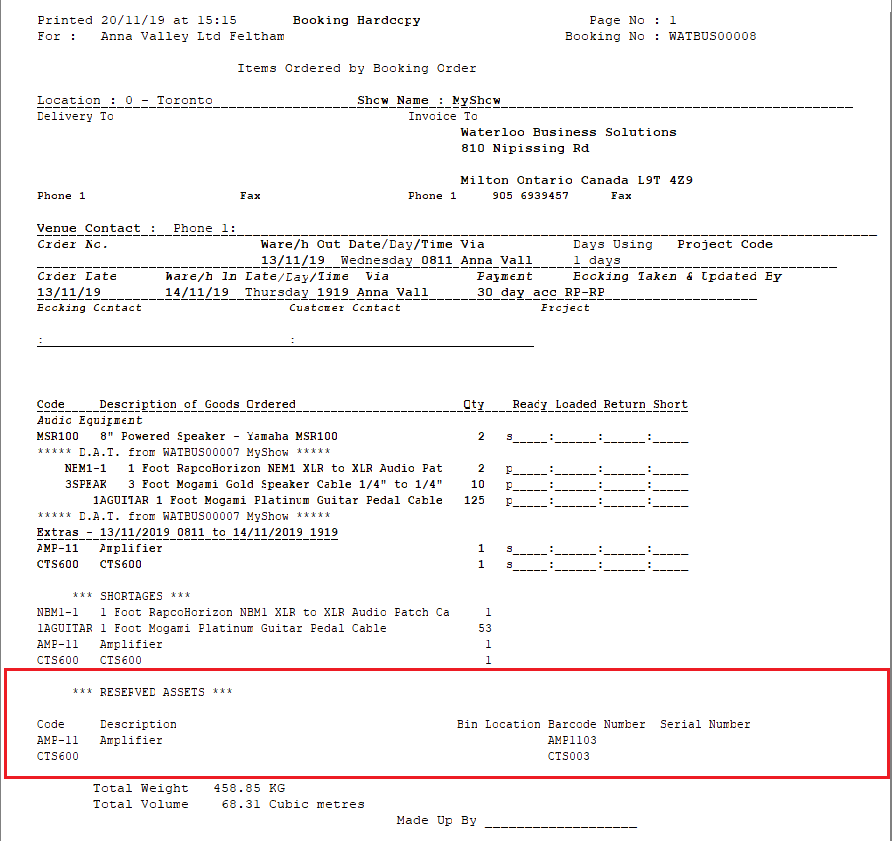
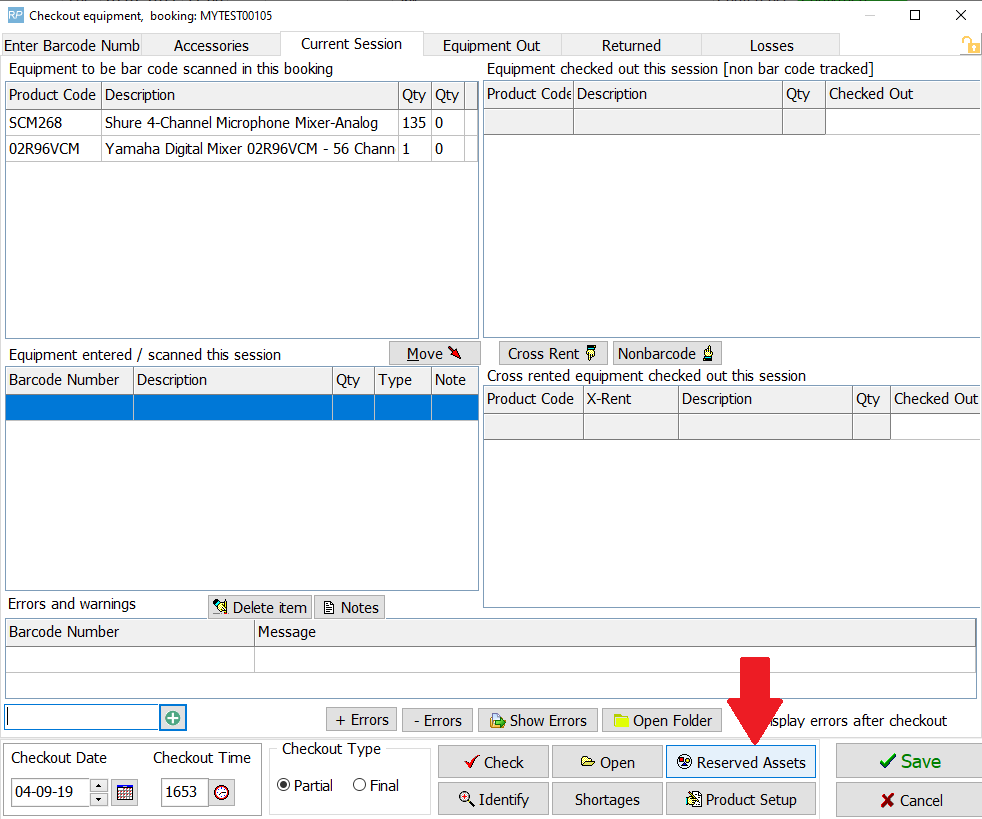
Checkout Reserved Assets
Search for reserved assets against a booking from the checkout window
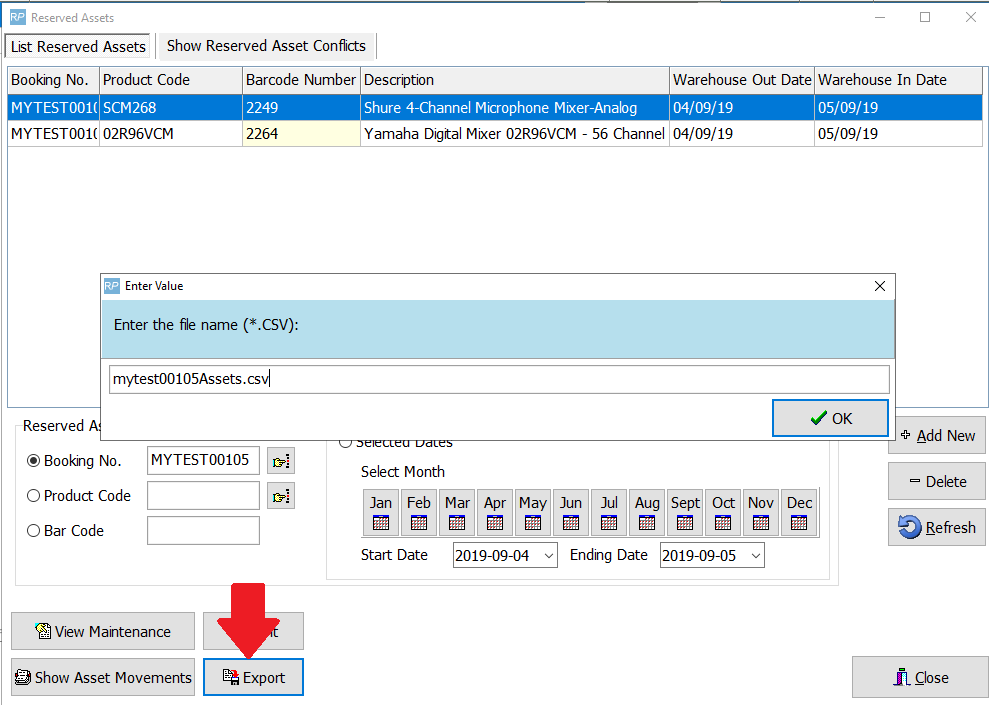
Export your list of reserved assets to csv if needed
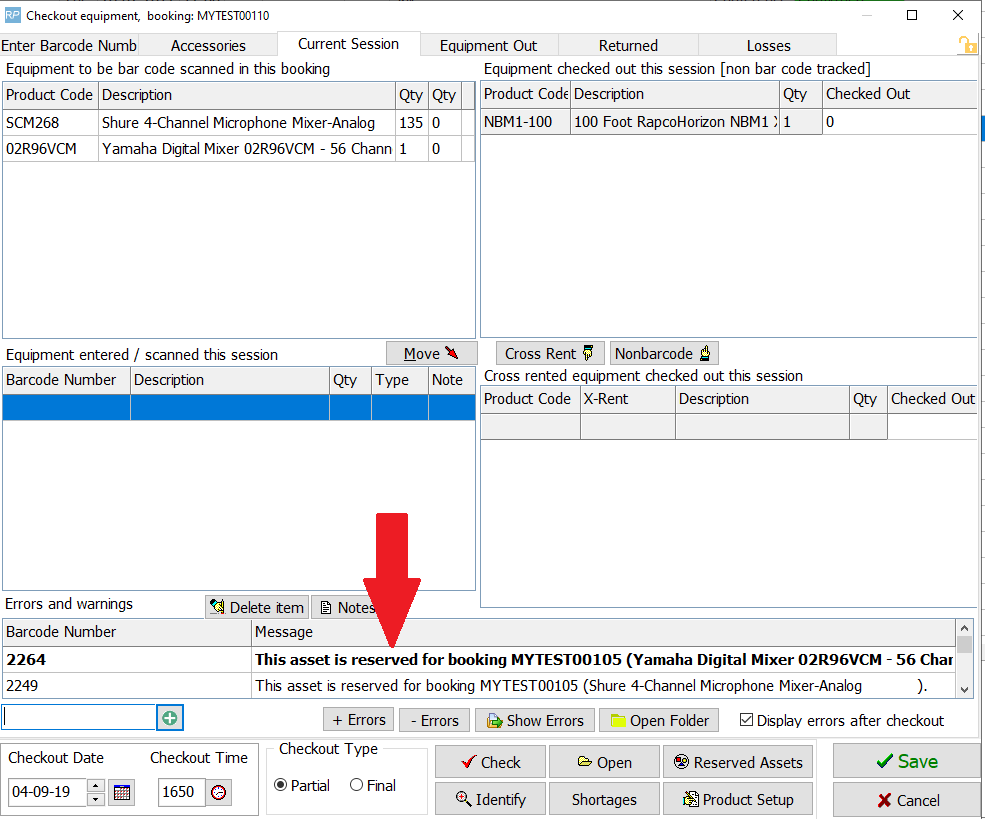
If you try to check out a reserved asset against a different booking, an error will be displayed in the checkout window
Parameters
Barcode Tracking #24 - Reserve Assets for Specific Bookings must be enabled.
Note, duplicated bookings do not bring the asset reservation to the new booking.
Setup-->parameters-->Barcode Tracking-->24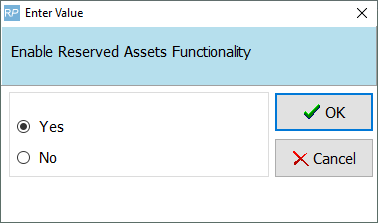
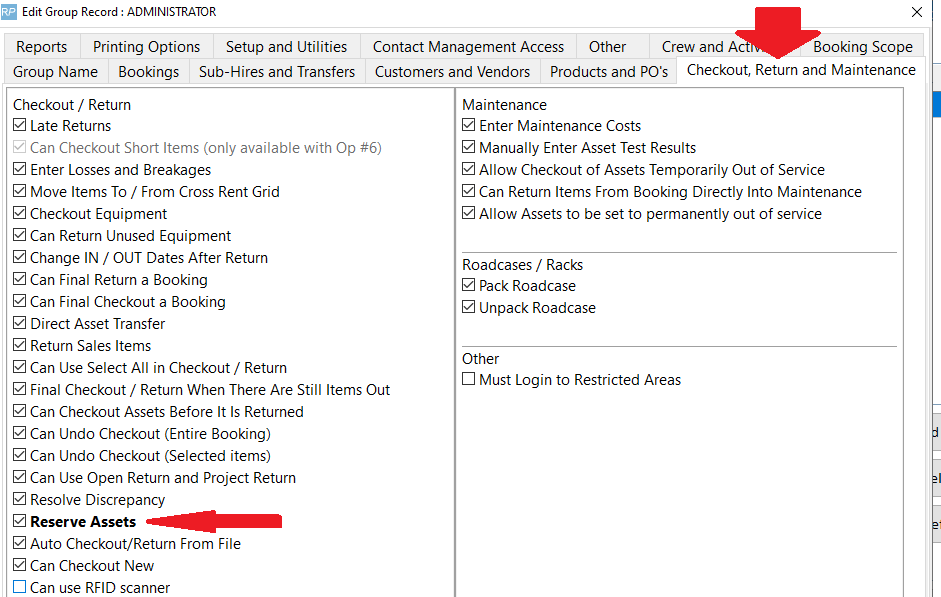
Operator Privileges


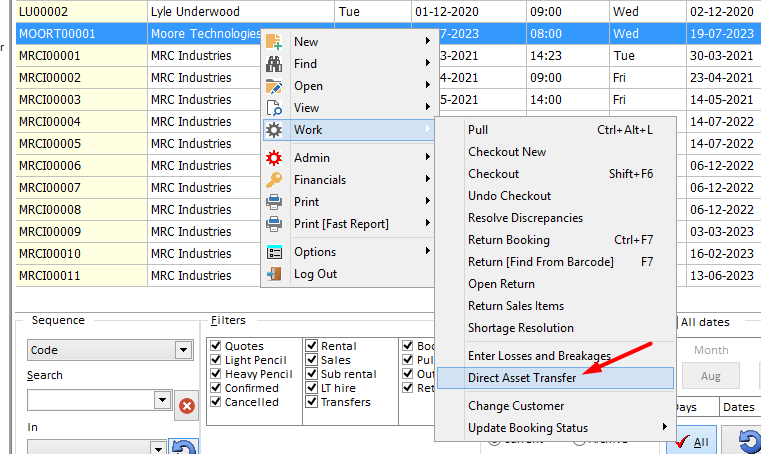
Use Direct Asset Transfer to skip the warehouse return and send checked out gear directly to another booking.
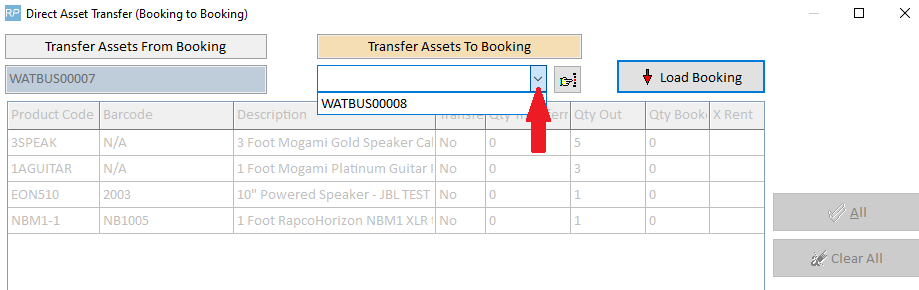
First, right click on the checked out booking, then select the Direct Asset Transfer option from the work menu
Enter details for the Transfer Asset To Booking, then click 
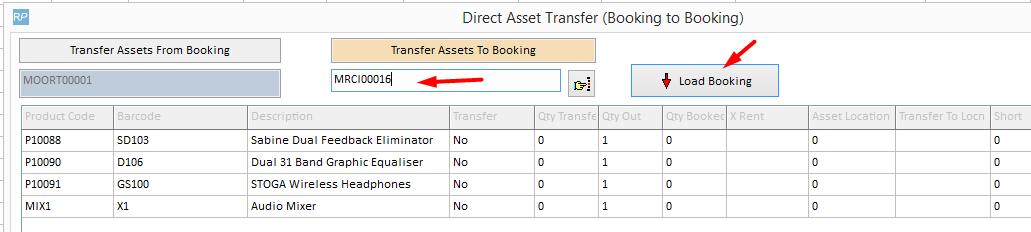
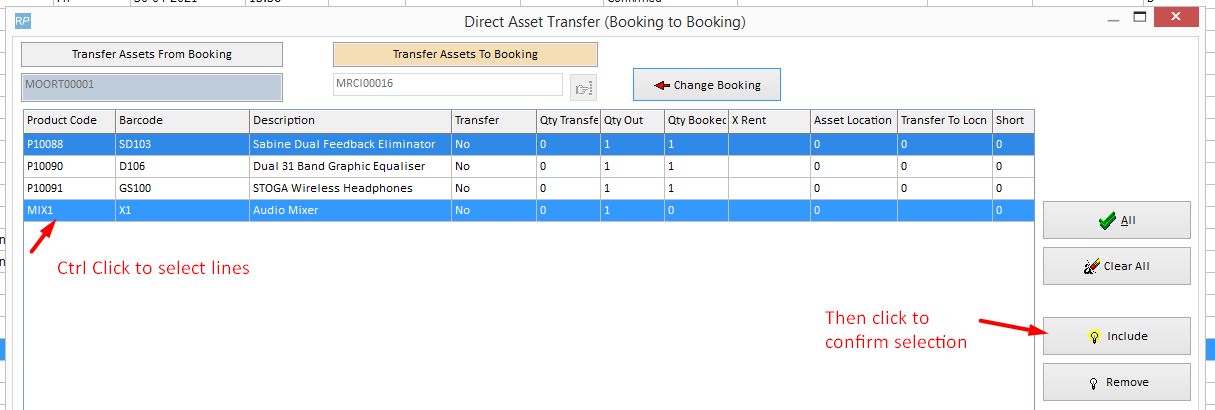
Once the booking is loaded, select items to include as follows:
 Select all assets
 Clear all selected assets
OR use the options below, then click  to confirm your selection
Ctrl Click Add the current asset to the selection list
Click & drag mouse To select a range of assets
Notice:
- The Transfer column now shows Yes next to the confirmed transfer items
- Items that do not exist on the transfer 'To' booking show a Qty Booked of zero (note these items will be added to the booking per parameter settings adding gear at checkout see Check Out a Booking for more information)
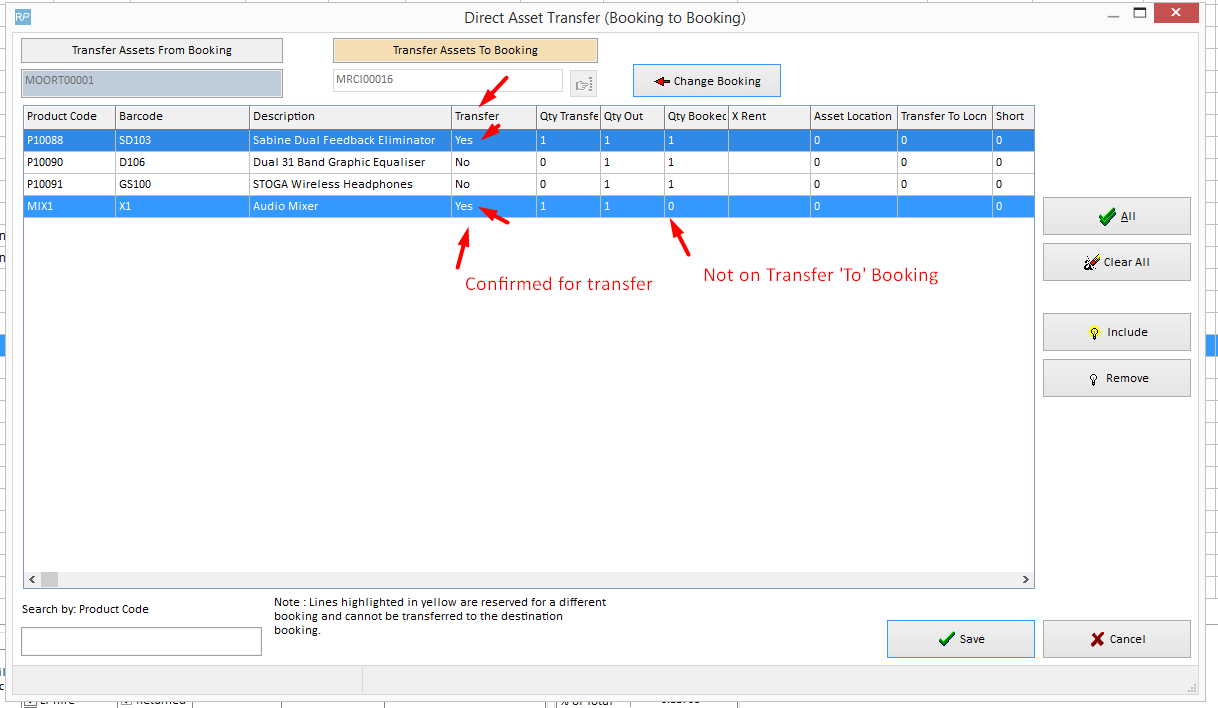
Click SAVE to process the transfer
Saved items are returned to the original booking

And checked out to the Transfer 'To' booking


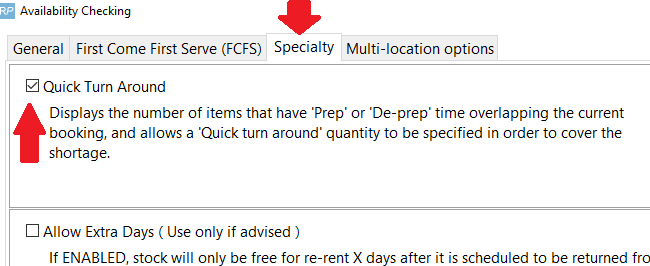
Quick turnaround can cover shortages by quickly prepping equipment for early release when it comes back into the warehouse or directly transferring it to another booking onsite. Setting a line as quick turnaround does not affect regular availability but will instead display the Quick Turnaround on Running Balance and Plot Sheet.
Using Quick Turnaround
When enabled a  column will appear in the booking equipment grid. See more information on Quick Turnaround parameters at the end of this article.
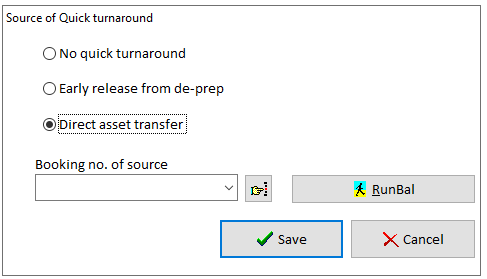
To assign quick turnaround to the line, enter a quantity in the 'Quick/TA' field and tab or click on the  button to launch the source window.

Fill the shortage from Direct Asset Transfer or Early release from de-prep, use the booking search/running balance options to find a suitable booking.
To cover all items under a heading, use the  option available on the right click menu

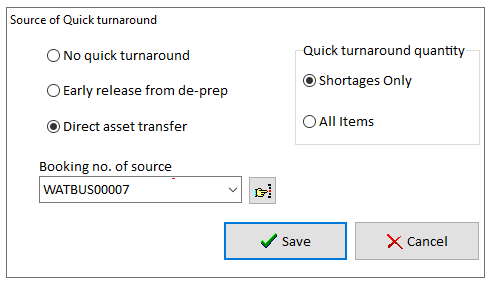
Cover all heading items or limit the coverage to shortages only
Shortages resolved with Quick Turnaround are identified in the 'Stat' column of the equipment grid
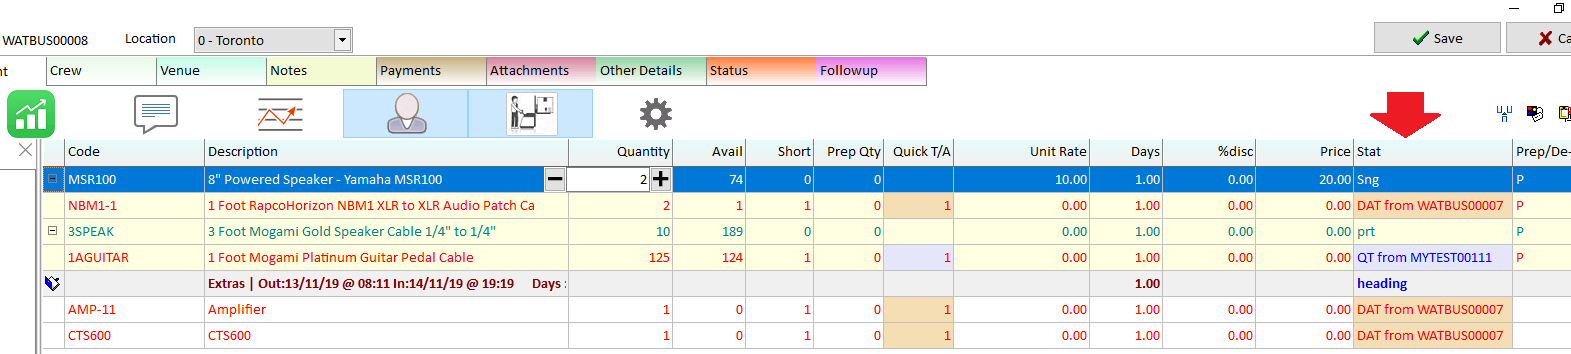
On subsequent opening of the booking, shortages resolved with Quick Turnaround options will be displayed.

Identifying Quick Turnaround Items (on the source booking)
Booking Grid
The Quick/TA column on the booking grid identifies bookings that have Quick Turnaround items on them needed for another order
See Booking Grid Documentation (page 4) to move the location of the Quick T/A column if needed

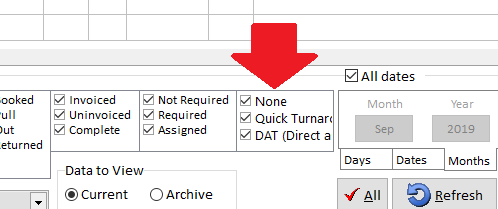
The Booking Grid scope filters allow for isolated display of Quick T/A Bookings
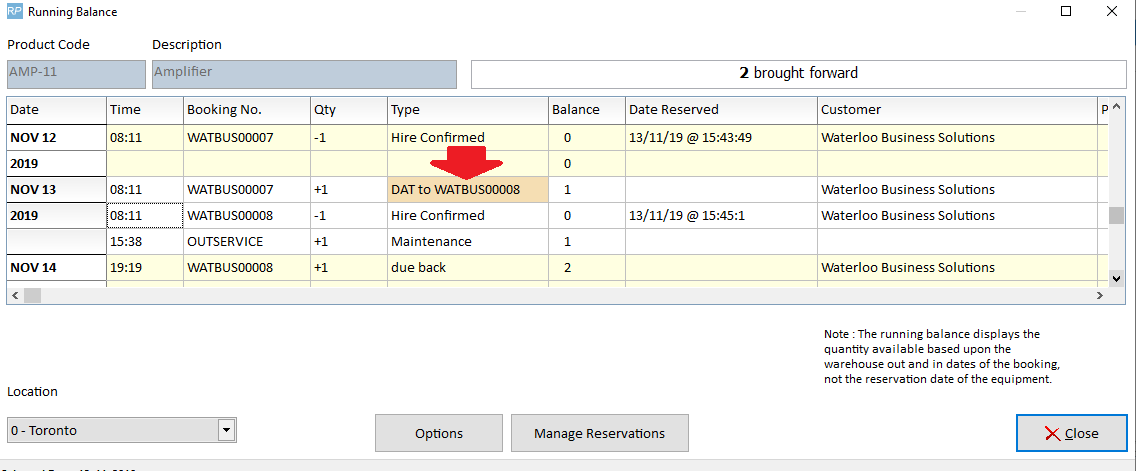
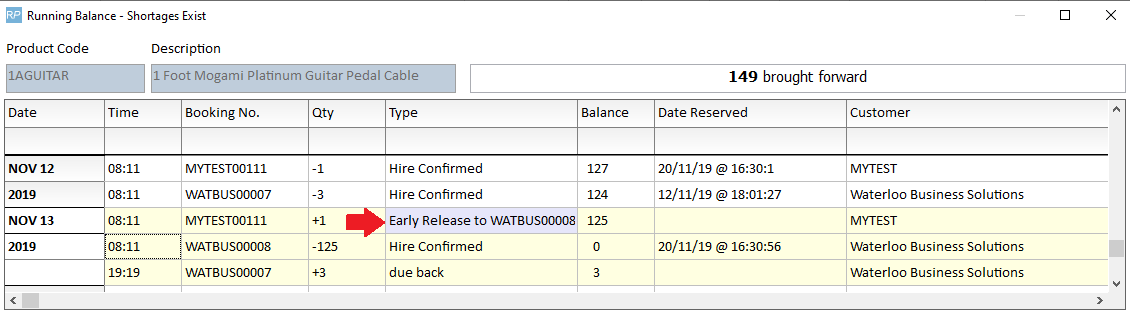
Running Balance
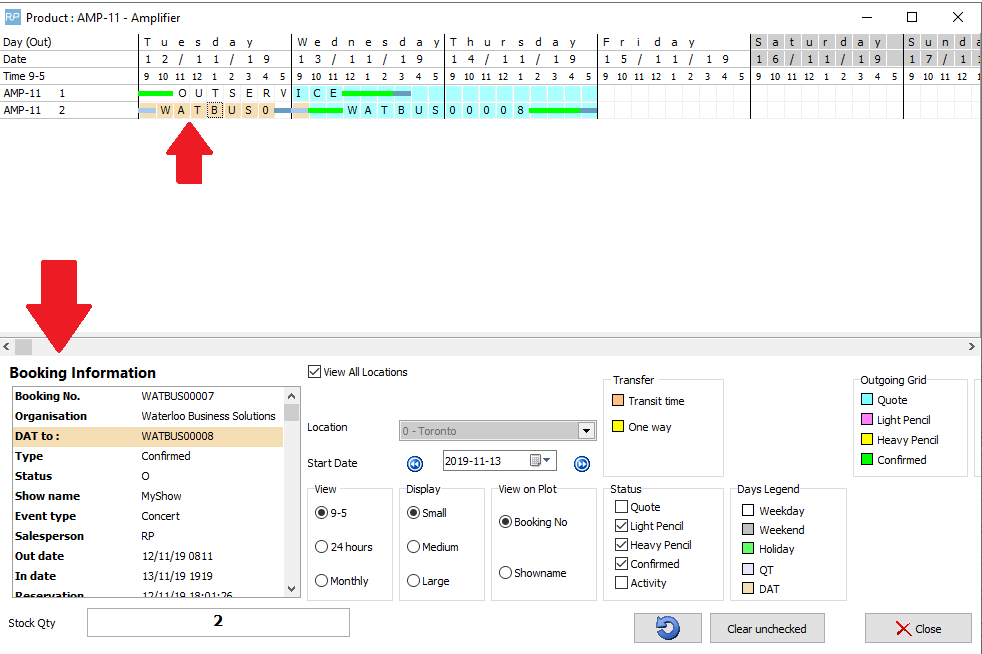
Plot Sheet
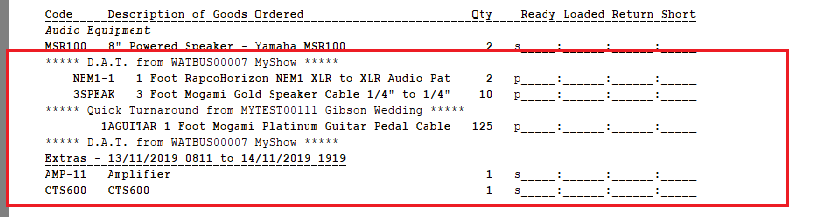
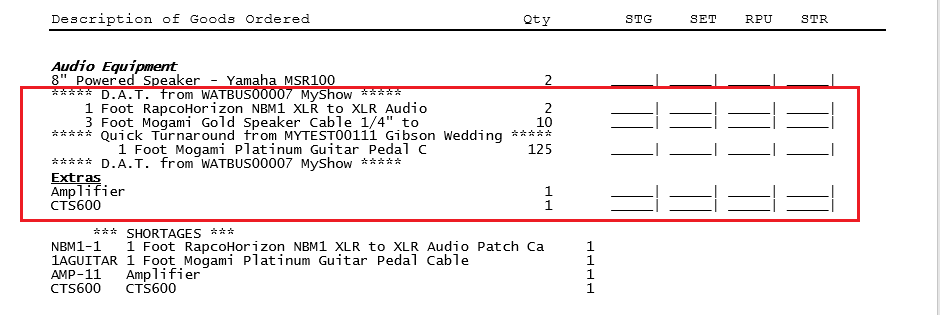
On the PickList / Booking Hardcopy
Shows the booking that the Direct Asset Transfer/Quick Turnaround is coming from
Standard Picklist
Custom PickList
Use &QDATC& insert field to show Direct Asset Transfer/Quick Turnaround on
Template Placement

Output
Collection Docket
Direct Asset Transfer (DAT)
Select the scheduled bookings for DAT from the drop down of the 'transfer to' booking instead of using the search.
Quick Turnaround Parameters
Set Operational Parameter 88 'Enable Preparation Time' to YES first
Enable quick turnaround on the ‘Specialty’ tab of operational parameter #6.